menu
close

Hide Shortcut Text From New Shortcuts You Create in Windows 8 & 7

Shortcut helps to launch Software products installed on our computer without going to the exact file location. We can launch the program with a double click on it we created for the software product. Anyone can identify it by simply reading the text Shortcut visible on everyone you create. This tutorial tells a simple registry trick, which removes the text written on every new shortcut you create. All we have to do is to change the binary value of a simple Registry key. You must understand, this trick does not remove the label written on shortcuts already created. Look the image below to see how the label is visible on every shortcut icons you created.
Hide shortcut text on Windows shortcut icons


How to Hide Shortcut Text Written On Every New Shortcuts
  1. Open Registry Editor

    Type regedit.exe on Search and click the registry icon.

  2. Backup Registry settings

    It is always advised to backup your current Registry settings. To do this visit the link below.
    How to Take Backup Of Current Registry Setting

  3. Go to the Following key.
    HKEY_CURRENT_USER\Software\Microsoft\Windows\CurrentVersion\Explorer

  4. Click on Explorer
    How to Delete Shortcut Text

  5. Change the binary key on the link to 00 00 00 00

    Double click the link on the right-hand panel and change the current binary value to 00 00 00 00. Right now the value is 1c 00 00 00.
    Delete shortcut text

    Click OK

  6. Log off and back on to make the change in effect
As I told before, the label on already existing shortcuts remains. For every new shortcut you create, you will not see the label on them. You can do the same registry trick to delete the label written on every newly created shortcut on Windows 7, Windows 8 and Vista computers.

How to Make Shortcut Text Visible
This is the reverse of what we have done before. In case if you are comfortable with seeing the text on shortcut icons you create, you can simply change the link key value to 1c 00 00 00. Do not forget to click the OK button once you have changed the binary key value of link key. You need to log off and come back to make the effect.

Other Windows Registry Tricks
  1. How to Unlock and Lock Control Panel Using RegEdit tool

  2. How to Disable USB Ports Using RegEdit tool

  3. End Not Responding Programs automatically Using RegEdit tool

This tutorial explained the steps to disable the label displayed on shortcut icons you create on Windows 8 and Windows 7 computers. It can be done simply by changing registry key but what will you do if you do not have access to RegEdit tool. Rarely some users are prevented from accessing Windows registry even if they are in admin account. In that case, follow the instructions provided in the link below.
RegEdit Is Disabled By Administrator & How to Unlock it

No: Recent Posts
Turn Off / On Windows Security and Maintenance Popups
Start WLAN AutoConfig (WLANSVC Service)
Getting 169.254.X.X (APIPA) Windows Automatic Private IP Address
Ping Gives Hardware Error
Add More Locations in Send To Menu
Destination Net Unreachable
Disable or Enable USB Ports from Registry & BIOS
Getting Error Code 0x80070424
How to Check Your Tata Photon Plus Internet Usage

How to Enable & Read Boot Log On Windows Computer

Boot log can be handy in case if you are facing booting issues on your Windows computer. You can find this file in Windows folder after you enable the boot log. Boot log is named as ntbtlog.txt and you can read how did each and every Operating System components act while you started your computer. It is supported in Windows 8, 7, Vista,  XP etc. This tutorial explains how to enable this feature on your PC. In case if you face troubles with starting your PC, it is a good option to read this log file. To enable boot log to check the status of every driver installed on your PC, follow the steps below.


How to Enable Boot log
  1. Type msconfig on the search bar and click on it
    bootlogging

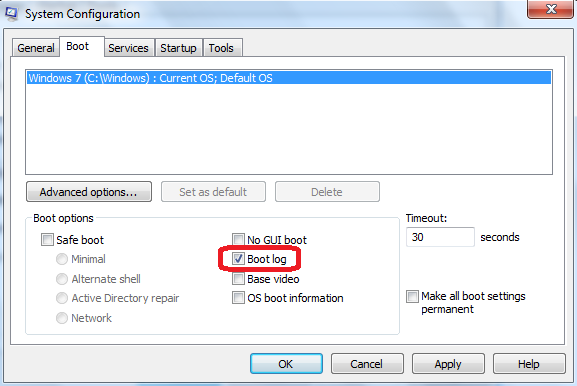
  2. Click on the Boot tab and enable it
    Check

  3. Click Apply

How to Check Boot Log On Windows 8 Laptop
We know how to enable this file on a PC but we must know where it is saved and how to open it. To check the boot log file, go to C:\Windows and check for the ntbtlog.txt file. You can open this file in notepad. If any driver didn't load properly while starting your laptop, it will be entered here. So while troubleshooting any start-up related issues on your laptop running on Windows 8, 7 etc, this tool is very handy. To read other tips to deal with unexpected starting issues, visit the link below.
Troubleshoot Automatic Restarting Of My Laptop


How to Enable Boot log On Windows XP Computer
Unlike Windows 8 and 7 PCs, we can enable this feature on XP PC in a different way. It is not hard and easy as in other versions. To enable it on XP computer, press [F8] button while starting PC and choose the Enable Boot-Logging. You can follow the same procedure to read this file on XP as mentioned for Windows 8. To create bootable emergency repair disc for your computer having Microsoft OS, visit the link below.
How to Create Windows 7 Bootable Emergency Repair Disc

If you believe, it is some of the OS components that act strange and causing troubles, this tool is very handy to isolate the problem maker. With the help of this tool, you can find the real culprit and help you to either fix this issue by yourself and help you to get better assistance from experts.

Tech Portal

Windows Notification Area(System Tray) Is Disabled On Taskbar & Hidden

Sometimes due to reasons like malware infections you may find issues with showing System Notification Area (System Tray) on the taskbar because it is disabled on your computer. You may also see issues with Turn off notification area cleanup along with disappeared system tray. Major reasons for the disappearance of this on your Windows computer are either enabling the feature Hide the notification area on Local Group Policy Editor or disable its display from the registry. If you face issues with viewing this area on your computer, follow the steps provided below.
  1. Make sure it is not hidden from Group Policy

  2. Make sure it is not hidden from Windows Registry

Enable System Tray (Notification Area) From Group Policy Editor
  1. Type gpedit.msc on the Search box and click to open
    Use gpedit,msc to disable system tray on Windows 8

  2. Click User Configuration and open Administrative Templates

  3. Click Start Menu and Taskbar

  4. Double click on Hide the notification area on the right side of the window.
    I cannot see system tray on taskbar

  5. Hide System Tray on Your Computer

    To hide the notification area on your PC, select the radio button Enabled and click Apply.
    Make system tray invisible

  6. Unlock hidden Notification Area

    To unlock the hidden Notification Area and make it visible on the taskbar, select the radio button Disabled or Not Configured. Do not forget to click Apply.

If your computer is facing issues with hidden taskbar and if you want to make it visible, you can always do it from group policy edit. We can make Notification Area invisible on taskbar from  Registry edit also. If it is disabled on your PC from the registry, you must follow the instructions provided below to perform it.

Registry Tip to Hide & Unlock System Tray on Taskbar
  1. Open Registry Editor
    Type regedit on the Search bar and click on it. Sometimes you may face issues with opening Registry Editor and failed to unlock disabled Notification Area on your PC. If you face this issue, click the link below and follow the instructions there.
    I Cannot Open Windows Registry Editor

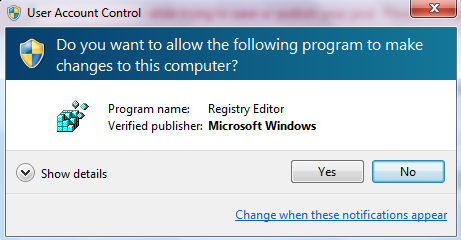
  2. Click Yes to Open Registry Editor on your computer
    Start Registry Editor to Disable Windows Notification Area

  3. Go to the location HKEY_CURRENT_USER\Software\Microsoft\Windows\CurrentVersion\Policies\Explorer
    How to make system tray invisible using registry editor

  4. How to Hide Notification Area in Registry Edit

    Right click on the right side of the registry window and create a new DWORD(32 bit)value and name it as NoTrayItemsDisplay. Set the value 1 to hide Notification Area on your Windows computer.
    Registry trick to hide System Tray on Windows 8 and Windows 7

    Double click on NoTrayItemsDisplay and set the value 1 to hide.
    Set system tray invisible

  5. How to Display hidden System Tray

    To show hidden system tray on the taskbar, you must set the value 0 to NoTrayItemsDisplay.

Other Popular Windows Troubleshooting Tutorials
  1. Why My Computer is Restarting Automatically Without Warning

  2. Registry Trick to Disable USB Ports On a Computer

  3. How to Start WLAN AutoConfig (WLANSVC Service) On Windows 8 &  7

  4. Different Methods to Open Services Window On Windows 8 &  7

No: Recent Posts
Turn Off / On Windows Security and Maintenance Popups
Start WLAN AutoConfig (WLANSVC Service)
Getting 169.254.X.X (APIPA) Windows Automatic Private IP Address
Ping Gives Hardware Error
Add More Locations in Send To Menu
Destination Net Unreachable
Disable or Enable USB Ports from Registry & BIOS
Getting Error Code 0x80070424
How to Check Your Tata Photon Plus Internet Usage