menu
close

I Cannot Boot My Computer in Safe Mode

Yesterday was a tough day for me because of my old desktop computer. I couldn't boot my PC in safe mode but it was working fine in normal mode. This tutorial is written based on my efforts to bring back safe boot on my PC with some extra tips. The first part of this guide tells common reasons for getting trouble with restarting your computer in safe mode and the second part deals with solving this issue. I have Windows XP on the Desktop computer but the procedure to fix this issue is the same for most Windows Operating Systems. Even if you are using Windows 8 or Windows 7, you can follow the instructions below.


Reasons For Having Troubles to Safe Boot a Computer
  1. Possible virus infection

  2. File system error

  3. Software/driver conflict

  4. Some windows files may be corrupted

  5. Windows update error

  6. False settings on the security suite installed on your computer
These are some of the possible reasons to prevent a laptop from restarting in safe mode. Now let us check how to troubleshoot the issue, identify the reason and fix it.

Solution to Issues With Safe Mode Restarting

The first thing you must do is to find the exact reason which prevents your system from restarting in safe mode. For that, you must use trial and error method. If you have no clue on how to do it, the pattern of troubleshooting given below is best for you.
  1. Set Safe Boot in System Configuration

    The first step you have to do is to access the System Configuration page and enable Safe Boot option. You can do it by following the instructions below.

    • Type msconfig on Windows Search (or on Run Window and click OK)

    • Open msconfig Window and click Boot tab

    • Select Safe Boot under Boot options
      Issues with safe mode restarting

    • Click OK and When you are prompted to restart your computer press OK

    If still, your computer is showing issues with safe mode booting, go to next step.

  2. Try Different Modes

    On boot menu options window, you can see other options like, start your computer in;

    • Safe mode with networking
    • Safe mode with command prompt

    Try to start your computer using these options.

    [ To get into the boot menu, keep pressing the  [F8] button while your computer starts restarting]


  3. Use Last Known Good Configuration

    If you have failed to start your computer in all available safe mode options, it is better to try to boot your computer in last known good configuration by selecting that option from the menu.

  4. Run Check disk and correct disk errors

    The next troubleshooting step is to run the check disk and fix the disk errors. To do this type Chkdsk /f on the command prompt. Please note that you must have the admin right to perform this task. After fixing the disk error, try to start your computer in safe mode. If the issue persists go to next step.

  5. Conflicts by Recently Installed software/driver

    Many users claim they had booting related issues after installing certain software products on their computers. According to many technology discussion forums, software products like DVD burning software, AntiVirus products, Data recovery products etc are accused of causing booting issues. Before jump into conclusion, I recommend you to disable each suspected programs and check the real culprit. It is recommended to perform a clean boot on your computer to identify the problem causing software. To know how to perform a clean boot on your computer, click on the link below.
    How to perform clean boot and rectifies the software conflict

  6. False AntiVirus Settings

    Wrong settings on the security software (Firewall, AntiVirus, etc..) may prevent you from booting your computer in safe mode. So make sure security product installed on your laptop is having correct configuration.

  7. Possible virus infection

    Once my laptop was infected by a virus which blocked many features including safe restart. It is possible your PC might be infected and the malware is preventing it from restarting in safe mode. To remove any infection, you must perform a virus scan on your system with reputed security software(updated with latest virus signature).

  8. Update to the latest service pack and run windows update

    You must update the Operating System to avoid known bugs and other issues. I recommend you to enable the option to check for latest Windows update to ensure your computer is having the latest OS.

  9. Repair Windows files

    To repair corrupted Windows files on your system, follow the steps below.

    • Start your computer from Windows CD

    • Press R to repair the windows files while it asks you the option to install or repair Windows on your computer

    • After repairing Windows files, try to start your PC in safe mode

    If still, you have the same issue, I recommend you to follow the next instructions.

  10. Reinstall Windows Operating System

  11. Format hard drive and reinstall Windows

  12. Try to disconnect the hardware devices like RAM, Hard disk etc from Motherboard and reconnect them

Related Articles
  1. How to Create Windows 7 Bootable Emergency Repair Disc (ER disc)

  2. Computer Restarts Automatically - Reason and Solution

  3. Increase Laptop Battery life

  4. Disk Boot Failure - Fix

No: Recent Posts
This Device is Not Configured Correctly. (Code 1)
Getting Device Manager Error Code 10
Getting 169.254.X.X (APIPA) Windows Automatic Private IP Address
How to Setup MTNL Broadband ADSL Modem
Setup Idea 4G on Android Phone
Bypass Windows Admin Account Password Of Vista, XP, Windows 8
Error 1747: The Authentication Service is Unknown
Reasons for Unexpected Automatic Reboot of Your Computer
Use Flash Memory (USB) as Virtual RAM in Windows
Setup Log Files for IP Messenger
Adobe Flash Player has Stopped a Potentially Unsafe Operation
FTP Error 503 Login Authentication Failed
Best LAN Messengers
How to Reset BSNL WiFi Modem
How to Check Your Tata Photon Plus Internet Usage
Destination Net Unreachable

How to Delete Google Web Search History From Your Account

Many Internet users are confused with the two similar terms 'Internet browsing history' and 'Google search history'. Though both terms look similar, they are different. Browsing history is saved on your web browser and can be viewed by pressing [Ctrl] and [H] buttons together. This key combination varies with browsers. Google Search history is the record of searches you have made while you are logged in your Google account. Internet browsing history will be deleted by clearing the saved history on your browser but Google search history will remain. There is a different procedure to remove it from your account. To see and delete Google search history, you need to log on to your Google account. Here you can see how to remove all previous log details and start from a clean slate.


Steps to view Google Search History

To see it for a particular account, follow the steps below.
  1. Log on to respective Google account

  2. Click on account settings

  3. Click on web history
    log

    Sometimes you may be prompted to re-login to your account to see this page.

This page is well organized and you can view the Search history of all times. It will definitely influence Google Personalized Search feature. If you don't know this feature, visit the link below.
What are Google Personalized Search Results

If you do not like it affects the search results, it is better to delete it from your account. Below section explains how to do it.


Steps to Remove Google Web Search History

  1. Click on Remove items

  2. Now check the items you need to remove and press the Remove button.

Now entire stored data will be successfully removed from your account. Now onwards you will get a fresh start without any influence. If you belong to the group of people who don't like to left the remnants of their previous activities on their laptops, the procedure I explained in this tutorial is for you. By following the steps explained in this article, you can remove the log details of your activities stored in big G's server. However, it doesn't guarantee your safety from log details stored on the server side by big G. All you can ensure is if someone hacks into your profile, he will never get the traces of your prior web activities. Now let us check some of our popular tutorials.

Popular Tutorials
  1. How to Disable Instant Feature On a PC

  2. How to Enable SafeSearch On a Computer

  3. How to Check Reading Level of a Blog

  4. Average AdSense Click Though Rate Of a Blog

No: Recent Posts
This Device is Not Configured Correctly. (Code 1)
Getting Device Manager Error Code 10
Getting 169.254.X.X (APIPA) Windows Automatic Private IP Address
How to Setup MTNL Broadband ADSL Modem
Setup Idea 4G on Android Phone
Bypass Windows Admin Account Password Of Vista, XP, Windows 8
Error 1747: The Authentication Service is Unknown
Reasons for Unexpected Automatic Reboot of Your Computer
Use Flash Memory (USB) as Virtual RAM in Windows
Setup Log Files for IP Messenger
Adobe Flash Player has Stopped a Potentially Unsafe Operation
FTP Error 503 Login Authentication Failed
Best LAN Messengers
How to Reset BSNL WiFi Modem
How to Check Your Tata Photon Plus Internet Usage
Destination Net Unreachable

Filter Important Emails From Gmail

Gmail is one of the most popular email service providers because of its reliable service and clean look. It offers a way to arrange the emails we receive according to our requirements. We can decide the fate of an email before reaching the inbox itself. For that, we can use the feature filter to select a certain type of emails according to the guidelines we set and apply the specified fate to them. It can help you to categorize emails in your account by assigning different Labels to them. This tutorial explains how to create a filter with your requirements and how to assign this filer to emails.

  1. Log on to your Gmail account

  2. Click on Settings
    Set

    Settings tab is ion the right-hand top of the page.

  3. Click on Filters
    Categorize

  4. Click on Create a new filter. Now the filter options window will appear.
    ideas

    Here you can see options to set filters based on the following criteria.

    • Filter based on from address

    • Filter based on To address

    • We can filter a particular subject

    • We can filter emails containing certain keywords

    • We can set filter by blacklisting certain keywords (opposite to iv )

  5. Enter the criteria to set filter and click next

    Now the wizard will ask you what will be the end action of the particular filter.  The possible actions are:

    • Skip the Inbox (Archive it)

    • Mark as read

    • Star the mail

    • Apply the label (We can set a particular label for this mail)

    • Forward to a particular mail

    • Delete the mail

    • Never send it to Spam

    After selecting appropriate actions click on Create Filter.

Once we create this, all the electronic mails satisfying the condition will have the fate we have configured. We can use the same feature to remove any unwanted messages coming to the inbox from a common sender. Though the messages are not from a common sender we can use the same filter feature to delete all of them by creating a filter with rules those satisfies the common characters of these unwanted messages. Though such a filter can remove a large portion of potential spam from your account, it is possible to get the same fate to a few genuine messages if any of those, unfortunately, have same characters. So it is important to be very careful while creating a filter to avoid solicited messages from your inbox.

Popular Articles
  1. I am online with USB Port but not with Ethernet Port

  2. Disable Chat for a Complete Network

  3. How to Find the Location of your Yahoo Messenger Friend

  4. Find Invisible Yahoo Messenger Friend

No: Recent Posts
This Device is Not Configured Correctly. (Code 1)
Getting Device Manager Error Code 10
Getting 169.254.X.X (APIPA) Windows Automatic Private IP Address
How to Setup MTNL Broadband ADSL Modem
Setup Idea 4G on Android Phone
Bypass Windows Admin Account Password Of Vista, XP, Windows 8
Error 1747: The Authentication Service is Unknown
Reasons for Unexpected Automatic Reboot of Your Computer
Use Flash Memory (USB) as Virtual RAM in Windows
Setup Log Files for IP Messenger
Adobe Flash Player has Stopped a Potentially Unsafe Operation
FTP Error 503 Login Authentication Failed
Best LAN Messengers
How to Reset BSNL WiFi Modem
How to Check Your Tata Photon Plus Internet Usage
Destination Net Unreachable

Safe Browse With Google Chrome Without Storing Any Personal Details

Google Chrome supports browsing without saving third-party cookies or browsing history on PC. This feature is named incognito and is very much similar to the  Firefox private browsing. When we start Chrome incognito window, it will stop storing cookies, visited page history, passwords entered, download logs etc. Once we close the window, all these information will be removed automatically. It means the next user will not find any browsing activity of the current user. This article is about different methods to start incognito window and browse without leaving any history.

How to Start Chrome Incognito Pages

We can start a private browsing window (incognito) of Google Chrome browser by different methods. Most of the important methods are listed below.
  1. By Keyboard Shortcut

    It is very easy to start Chrome safe browse using shortcut keys. We have to press the following three keys at the same time.
    [Ctrl] + [Shift] + [N]

    When you press the above key combination, a new Google Chrome window will appear with the following message.


    This page will inform you of the specialty of the new window. If you want to learn more about this feature, you can click on the 'Learn More' link.

  2. From Chrome Start Menu

    When you select Chrome from Windows start menu, you will get the option to start either normal window or incognito window.

  3. From Customize Button

    You can start Google Chrome Private Browse from Customize menu. To do it, follow the instructions below.

    • Click on Customize and Control Button On right-hand top of the page


    • Click on New incognito window

  4. Create Shortcut

    • Right click on Chrome Shortcut

    • click Properties

    • Add –incognito at the end of the target and click apply


    Now onwards, whenever you need to start browsing without storing any third party cookies or offline log information on the laptop, double click on this shortcut. It will open a private browser window and no browsing history will be stored on the computer.

It Can't Assure Cent Percent Safety

Google warns us, using incognito will not make us secure from other Internet threats. It cannot protect our data from websites which collect information from our computer by installing malicious codes. Agents who work with ISP can track our Internet activities unless we encrypt the entire communication. Incognito is also helpless against Malicious software products like Trojans or keyloggers if they are already installed on computers. Keylogging tools can track every keystroke we make on a PC and either store the details or send to its server. Private browsing feature of a browser cannot prevent this activity. However, we can prevent the auto saving of cookies and browsing history on our laptop using the incognito feature. Even the download activities will not be entered to the download log file. In a nutshell, though this feature will not give anonymity of full safety, it is worth than browsing using a normal browser window.

Popular Guides
  1. How to Take Full Webpage Screenshot

  2. How to Kill Unwanted Browser Processes

  3. How to Play Angry Birds Without Installing

  4. Turn On Disabled WiFi Card On a Laptop

Home

Setup D-Link WBR-2310 Router With WPA Wireless Security Settings

WBR-2310 is a popular wireless router from D-Link and this article presents a complete configuration of this device including WiFi security. The first part of this guide explains how to setup WBR-2310 with auto configuration utility and the second part tells how to configure D-Link wireless network with latest security settings. D-link WBR 2310 is an IEEE802.11g router with range booster technology. It supports data transfer speed up to 108 Mbps and works in 2.4GHz frequency. It supports other features like DHCP, NAT etc. Manual configuration of this device is provided at the end of the guide.


Steps to setup D-Link WBR-2310 Wireless router
  1. Connect WBR-2310 to your computer

    Your computer should be connected to the LAN port of WBR-2310 using an Ethernet cable. Power on the device after connecting it to your PC.

  2. Log on

    To log in to WBR-2310 wireless router, type the default IP address of the router on the address bar. The default IP address of the D-Link WBR-2310 router is 192.168.0.1

    Before log on to the router, it will ask you the user name and password. For a factory new D-link router, enter the following details.

    • Username: admin
    • Password: {Leave this field blank}

    There is no default password for D-link WBR-2310.

  3. Select Configuration Method

    You will be redirected to the settings page. Here you will see two different ways to configure WBR2310. They are by pressing Setup Wizard and Manual Configure. Here I use the Setup Wizard button.
    join

  4. Click on Launch Internet Connection Setup Wizard

    To configure the Internet connection on this D-link router, click on the button Launch Internet Connection Setup Wizard.
    connection

    Now the wizard will show you what steps it is going to complete while running the wizard. Click Next to continue.


  5. Create new Password For D-link WBR-2310 Router

    The setup wizard will prompt you to create a new password for your WBR-2310 Wireless Router. After entering the password, click on next.
    password

  6. Select your Time Zone

    You can select the correct time zone for the D-Link router.
    time

  7. Configure Internet connection

    Now you will get the option to set up the Internet connection for WBR-2310.
    ISP

    Here you must select the type of broadband connection you are getting from your ISP.

Convert D-Link WBR-2310 to WiFi Access Point
  1. Log in

  2. Click on Manual Configure button


  3. Select Enable Access Point Mode
    AP

    Now onwards you can use D link WBR 2310 as WiFi Access Point.


Enable Wireless Security On WBR-2310

D-link WBR-2310 Wireless Router supports WEP and WPA, two important wireless encryption. Here, let us check how to enable WiFi and WiFi security on this device. This section also covers configuring other necessary wireless settings on WBR2310  like wireless channel, SSID etc.
  1. Click on Wireless Settings

    • Check Enable Wireless checkbox

    • Change Wireless Network Name to a preferred name

    • Select Security Mode

    We can select either WEP or WPA from the list. The enhanced security modes like WPA2 and WPA2 Auto are also available.
    Safety

  2. Enable WEP

    WEP

    Select WEP Wireless security from the list. Now we will get WEP settings page. Here we can select either 64-bit encryption or 128-bit encryption. For 64 bit keys, you must enter 10 hex digits into each key box. For 128 bit keys, you must enter 26 hex digits into each key box. A hex digit is either a number from 0 to 9 or a letter from A to F. After entering the details click on save settings.
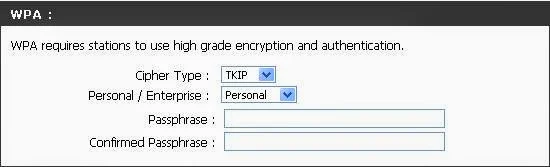
  3. Enable WPA

    To enable WPA on D-Link WBR2310, we need to select the WPA wireless security from security mode list. Now the WPA settings page will appear. Here we need to enter the Passphrase (Security key).
    WPA

Popular Articles
  1. Configure Access Point

  2. Upload Firmware On Access Point

  3. Check your Local network when you cannot go online

  4. How to Setup D-Link WiFi Router Manually
Home

How to Change Linksys Router Wireless Channel

Changing the wireless channel is an important step mentioned in many WiFi connectivity tutorials in this blog. This article is specifically to explain how to do it on an Access Point or a router. Here the steps mentioned are based on a popular router model from Linksys. Linksys is one of the popular SOHO product manufacturers. Though the steps provided in this tutorial are based on a specific model, you can use the same procedure with other vendor products. It is because this concept is the same for every WiFi products.


Wireless Channels To Pick

Before changing the current channel selected, you must understand, only three of them are worth to use. It is because others are affected with interference. The channels which are free from interference are listed below.

  • 1

  • 6

  • 11
These three are free from interference. If you don't want to enter it manually, you can choose automatic instead of specifying the number. For modern devices, automatic selection is recommended.

How to Change WiFi Channel of an AP

If you want to change the currently selected wireless channel, I recommend you to follow the instructions provided here. Here I show instructions for a specific vendor product but the procedure is the same for all routers.
  1. Log on to Linksys Setup Page

    Type the login IP address on the address bar of web browser and press enter. For Linksys router it is 192.168.1.1 Now you will be prompted to enter the username and password to continue the process. For a brand new Linksys router, there is no user name and the password is "admin". In case if you have set a different username and password, you must use that information. If you cannot recollect them, use the instructions provided in the link below.
    How to Recover Lost Password

  2. Click on the wireless tab and look for basic wireless settings. You can see the wireless channel there. You can change the current one with the other two allowed ( channel 1, 6 or 11). For example, if 1 is currently selected, you may change it with 6 or 11. As I explained before, if you do not want to enter this detail by yourself, you can choose auto selection option. If you have selected auto select, the device will pick the most interference-free channel.

  3. Save settings and log off

    Now you have successfully changed the wireless channel of your WiFi router.

Popular Guides
  1. How to Setup Belkin Router

  2. How to Setup  WRT160N

  3. Upgrade Firmware of Linksys Access Point

  4. Configure Linksys Range Expander

No: Recent Posts
Wireless Network Getting Disconnected
Restart WLAN AutoConfig (WLANSVC Service) On Windows 10
restart WZC on Windows
How to Setup MTNL Broadband ADSL Modem
Setup Idea 4G on Android Phone
Delete Beneficiary Fund Transfer in HDFC Netbanking
Setup Asianet WiFi Router
Manage and Delete Wireless Filters On Windows
Wireless Router Shows Wireless Packet Drops
Setup Log Files for IP Messenger
Wireless N is backward compatible with wireless G
Remote Procedure Call (RPC)
Error 797: A Connection to the Remote Access Server was not Made
How to Reset BSNL WiFi Modem
How to Check Your Tata Photon Plus Internet Usage
Destination Net Unreachable

No SSID Broadcast From Wireless Router & Access Point

Yesterday night I faced a strange issue related to wireless connectivity on my laptop. I could not find SSID from my router. First I thought it was my Laptop wireless adapter's issue as there are no other networks. My desktop does not have a wireless adapter so I have no other option to verify whether it is the router issue or my laptop issue. Today morning I went to one of my friend's house and checked whether my laptop is able to see WiFi from his Access Point. Yes, my laptop is seeing it from his Access Point. So it is clear that my laptop adapter is working fine and the culprit is my Wireless Router. The major steps I performed on my router to fix this issue are described below in a systematic order.

The router is Not Broadcasting Signal

Step by step troubleshooting for a Router or Access Point when it is not broadcasting signal.
  1. Check WiFi light

    Check the status of wireless light on the AP. If it is broadcasting WiFi, the light is ON. If it is off, you cannot see WiFi network from AP on your computer because there is no broadcast. In some rare cases, this light may be off even though it is a broadcasting signal due to LED issues. Here I assume LED light is fine.

  2. Make sure the SSID broadcast is enabled

    To check this, you need to log on to setup page and check the status of SSID broadcast. You can find this option under the wireless tab. If SSID broadcast is disabled, it will not broadcast WiFi.

  3. Power cycle

    It is advised to power cycle Access Point to fix broadcasting issues. To perform this you should power off the device for 30 seconds and after 30 seconds power on it again. When all the lights are steady, check for the issue. If you do not know how to perform it in a systematic way, follow the instructions provided in the link below.
    How to Power Cycle an Access Point

  4. Change SSID

    It is advised to change the wireless network name (SSID) and check whether your laptop is receiving signal. You can change the current network name under wireless.

  5. Change wireless channel

    You can change the wireless channel to channel 1, 6 and 11 depend on the current channel. To learn more about it, visit the link below.
    Change WiFi Channels on Linksys Access Point

  6. Upgrade Firmware

    If the firmware flashed on your Access Point is outdated you may start seeing issues with its working. Updating to latest firmware version can resolve every known issues and bug in the previous version. It is highly recommended to update the firmware of any networking device with the latest version to expect full functionality.

  7. Reset and reconfigure

    If none of the steps provided here are working, you may reset the device to factory default and reconfigure it.

All the steps above mentioned are about how to troubleshoot the router when there is no broadcasting from your WiFi router. What if the real culprit is your laptop and not the router? In that case, you should troubleshoot the laptop instead of a router. You can follow the instructions provided in the link below in that case.
My Laptop is Not Getting WiFi Signal and Internet

No: Recent Posts
Wireless Network Getting Disconnected
Restart WLAN AutoConfig (WLANSVC Service) On Windows 10
restart WZC on Windows
How to Setup MTNL Broadband ADSL Modem
Setup Idea 4G on Android Phone
Delete Beneficiary Fund Transfer in HDFC Netbanking
Setup Asianet WiFi Router
Manage and Delete Wireless Filters On Windows
Wireless Router Shows Wireless Packet Drops
Setup Log Files for IP Messenger
Wireless N is backward compatible with wireless G
Remote Procedure Call (RPC)
Error 797: A Connection to the Remote Access Server was not Made
How to Reset BSNL WiFi Modem
How to Check Your Tata Photon Plus Internet Usage
Destination Net Unreachable