D-Link quick setup wizard is enough for an average user to set up his router but for advanced options, it is better to learn how to configure this device manually. This tutorial explains how to configure every model of D-Link wireless router manually for advanced features. Here we learn how to enable Internet access, WiFi and WiFi security. The first step of this guide is to make sure you can go online with the modem by connecting a computer to the Ethernet port of the modem.
If it is fine, disconnect the modem and connect the computer to one of the LAN ports of D-Link Wireless Router using an Ethernet cable. Now power on the device.
So it can extend its support for 802.11a, 802.11b, 802.11n, and 802.11g wireless standards. 802.11n supports both 2.4GHz and 5GHz where 802.11a supports 5GHz only. 802.11b and 802.11g work in 2.4GHz.
Here we share the manual steps to configure wireless and security on the D-Link router.
In this article, you have learned to set up a brand new D-link router without the help of a setup disc.
Configuration with a DSL connection is different from a cable broadband connection.
Do not forget to secure the device with a new login username and password.
You should also set up a strong WiFi passphrase to prevent unauthorized use by intruders.
If it is fine, disconnect the modem and connect the computer to one of the LAN ports of D-Link Wireless Router using an Ethernet cable. Now power on the device.
Configure Broadband Access On D-Link Router
- Access Setup Page:
- Type 192.168.0.1 on Browser address bar and press enter.

- Enter username admin and leave the password field blank. Click on login to access setup page.
- Type 192.168.0.1 on Browser address bar and press enter.
- Click on Manual Internet Connection Setup

- Select Internet Connection type:
Using the drop-down menu, you can select the Internet connection type you are using.

Configuration details for each of the Internet connection types are listed below.
- Configure D-Link Router for Cable Internet Connection:
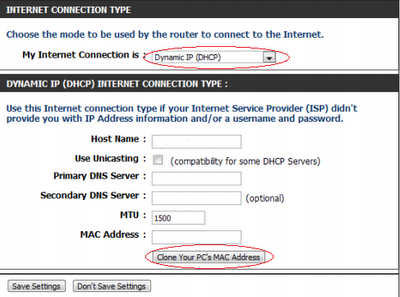
To setup, your router with cable Internet, select the option Dynamic IP(DHCP).

If you are using cable Internet connection the most important step is to click on the button Clone Your PC's MAC Address. To know the importance of this step, click on the link below.
Why MAC Address Cloning Required for Cable Internet Connection
If your cable ISP doesn't provide any details about Host Name, DNS Server, etc.. leave them blank or keep the default value. Do not forget to click on Save Settings button.
- Configure D-Link Router with DSL Connection (PPPoE):
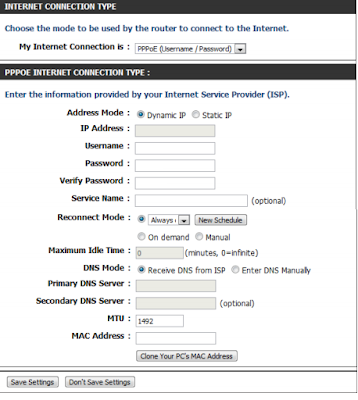
With DSL broadband, you should select the option PPPoE(Username/Password) from the drop-down menu. Enter the Username and password provided by ISP.

Keep the Address mode "Dynamic" if your ISP does not provide you any IP address details. Normally for a DSL connection, you do not need to clone computer MAC address unless asked by your ISP. Click on Save Settings after entering details.
- Configure D-Link Router with PPTP Connection:
Steps to setup your router with PPTP connection is similar to PPPoE connection.

- Configure D-Link with Static IP:
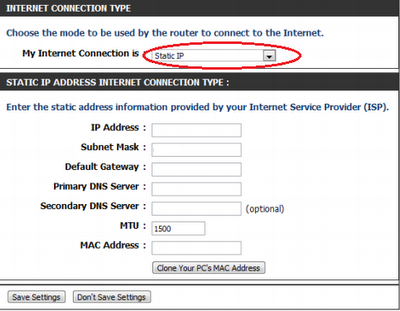
Here you should enter the full IP address details provided by your ISP including Subnet Mask, Default Gateway, DNS Servers, etc.

After entering details click on Save Settings.
- Configure D-Link Router for Cable Internet Connection:
- Connect Modem to D-Link Router:
- Connect the Internet port of D-Link router to the LAN Port of modem
- Connect Computer to LAN port of Modem
- Switch on Modem
- Connect the Internet port of D-Link router to the LAN Port of modem
- Power Cycle:
I recommend you to perform a power cycle if you face any issues with going online. To do the power cycle follow the steps mentioned in the link below.
How to Power Cycle Router and Modem
Configure Wireless & Security
Right after configuring Internet access on the D-Link router, you need to configure the wireless settings if you want to use it. Latest D-Link wireless routers support both 2.4GHz and 5GHz frequencies.So it can extend its support for 802.11a, 802.11b, 802.11n, and 802.11g wireless standards. 802.11n supports both 2.4GHz and 5GHz where 802.11a supports 5GHz only. 802.11b and 802.11g work in 2.4GHz.
Here we share the manual steps to configure wireless and security on the D-Link router.
- Login
- Click on Wireless Settings tab

- Click on Manual Wireless Connection Setup
- 2.4GHz Devices(802.11n,11g, and 11b):
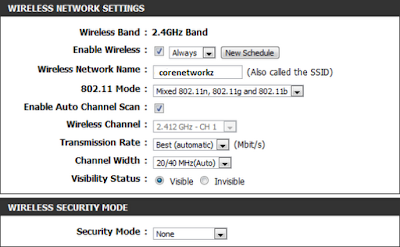
- Click on Enable Wireless and Select 802.11 mode (2.4GHz).

You can select one of the following 802.11 modes:
- 802.11b Only
- 802.11g Only
- 802.11a Only
- Mixed 802.11g and 802.11b
- Mixed 802.11n and 802.11g
- Mixed 802.11n,11g, 11b
- Check on Enable Auto Channel Scan:
Now D-Link Wireless Router will automatically pick the channel with least interference.
- Wireless Network Name:
Here you can write the name of your wireless network (SSID). SSID can be up to 32 characters, and it is case sensitive.
- Select Channel Width:
20/40 MHz if you are using both 802.11n and non802.11n devices. If you are not using 802.11n devices, you can select 20MHz.
- Visibility of SSID:
If you do not want to show your SSID, you can check the option Invisible.
- Click on Enable Wireless and Select 802.11 mode (2.4GHz).
- 5GHz Devices (802.11n and 11a):
- Enable Wireless:

- Enable Wireless:
In this article, you have learned to set up a brand new D-link router without the help of a setup disc.
- Error 633: The Modem is Already in Use or not Configured Properly
- Change COM Port Assigned to Modem on Your Computer
- Different Methods to Access Device Manager
Configuration with a DSL connection is different from a cable broadband connection.
- Remove Blogger Navbar from Your Blog
- Setup in Bridge Mode
- Port Forwarding in Nokia Siemens Residential
Do not forget to secure the device with a new login username and password.
- Setup WBR-2310 With WPA
- Access Point DWL-G700AP by Setup Wizard
- DIR-865L Amplifi Cloud 5700 With Cable & DSL
You should also set up a strong WiFi passphrase to prevent unauthorized use by intruders.


Thanks for such a simple tutorial
ReplyDeleteIt is simple, I thought only with wizard I can configure this router.
ReplyDeleteNormally there is no compatibility issues between Linksys wireless router and D-Link wireless router. To check more about your case please provide the model numbers of both routers you have.
ReplyDeleteThanks, it helped me.
ReplyDeleteI have an older version of D-Link Wireless router. When I contacted D link support, they said mine is too old to get support. Can you help me to fix my router?
ReplyDeleteI am planing to buy D-Link Gaming Router (DGL-5500), when available here. I would like to know the speed, wireless specifications, wireless and router security in D-Link DGL-5500 router and also want to know is it worth money?
ReplyDeleteHope you can assist me.
The best configuration guide I ever read on D link router. Thanks
ReplyDeleteHi, I turned on bridge on by mistake on my d-link router using my android phone, noe
ReplyDeleteW wireless signal is off and can't turn it back. Any idea on how to fix this without additional ethernal cable? Thank you
@ M A
ReplyDeleteIf your router in bridge mode, you cannot connect any wireless devices to it. So, either you need to connect a PC to your router with an Ethernet cable to access the wireless setup page, or you need to reset and reconfigure it.
If you are attempting to configure a D-Link router, take note of your computer's Default Gateway IP address.
ReplyDeleteThis will allow you to share your internet connection with any connected device for details visit http://bit.ly/dlinksetup