menu
close

How to Configure Reliance DSL Broadband Modem

Reliance Broadband is one of the leading private DSL connections in India. Usually, they supply a modem which will be configured by Reliance technician at your place, and you do not need to worry about the setup procedure. However, there are instances where you may need to reset the modem or change any default settings by yourself. You will face connectivity issues if you do not know how to set up Reliance DSL modem after having manual changes.

Here I provide you the guidelines to configure every Reliance Broadband Modem models by yourself. This article provides step by step guidelines to set up Reliance DSL broadband modem by your self.

Though I have added screenshots in this tutorial, you should note that different modem models have different user interfaces.

Manual Setup Guide for Reliance Broadband Modem

Manual steps to configure Reliance DSL Broadband Modem are:
  1. Connect Modem to Computer :
    You should connect the LAN port of the Modem to a computer using an Ethernet cable (RJ45) and make sure the power light on Reliance modem is steady.
  2. Login to Reliance Modem:
    1. Find the Login IP address of Reliance modem by following the steps mentioned in the link below.
      How to Find the Login IP address of Reliance Modem
    2. Type the login IP address (in most modem versions it is 192.168.1.1) on the address bar of your browser and press enter.


    3. Enter the Username and password provided by the modem manufacturer (in most cases they use the combination of admin.)

  3. Click on Configure/ Internet Connection/ WAN tab (Depends on modem versions, the name also changes)
    Create a new connection in Reliance DSL Modem

    Delete all previously configured connections using the delete button
  4. Create new Connection: You can see a button names create or add to create new Internet connection for Reliance DSL broadband connection. Now enter the following values.
    How to setup DSL Reliance modem and router

    VPI= 0
    VCI= 35

    Leave other values default unless you are instructed by Reliance DSL team otherwise. Click next to continue.
  5. Configure Reliance modem in PPPoE mode: In most cases, Reliance will give your username and password. You need to configure your DSL modem in PPPoE to enable the Internet on multiple computers. So select the option PPP over Ethernet (PPPoE) and click next.
    Setup Reliance modem in PPPoE mode

  6. Click on Obtain an IP address automatically. Make sure you have checked the check boxes of Enable NAT and Add Default Route. Click next to continue.
    Set the modem to get an automatic IP address

  7. Enter username and password provided by Reliance DSL broadband and make sure Always on radio button is selected.


    Service Name: Reliance DSL
    Broadband User Name: (Provided by Reliance)
    Password: (Provided by Reliance)

    Click next to continue.
  8. Verify the details and click on Apply
  9. You might need to reboot the modem by clicking the Reboot from the last button under the Admin tab.
    Reboot Reliance Router

    Reboot process may take one minute and wait till power light, DSL light are steady.

  1. Duplicate Name Exists
  2. How to Power Cycle
  3. Change SSID on D Link Router
  4. Update D-Link Router Firmware

Just like how we configure Reliance DSL modem, if you are looking for step by step instructions to setup BSNL modem, follow the steps mentions in the link below.
How to Configure BSNL Broadband Modem

Change Wireless Network Name (SSID) On D-Link Router and Hide Network

One week ago one of my friends called me to fix wireless network issues at his home. He told me that his computer was receiving good network signals but once a while his device was getting disconnected without any reasons. I asked him whether his PC connected to the right network. His answer was yes. He had a D-Link router, and the wireless network name (SSID) was dlink. He was pretty sure his laptop was connected to the right network since the SSID was the same name configured on his D-Link router.

I asked him to switch off the router and check if he could connect to it. He did the same. Still, he was connected. It was another network his computer connected to with the same SSID.

To avoid this type of mistakes, you should change the default Wireless Network Name with a unique name. To change the SSID on D-Link Wireless Router, follow the steps below.

If you are looking for steps to configure Internet, follow the steps provided in the link below.
How to Setup D-Link WiFi Router

How to Change Wireless Network Name on D-Link Router

  1. Log in to D-link Router: Type 192.168.0.1 on the address bar of the browser and enter admin as the username. You can leave the password field blank.

  2. Click on the Wireless Settings tab

  3. Click on Manual Wireless Connection Setup button
    Change

  4. You can delete the default name and write a unique wireless network name
    D-link router

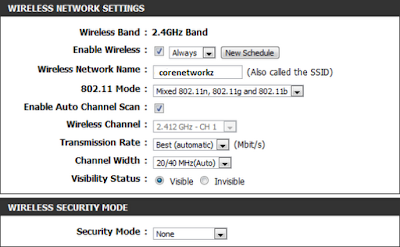
  5. Click on Save Settings

How to Hide D-Link Wireless Network from Others

You can have one more layer of protection by hiding your WiFi broadcast from others. Though it is not very effective against skilled intruders, there is no harm in trying this. To hide your D-Link Wireless network, follow the steps mentioned below.
  1. Log in the router and open manual wireless connection setup page.

  2. Select the visibility status as invisible

  3. Click on Save settings


Once you have completed the steps, your D-Link WiFi network will be invisible. To connect to a hidden WiFi, you have to type the SSID manually and click the connect button. So, it is important to remember the unique SSID you have set.

  1. Configure Reliance DSL Broadband Modem
  2. How to Power Cycle
  3. A Network Cable is Unplugged
  4. Ping Request Could not Find Host
  5. Setup Cox Cable Modem

This article is about how to change the D-Link router SSID. To learn more about configuring this device, click on the link below.
How to Configure WiFi on DLink

  1. How to Upgrade D-Link Router Firmware
  2. Getting Error 720 While Making a Dial-up Connection
  3. Block Websites Using D-Link Router In Home
  4. How to Reset a Modem
  5. Create Log Files for IP Messenger Installed

In case if you face any issues with connecting to the D-Link WiFi after changing the SSID, the steps mentioned in the link below can help you.
WiFi Keeps Disconnecting

A Network Cable is Unplugged

Today we are discussing one of the minor error messages you may have faced before. That error message is A network cable is unplugged. As compared to the other error messages we discussed before, it is not a big deal. In most cases, a simple loose connection can be the reason. Sometimes, this alert may create some confusion for you. If you are connected to the Internet by a wireless connection, this alert can make you confused. One of my friends told me even if he was using the wireless network to go online he received this alert.

He usually avoids this alert A network cable is unplugged because he can go online even though the alert message is there. This article explains this error and teaches you how to fix it.

Major reasons to get the alert A network cable is unplugged are listed below.


Reasons for the alert A network cable is unplugged

  1. Ethernet Cable is not connected properly(loose connection)

  2. Unused Ethernet Adapters are enabled: One of the most common reasons to get the alert A network cable is unplugged is the unused Ethernet adapter on your computer. If an Ethernet adapter is not connected, you will get this message.

  3. Unmatched duplex settings are enabled

  4. Faulty Ethernet adapter, Ethernet cable or Router/hub port

The Solution for A network cable is unplugged

It is not hard to solve the message A network cable is unplugged. You can follow the steps below to troubleshoot this error message.

  1. Unplug the Ethernet Cable and reconnect. Now make sure the lights on Ethernet adapter and the router port are steady. If there are no lights, it means either the Ethernet cable or the Adapter/ port is not working.

    1. Configure Reliance DSL Broadband Modem
    2. How to Power Cycle a Network
    3. Setup Cox Cable Modem
    4. Resolve Getting 169.254.X.X (APIPA)

  2. Disable the Ethernet adapters which are not in use. To disable an adapter right click on it and click Disable. To learn how to enable an adapter click on the link below.
    How to Enable Ethernet Adapter

    1. Update D-Link Router Firmware
    2. How to Uninstall TCP/IP
    3. Destination Net Unreachable
    4. Ping Request Could not Find Host. Please Check the Name and Try again

  3. To try different link speed and duplex settings on Ethernet adapter. To learn how to change the link speed, click on the link below.
    How to Change Link Speed and Duplex settings

    1. PING: Transmit failed. General Failure
    2. Setup Idea 4G on Android Phone
    3. Destination Host Unreachable
    4. Router Cascading Tutorial

  4. Update Adapter driver: To update the Ethernet adapter driver, click on the link below.
    Steps to Update Ethernet Adapter Driver Installed on Your Computer

How to Update The D-Link Router Firmware to the Latest version

Router manufacturers release new firmware version with patches for the bugs and errors reported in the past versions. So it is a good practice to verify your D-Link wireless Router runs on the latest firmware version released. In addition to the security benefits, upgrading firmware on router or Access Point can resolve many connectivity and performance issues. You can check whether your D-Link device is having the latest version from the web-based setup page. There is an important point you should remember while uploading firmware.

 You should connect the D-link router to the PC using an Ethernet cable. Steps to check the current firmware version on the D-Link router and update it to the latest version are provided below.

Steps to Update D-Link Router Firmware
  1. Log on to D-link Router:
    Type 192.168.0.1 on Browser address bar and press enter. When prompted, enter admin as username and leave password field blank. To learn more about this click on the link below.
    How to Login and Setup D-link Wireless Router

  2. Click on Tools bar on the Top menu

  3. Click on Firmware
    how to update

  4. Check Firmware Version: To check the current and latest firmware versions of the D-Link Router, click on the button Check now under Firmware information.
    check

  5. Download Latest Firmware for D-Link Router:

    If the current firmware on D-link router is not the latest one, download the latest version from their support site. You should save the file on your hard-disk.

  6. Upload:

    To upload the latest firmware click on the button Upload after specifying the location of the downloaded file on your computer by using the button Choose file.
    update

    Now, wait till power light on the D-Link router is steady.

  7. You may power cycle D-Link router after completing the firmware upload process.
    How to Power Cycle


Trouble Uploading D-Link Firmware
Whether it is a router or Access Point, some unexpected issues may arise while flashing the current firmware. If you are facing trouble performing the steps mentioned above, this section may help you.

  1. Unzip

    Sometimes the file downloaded from the website is in zipped format. In that case, you must unzip it before uploading.

  2. Already having the latest version

    If the Access Point has the latest software, the update process may fail. So check the version of software running on the device before starting the update process.

  3. Connection Error

    While updating a device firmware, it must have a reliable connection. It is important to connect the Access Point and PC with an Ethernet cable rather than via WiFi.

In this tutorial, you have learned how to check whether your D-Link router has the latest firmware version or not. You have also learned how to update D-Link router firmware.
  1. Setup Reliance DSL Modem
  2. Change SSID
  3. Configure DSL-2520U ADSL2+ Ethernet/USB Combo Modem
It is a good practice to ensure periodically if your D-Link router has the latest firmware. Newer firmware versions are free from the bugs reported in the older versions.
  1. Delete Yahoo Messenger Account
  2. Setup Cox Cable Modem
  3. Convert D-Link Router into Bridge