menu
close

Enable Wireless Security (WPS & WPA)On Netgear R6300 Wireless AC Dual Band Router

Netgear R6300 router is an 802.11ac wireless dual-band router offers gigabit speed. One of impressing feature of R6300 wireless router is the simultaneous operation in both 2.4GHz and 5GHz wireless bands. So the combined wireless speed of Netgear R6300 router is 450+1300 Mbps. That means Netgear R6300 Wireless router offers gigabit wireless speed. Netgear R6300 Router is backward compatible with 802.11a/b and g devices. So even if you have other wireless devices which do not support 802.11ac standard, you can connect them with Netgear R6300 802.11 ac dual-band wireless router.

The speed of Wireless network will reduce to the speed of device with inferior wireless standard. With R6300 Router we can expect minimum interference from other wireless devices because it operates in simultaneous dual-band mode.

There are many wireless security precautions in R6300 router like separate wireless access for guests, WPS, WPA encryption, etc. In this tutorial, we check how to enable wireless security on a Netgear R6300 802.11ac router.


Setup Wireless Security on Netgear R6300 Dual Band 802.11ac Router

  1. Login to Wireless Router:

    To login R6300 wireless router and configure it, click on the link below and follow the instructions there.
    How to Login and Configure Netgear R6300 Dual Band Wireless Router

  2. Click on the Wireless tab
    how to setup wireless settings on Netgear router R6300

  3. Change Default Wireless Settings on Netgear R6300 Router

    There is a factory default wireless network with security is enabled on the R6300 router. You can check the wireless SSID and security details like wireless key and encryption on the bottom of the device. However, I prefer to use custom wireless details and security for Netgear R6300 Dual-band wireless router.
    Change Wireless settings and encryption in R6300 Router

    To enable custom-made wireless name and security on Netgear R6300 router, follow the instructions below.

    1. Change the default SSID with your custom name for the wireless network at SSID

    2. You can change the default wireless channel selected in Netgear R6300 wireless router by selecting the preferred channel at Channel.

    3. You can select the preferred wireless encryption at Security Options and change the wireless key at Passphrase. If you do not want any wireless security for your network, you should select the none option.

      You can have following wireless encryption on R6300 Router.

      1. WPA-PSK(TKIP)
      2. WPA2-PSK(AES)
      3. WPA-PSK(TKIP) + WPA2-PSK(AES)

      Click on Apply after changing the wireless settings.

  4. How to Configure WPS on Wireless Devices With Netgear R6300 Router Automatically

    To configure WPS(Wi-Fi Protected Setup) on any wireless devices or computers which supports WPS automatically, follow the instructions below.

    1. Make sure the device supports WPS

    2. Press WPS button on Netgear R6300 Router

    3. Press the WPS button on the wireless device within 2 minutes


After enabling Wireless and wireless security on Netgear R6300 Router, if you are seeing issues with accessing the Internet and while doing a ping on a computer connected to the router shows network unreachable error message click on the link below to troubleshoot it.
How to Solve Destination Net Unreachable Error Message

  1. Resolve Getting 169.254.X.X (APIPA) Windows Automatic Private IP Address
  2. How to Restart WZC
  3. How to Reset a Router Manually
  4. How to find Login IP Address of a Router or Modem
  5. How to Setup D-Link Wireless Router Manually
  6. How to Setup D-Link Wireless Router into Bridge Mode
  7. This Domain is Already Assigned to an Account When I Add to Hosting in Godaddy

You can connect Range Expander and Access Points to the Netgear R6300 wireless network.

  1. How to Setup Reliance DSL Broadband Modem
  2. How To Setup Cisco DPC2320 Cable Modem
  3. How to Block Websites Using D-Link Router In Home
  4. Ping Request Could not Find Host
  5. How to Solve TTL Expired in Transit
  6. Asianet Dataline Cable Broadband Modem WiFi Connectivity
  7. Setup Linksys WRT54G Wireless Router

You can connect Wireless Range Expander, and Access points support 802.11a/b/g/ac standards.

  1. Router Cascading Tutorial
  2. How to Enable Disabled Adapter
  3. Destination host unreachable
  4. The Solution for Destination Net Unreachable - Error
  5. PING: Transmit failed. General Failure
  6. How to Configure Idea 3G on Android Phone
  7. How To Power Cycle a Modem

If you want to configure Linksys Range Expander with Netgear R6300 Dual-band wireless router, follow the instructions provided in the link below.
How to Setup Linksys Range Expander RE1000

WPS helps to connect your friend's devices to the WiFi without going through the trouble of typing the passphrase.

Configure Netgear R6300 Gigabit Router With Cable Internet Modem

Netgear R6300 Wireless AC Dual Band Gigabit Router is the latest router from Netgear. This model supports wireless standard 802.11 ac. IEEE 802.11ac standard offers Gigabit speed over a wireless connection, and the simultaneous dual-band feature ensures minimum interference with other wireless devices. In this tutorial let us check how to configure a Netgear R6300 wireless router with a Cable Internet modem. Most of the cable Internet service providers ensure the usage of cable Internet on just one computer by registering the MAC address of the computer.


No other computers (with different MAC address) are allowed access to the Internet. With Netgear R6300 Wireless AC Dual Band Gigabit router we can overcome this limitation set by Cable Internet Provider and share cable Internet among multiple computers.

Steps to setup Cable Modem with Netgear R6300 Gigabit router are:

Setup Cable Modem With Netgear R6300 Gigabit Wireless ac Router

  1. Connect Cable modem to the WAN/Internet port of R6300 and power on both devices. Connect a computer (on which cable modem is configuring) to the LAN port of Netgear R6300 Gigabit router.

  2. Login Netgear R6300 Gigabit router setup page:

    You can log in Netgear R6300 router using the default Login IP address provided in the user manual (by default it is 192.168.0.1 or 192.168.1.1). Also, you can access the web-based setup page of Netgear R6300 Gigabit router by typing http://www.routerlogin.net on the address bar of the browser

  3. Enter admin as username and password and click Ok

  4. On Home click on the Internet tab:
    how to set up cable internet for multiple computers using Netgear router

    Select the following options:
    configure internet in Netgear router with cable modem

    1. Select No button below the question does your Internet connection requires a login
    2. Under Internet IP Address, select Get Dynamically from ISP
    3. Under DNS Address select Get Automatically from ISP

  5. Do not forget to select Use Computer MAC address and make sure you are on the same computer on which cable modem configured. If you do not clone MAC address in Netgear R6300 Wireless AC Dual Band Gigabit router, you may not able access Internet from your cable ISP.
    how to do MAC address cloning in Netgear r6300 router

  6. Renew IP Address on Netgear R6300 router

    The last step to configure Netgear R6300 router with a cable modem is to check if IP address is renewing automatically. If not, follow the steps below.
    1. Click on the Advanced tab
    2. Click on Administration
    3. Click on Router Status and click connection status to renew IP address

    Get Public IP address on Netgear 6300 router

    You can always look at this page to check the public IP address Netgear router gets from the cable modem.
You can connect at least four computers using Ethernet cable with a Netgear R6300 router because it has four Ethernet ports in addition to the wireless computers.

  1. The Solution for Destination Net Unreachable - Error
  2. How To Setup Cisco DPC2320 Cable Modem
  3. How to Block Websites Using D-Link Router In Home
  4. Ping Request Could not Find Host
  5. How to Solve TTL Expired in Transit
  6. How to Enable Disabled Adapter
  7. How to Configure Idea 3G on Android Phone

With MAC address cloning you will not face any issues with sharing Internet among all the computers connected to the router.

  1. How to find Login IP Address of a Router or Modem
  2. Setup Linksys WRT54G Wireless Router
  3. How to Setup Reliance DSL Broadband Modem
  4. How to Setup D-Link Wireless Router Manually
  5. How to Setup D-Link Wireless Router into Bridge Mode
  6. Asianet Dataline Cable Broadband Modem WiFi Connectivity
  7. Router Cascading Tutorial

If you feel Internet speed from Netgear R6300 Gigabit Router is lower than before, click on the link below to troubleshoot it.
  1. How to Improve Internet Speed On Your Computer
  2. How To Power Cycle a Modem
  3. Resolve Getting 169.254.X.X (APIPA) Windows Automatic Private IP Address
  4. How to Restart WZC
  5. How to Reset a Router Manually
  6. What is Destination host unreachable
  7. PING: Transmit failed. General Failure

Make a Program Starts Automatically When Your Computer Boots

Do you want to set a software installed on your computer to start automatically when your PC boots up? If you use an application installed on your PC often, it is better to set that application starts automatically. I have a Samsung netbook which I use for browsing. So it makes sense to enable auto start for Google Chrome and Firefox, my favorite browsers. To convert a normal software to start automatically on a computer, we must add it to Windows StartUp.

All the programs and tools listed in StartUp run automatically when the computer boots. This tutorial explains how to enable auto-start on selected applications installed on your laptop.

The second part of this guide explains how to delete a program from StartUp if you no longer want that application start with booting.


Make A Software Runs Automatically
I think it is better to explain this concept with a practical example. I am going to set the Google Chrome to run automatically on Windows boot. You can follow the same procedure to convert any application into an auto-run mode.
  1. Open StartUp Folder:
    1. Click on Windows Start and Select All programs

    2. Right click on StartUp and Click open

       folder
  2. Create Shortcut of Google Chrome
    1. Right Click on Google Chrome

    2. Click on Create Shortcut

  3. Drag the shortcut into the StartUp folder

Now the Google Chrome is added to Windows StartUp. It means, whenever your computer boots, Google Chrome too will start automatically. By following the same steps, you can add any programs on your computer to Windows StartUp and convert them autostarting applications.

Now it is the time to learn about Windows runtime errors. To learn more about runtime error click on the link below.
Runtime Error- Running Software has Requested Runtime to Terminate

Remove unwanted Startup Programs
Sometimes you may need to remove certain applications from this list. It is because having so many applications in that folder may reduce your system bootup speed and efficiency.

We can remove any programs from appearing in system bootup menu by removing them from msconfig window.
  1. Click on Windows start

  2. On search type msconfig and press enter

  3. Click on the startup tab

  4. Uncheck unwanted programs

The unchecked programs will not appear in that folder again.

  1. Error 1747: The Authentication Service is Unknown
  2. Setup Linksys WRT54G Wireless Router in PPPoE Mode
  3. Configure D-Link DIR-865L Amplifi Cloud Router 5700
  4. D-Link DSL-2520U ADSL2+ Ethernet/USB Combo Router
  5. Netgear R6300 Gigabit Router With Cable Internet

After unchecking the applications, while saving it, you may need to restart your computer.

  1. FTP Error 503 Login Authentication Failed
  2. Adobe Flash Player has Stopped a Potentially Unsafe Operation
  3. Setup Log Files for IP Messenger
  4. Use Flash Memory (USB) as Virtual RAM in Windows
  5. Reasons for Unexpected Automatic Reboot of Your Computer

Adding more programs and tools into the startUp folder may cause more time to boot your computer.

  1. Bypass Windows Admin Account Password Of Vista, XP, Windows 8
  2. What is Destination Net Unreachable
  3. How to Check Your Tata Photon Plus Internet Usage
  4. How to Reset BSNL WiFi Modem
  5. Best LAN Messengers

Though it affects the booting time, you can access the tool you want right after Windows on because those tools have started automatically.

  1. This Device is Not Configured Correctly. (Code 1)
  2. Getting Device Manager Error Code 10
  3. Getting 169.254.X.X (APIPA) Windows Automatic Private IP Address
  4. How to Setup MTNL Broadband ADSL Modem
  5. Setup Idea 4G on Android Phone

If you have issues with automatic rebooting, the below link may help you to fix it.
How to Fix Automatic Rebooting Of Your Computer

Setup Linksys WRT54G Wireless Router in PPPoE Mode

WRT54G and WRT54GS are two famous wireless routers from Linksys family. These two wireless routers support Wireless G and B. 802.11g is backward compatible with 802.11b. So technically we can say these Linksys routers support both g and b networks. In this tutorial, we can check how to configure Linksys WRT54G and WRT54GS in PPPoE mode. To configure Linksys WRT54G router in PPPoE mode, you must have the username and password from your DSL broadband providers. Also by configuring it in PPPoE mode, you can use the built-in Linksys firewall and NAT.

Configure WRT54G Wireless Router in PPPoE Mode
  1. Make sure that you can go online by connecting your computer to the modem (Without connecting the WRT54G router in the network). Make sure DSL modem is in bridge mode. If the configuration of the DSL modem is in PPPoE mode, we do not need to configure WRT54G in PPPoE mode.

  2. Connect your computer to one of the LAN ports of WRT54G.

  3. Connect the DSL modem to the WAN Port of WRT54G. Power on all the devices.
    Setup in PPPoE Mode

  4. Open Internet Explorer and type WRT54G login IP address. The default IP address of WRT54G is 192.168.1.1 and press enter.

  5. After Entering the default Username and Password, you will log on to the Router Setup page.

    Default Username: {no username}
    Default Password: admin
    Wireless G Router

    Update: To configure in PPPoE there is no need to change the current Local IP Address.

  6. On WRT54G setup page select PPPoE instead of Automatic Configuration DHCP
    Configure Linksys WRT54G Wireless G router in PPPoE mode

  7. Now it is the time to configure PPPoE settings on the WRT54G and WRT54Gs router. Enter the Username and Password provided by your Internet Service Provider and click on save.
    Enter PPPoE settings on WRT54Gs Wireless Router

  8. Click on the status bar and click on the connect button.
    Connecting to PPPoE server by clicking connect button in WRT54GS

If your DSL ISP provides a standalone modem or modem in bridge mode, you must configure Linksys WRT54G in PPPoE mode to avoid dialing on your computer. Also, a bridged modem can provide Internet access to only one computer. To overcome this limitation, we must use a router, and the router must be in PPPoE mode.

  1. Anonymous Proxy Detected, Click Here
  2. How to Remove Background Of a Photo Using Microsoft Paint
  3. Solve AT&T Latency and Connection Issues

To learn more about configuring a Linksys router manually, click on the link below.
Manual Configuration Steps For Linksys Wireless Router

  1. Make a Program Starts Automatically
  2. Netgear R6300 Gigabit
  3. Tips to Improve Alexa Rank

Right after configuring the WRT54G router in PPPoE, if you failed to access websites through it, follow the steps mentioned in the link below.
Cannot Access some websites though Linksys Wireless Router

  1. D-Link DIR-865L Amplifi Cloud
  2. D-Link DSL-2520U ADSL2+ Ethernet/USB Combo
  3. How To Reset Microsoft Notepad

If you are a serious gamer, you need to open or forward certain port numbers through NAT and Firewall on Linksys WRT54G Router. To learn the steps to forward a port number through Linksys WRT54G router, click on the link below.
How to perform port forwarding on Linksys WRT54GS

Configure D-Link DIR-865L Amplifi Cloud Router 5700 With Cable & DSL Internet

DIR-865L Amplifi Cloud Router 5700 is from D-Link with SPI firewall, easy media sharing features, 2.4GHz Wireless N, etc.. DIR-865L Amplifi Cloud Router 5700 supports WPA2, strong wireless protection against intruders. It has 4 LAN ports, one USB port (which can be connected to a flash drive and share content among all devices in the network), one Internet port, reset port and power button. You need to press the WPS button to start the WPS in DIR-865L Amplifi Cloud Router.

In this tutorial, we can check the methods to configure D-Link DIR-865L Amplifi Cloud Router 5700 with DSL broadband and Cable Internet connection.


If you have seen any drop in Internet speed after connecting  DIR-865L Amplifi Cloud on your existing network, you can follow the instructions provided in the link below to improve the Internet connection speed.
Improve the Internet Connection Speed With DIR-865L

Access and Configure D-Link DIR-865L Amplifi Cloud Router 5700

To access and setup D-Link DIR-865L Amplifi Cloud Router 5700 in your existing network, follow the steps below.
  1. Access Web-based setup page of DIR-865L Amplifi Cloud Router

    1. Type, Login IP address of D-Link DIR-865L Amplifi Cloud Router, 192.168.0.1 on the address bar and press enter
    2. Enter admin as username and leave password field blank when prompted

  2. Click on Manual Internet Connection Setup to configure DIR-865L Amplifi Cloud Router with DSL modem or Cable Modem manually.
    D-Link DIR-865L Amplifi Cloud Router 5700 With Cable & DSL

  3. Now select the Internet Connection type from the drop-down menu provided in the setup page.
    Login DIR-865L Amplifi Cloud Router 5700 web-based configuration page

  4. Setup D-Link DIR-865L Amplifi Cloud Router 5700 With Cable Internet Connection

    If you have a cable Internet connection, you must configure it with the option Dynamic IP. You need to clone your PC's MAC address to validate the connection between router and cable modem.

    Please note that you have to clone the MAC address of the computer which you used at the time when you configured the cable modem. It is because that specific MAC address is registered with your cable broadband ISP.

    1. Select Dynamic IP(DHCP) from the drop-down menu to configure D-Link DIR-865L Amplifi Cloud Router 5700 with your cable Internet connection.
      setup D Link DIR-865L Amplifi Cloud Router 5700 with Cable broadband

    2. Now click on Clone your PC's MAC address and save settings
    After this step, you can share Internet from your cable modem among multiple computers connected to D-Link DIR-865L Amplifi Cloud wireless Router 5700.

  5. Setup D-Link DIR-865L Amplifi Cloud Router With DSL Internet Connection

    While configuring it With DSL modem, you must ensure that the third octet of the router IP address is not same as the 3rd octet of DSL modem IP address. For example, the modem IP address can be anything 192.168.X.1, where X cannot be 0.

    If modem IP address is 192.168.0.1, we have to change the IP address of D-Link DIR-865L Amplifi Cloud Router to 192.168.1.1

    1. Select the option PPPoE (Username/Password) from My Internet Connection drop-down menu.

    2. Enter the details supplied by your Internet Service Provider such as username, password, etc..
      setup D-Link DIR-865L Amplifi Cloud Router with DSL broadband

      Click on Save settings.
Now we have successfully configured Internet connection on D-Link DIR-865L Amplifi Cloud Router 5700 with the ISP.

  1. DSL-2520U ADSL2+ Ethernet/USB Combo
  2. Reset Microsoft Notepad To Default Settings
  3. Turn Windows Search In to Instant Internet Search

To learn more about how to configure a D-Link router manually with cable and DSL broadband connection click on the link below.
How to Setup D-Link Wireless Router Manually

In this article, we have learned how to configure D-Link DIR-865L Amplifi Cloud Router 5700 with both cable Internet connection and DSL Internet connection.

  1. Configure Linksys WRT54G
  2. Make a Program Starts Automatically
  3. Netgear R6300 Gigabit

Now let us check how to configure the modem with one of the leading broadband service provider(DSL connection). To learn more about it click on the link below.
How to Configure Broadband On BSNL Teracom Modem

Configure D-Link DSL-2520U ADSL2+ Ethernet/USB Combo Router/Modem

D-Link DSL-2520U ADSL2+ Ethernet/USB Combo Router is a high-speed ADSL Modem with routing feature. DSL-2520U can support up to 2 Mbps upstream and 24 Mbps downstream. You do not need extra Firewall protection If you are using DSL-2520U ADSL2+ Ethernet/USB Combo Router as ADSL modem. It is because DSL-2520U has its own built-in firewall. Another advantage of using D-Link DSL-2520U is the NAT firewall and SPI support for your network.

Since it is a modem cum router with DHCP feature, you do not need another device to share the Internet connection among multiple computers in your network. You can connect a computer to DSL-2520U ADSL2+ Ethernet/USB Combo Router with Ethernet cable(RJ 45), and USB cable.

Are You Facing Slower Internet With D-link?

Configure D-Link DSL-2520U ADSL2+ Ethernet/USB Combo Router


In order to configure D-Link DSL-2520U in your network, follow the instructions below.
  1. Connect the Phone cable (DSL line) to the WAN/Internet port of D-Link DSL-2520U ADSL2+  as specified by the ISP

  2. Connect D-Link DSL-2520U to Your Computer using an Ethernet cable

  3. Power on the device and type 192.168.1.1 on the address bar of a browser and log in to the web-based setup page using following details.

    Username: admin
    Password: admin

  4. Click on Quick Setup and check the box DSL Auto connect
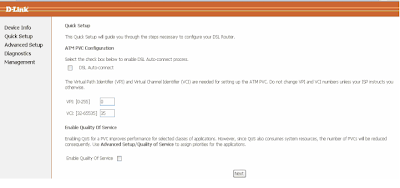
    connection

    Click on Next

  5. Enter the VCI/VPI values provided by your ISP to configure Internet connection on your DSL Modem
    Enter VCI VPI details

    Click Next

  6. Select the connection type as specified by your ISP

  7. Configure D-Link DSL-2520U ADSL2+ Modem in PPPoE

    If your ISP provides username and password to connect to the Internet, you should configure D-Link DSL-2520U ADSL2+ in PPPoE Mode. The advantage of configuring D-Link DSL-2520U ADSL2+ modem is that you can connect multiple computers to this device and share the Internet connection among them. Steps to setup D-Link DSL-2520U ADSL2+ modem in PPPoE mode is provided below.

    1. Select the connection type PPP over Ethernet(PPPoE)

      PPPoE
      click on next.

    2. Enter the Username and password provided by your ISP
      configure PPPoE connection with your D Link modem

      click on next

    3. Check Enable NAT and Enable Firewall
       
      Enable firewall and NAT

      Click Next

    4. You must enable the DHCP server to connect multiple computers to this D-Link Modem. Modem IP address is 192.168.1.1 and Subnet Mask is 255.255.255.0
      Enable DHCP in Dlink modem

      Starting IP address is 192.168.1.2 and the end IP address is 192.168.1.254, Subnet Mask is 255.255.255.0. Now click next

    5. Now you are in the summary page.
      reboot Dlink modem

      Click on save, and D-Link modem starts to reboot.


  8. Configure D-Link DSL-2520U ADSL Modem in Bridge Mode

    If your ISP wants your modem configured in bridge mode, you can follow the steps mentioned here to setup D-Link DSL-2520U ADSL2+  in bridge mode. The issue with bridge mode is that you can connect only one computer to the D-Link DSL-2520U ADSL2+ modem and that computer will get the public IP address provided by ISP. Since there is no option to enable DHCP, you cannot use it as a router. You also need to use an external firewall if you are configuring D-Link DSL-2520U ADSL2+ modem in bridge mode because the built-in firewall is disabled in bridge mode.

    1. Select the connection type Bridging
      Connect mode

      click Next

    2. Check Enable Bridge Service
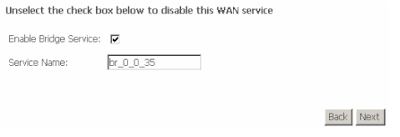
      Enable Bridge service

      Click Next

    3. Enter the modem IP address as 192.168.1.1 and Subnet Mask 255.255.255.0

      Click Next

    4. Now we are at the final page of bridging D-Link ADSL Modem.

      Click Save. Now Dlink modem starts to reboot

Security Features of D-Link DSL-2520U

D-Link DSL-2520U ADSL2+ Ethernet/USB Combo Router is able to detect common attacks including DOS attack, port scan attack, etc.

  1. How To Reset Microsoft Notepad To Default Settings
  2. Turn Windows Search In to Instant Internet Search
  3. Reset BSNL Modem to Factory Default

To learn more about DOS attack and how to prevent, click on the link below.
What is DoS Attack and How to Prevent it

If you have configured D-Link DSL-2520U ADSL2+ Ethernet/USB Combo Router in bridge mode, you cannot use the router feature of this device.

  1. Precautions For ROM-0 Router Vulnerability
  2. Setup Linksys WRT54G in PPPoE Mode
  3. Make a Program Starts Automatically When Your Computer Boots

You need an additional router to connect and share the Internet among multiple computers in the network. To configure a D-Link router, visit the link below.
How to Setup D-Link Wireless Router Manually

Turn Windows Search In to Instant Internet Search Engine Google & Bing

If you are using Windows computer, you can configure your default Windows Search(WS) in the start menu to conduct an instant search on the Internet without opening the browser and visiting Search Engines (SE). You can turn Windows Search into your favorite SEs like Google, Bing or Yahoo and use the power of your favorite SE to Search Internet instantly using WS. Here in this tutorial, you can see steps to convert default Windows Search to your favorite Internet Search Engines like Google and Bing.

For this, we have to access Group Policy edit on your computer where we can configure it without any issues. This feature is available in Windows10, Vista, 7 and 8.


Configure Custom Instant Search Internet Search Provider On Your Computer

  1. Type gpedit.msc on Run or Search and press enter

  2. Click on User Configuration, and select Administrative Templates

  3. Click on Windows Components, and select Instant Search
    Use Google or Bing Search from Start Menu

  4. Double click on Custom Instant Search Internet Search Provider

  5. Select Enabled
    Convert

  6. Turn Windows Computer Search into Google

    To convert WS on your computer to Google Instant, follow the steps below.
    1. Enter the name of the Search under "string" (Eg: My Google)

    2. Type the following string under the URL to use when invoking the custom Internet search.

      http://www.google.com/search?q=%w

      Now click on Apply.

    3. Now type a string on WS and see if you can see the Instant Internet Search Provider.
      show Google

  7. Convert Windows Search to Bing Instant

    To convert Windows search on your computer to Bing, follow the steps below.
    1. Enter the name of the SE under string (Eg: My Bing)

    2. Type the following string under "the URL to use when invoking the custom Internet search".

      http://www.bing.com/search?q=%w
      how to add

      Now click on Apply.
Now you know how to convert default WS in the start menu into Instant Internet SEs like Google and Bing. There is one more method to show it on Microsoft menu without configuring the "Custom Instant Search Internet Search engine Provider" settings in Group Policy edit.

  1. Remove Background Of a Photo Using Microsoft Paint Application
  2. Disable and Restart Windows Update Service
  3. Reset SBI Profile Password Without Explanation

To learn more about it and show a link to "Search the Internet" on start menu click on the link below.
Add Google On Windows 7 Start Menu

  1. Reset Microsoft Notepad To Default Settings
  2. Configure D-Link DSL-2520U ADSL2+ Ethernet/USB Combo Modem
  3. D-Link DIR-865L Amplifi Cloud Router 5700

Here in this article, we have edited the way default WS works. Now onwards Windows search will work as the preferred Search Engine configured from GPedit.

  1. How to Reset BSNL WiFi Modem
  2. How To Identify Low-Quality Backlinks
  3. Ultimate Trick to Force Google to Index a New Website Manually

Similarly, if you want to know how to edit the boot menu, click on the link below.
How to Edit Boot.ini and Windows Default Boot Menu Options

How to Reset BSNL Modem to Factory Default Settings

Bharat Sanchar Nigam Limited (BSNL) is one of the leading Internet Service Providers in India. Though they provide a preconfigured modem while taking Internet connection, we may need to reset and reconfigure it due to several reasons. If you forgot the username and password set for BSNL modem, you might need to change it to factory default and reconfigure it. Another reason to reset BSNL Gateway is to fix some network connectivity issues. This article is for those who want to reset BSNL modem to factory default settings.

There are two different methods to reset a BSNL modem to factory settings. They are soft and hardware reset. In soft reset, we should log in to the BSNL modem configuration page and select the option to restore default or factory default.

If you do not have the modem username and password, you cannot perform this procedure. It is because without login details you cannot log in to the settings page. In that case, the only option left is to perform a hard reset.

In this tutorial, you will see both methods irrespective of the modem vendor and version.


Soft Reset BSNL Broadband Modem
  1. Login
    1. Type 192.168.1.1 on the address bar of your browser and press enter
      how to reset a BSNL type 2 modem

    2. Enter admin as username and password

  2. Click on the Admin tab

  3. Click on Reboot
    forgot BSNL login password

  4. Select the factory settings and click on reboot

Software reset will help you to fix any wrong entries you have made. It can rectify any wrong Internet and wireless settings.

Though this method is helpful, you cannot perform it when you are unable to login to the settings page. In that case, you must go for the second method.


Hard Reset BSNL Teracom Modem
You can find a reset button on the back side of your BSNL modem. You have to press it using a pen for at least 30 seconds. You have to ensure that the power light is flashing while you are doing it.

To learn more about performing it, follow the instructions provided in the link below.

How to Conduct Hard Reset on a Device

After perming the above step, you need to reconfigure the device from the factory default. To configure wireless after it, follow the link below.

How to Enable Wireless On your Broadband Device

The Internet is not available In factory default state, and you must reconfigure the device. To learn how to configure various versions of BSNL modems, click on the links below.


  1. This link explains the steps to configure Teracom modem with BSNL connection after resetting it.
    How to Configure Teracom Router

  2. After resetting WA 3002 G4 BSNL Modem, to reconfigure it, follow the steps in the link below.
    How to Setup WA 3002 G4 Router

  3. You can use the above methods to reset Nokia Siemens Residential Router 1600. After resetting the device, to reconfigure it, click on the link below.
    Setup Nokia Siemens Residential Router 1600

  4. We can reset WA3002 -g1 UTStarcom ADSL Router by the methods explained in this guide. To reconfigure the device, click on the link below.
    Setup WA3002 -g1 UTStarcom ADSL Device
Some of the recent tutorials published on CoreNetworkZ.com
  1. How to Solve USB Tethering Error On Android Phone
  2. Turn Windows Search In to Instant Internet Search Engine
  3. Change Microsoft Notepad Default Settings
  4. D-Link DSL-2520U ADSL2+ Ethernet/USB Combo Router

How To Identify Low Quality Backlinks to My Website

There was a time when every link pointing to our websites gave PR hike and keyword ranking. After Penguin updates, low quality backlinks neither help nor improve the PR of our websites. Penguin update penalizes websites having a lot of low valued backlinks. It is the hard time where webmasters are eagerly looking for any bad links pointing to their website and remove them before causing more damage. This tutorial helps you to identify lower quality backlinks and assist you to neutralize them.


Google webmaster tool has added disavow feature to help webmasters to neutralize spammy backlinks indexed by Google. All you have to do is to upload the list of lower quality backlinks using this too. Now I am asking you a few important questions.

  • Which links are lower quality links?

  • Which type backlinks may harm your website?

  • How do we find whether a backlink good or bad?

  • Is there any tool to find low-value web pages pointing to our websites?

These are the common questions asked by every professional webmaster. After reading this article, you will learn how to check which type of links can harm the SEO value of a website.


Factors Decide the Quality of an External Link Pointing to Our websites
How to find if a backlink to my website is a quality one? Different webmasters and SEO consultants have different opinions about the total value of a backlink. The below list shows the most accepted qualities of a high-quality backlink.

If one link does not satisfy the following conditions, we can say it a low-value backlink.

  1. The Relevance of the web page:

    The first and most important factor which decides the value of a backlink is the relevance of the linking page with the linked page. If your website gets a backlink from an unrelated web page, it is a low-value backlink. Links from irrelevant web pages can attract Penguin effects.

    For example, any reference from a cosmetic blog post to an electrical website is a low-value link.


  2. The Number of External Links From a Page:

    If we acquire a backlink from a web page with 100 links, Google does not give much weight to it.


  3. Page Rank of the web page: (Google no more updates public PR ):

    We should consider the Page Rank(PR) of the page from which we get backlinks. A backlink from high PR Page will give more value.


  4. Domain Authority and Trust:

    References from a trusted source have more value than the web pages with less Domain Authority. Backlinks achieved from a trusted website in the same niche are high-quality backlinks.


  5. Nofollow Attribute:

    Links without having a nofollow attribute pass PR juice to linked webpage. Though there is a discussion going on about whether nofollow blocks entire PR juice, I prefer links without having nofollow attribute to my website.


  6. Editorial Review:

    Google likes backlinks from a post published after a strict editorial review. One from user-generated content, not reviewed by moderators, is considered as a low-quality backlink.


  7. Automatic Link Building:

    Links built by automatic tools are low-quality backlink and which may even attract Penguin penalties.


  8. Links From Duplicate Content:

    References from duplicate content cannot be quality backlinks. They should come from unique quality content to become considered as quality backlinks.

  9. Google Loves Natural Links:

    We know Google loves natural links which are added by time on other websites by respective webmasters who are impressed by the high-quality content on our website. According to Google guidelines, any backlinks artificially created are treated as low quality.


Quality backlinks help our websites to get high keyword rank in Google. Also, we know the importance of them to help Google spiders to index a webpage.

  1. Tools To Check Historical Design Of a Website
  2. Prevent Others From Copying Your Adsense Code
  3. Can Guest Blogging Attract Google Penalty?

Search Engine spiders follow them and index any unindexed pages.

  1. How Much Bloggers Earn From Google AdSense Per Month?
  2. How to Change Blogspot Blog Address from Blogger Settings
  3. Turn Windows Search In to Instant Internet Search Engine

If you face any indexing issues with your website, follow the method mentioned in the article below to rectify it.
Tell Google to Index My Website Manually From Webmaster Tools Account

The number of total links on a linking page is an important factor which decides the number of authority passes.

  1. Tips to Improve Alexa Rank
  2. Update Firefox Browser to the Latest Version
  3. Godaddy Error: This Domain is Already Assigned to an Account

It includes both nofollow and dofollow links. To learn more about it click on the link below.
Do You Use Nofollow For Internal Linking on Your Blog?