Configure Nokia Siemens C2110 ADSL Modem to Setup BSNL Internet

Updated by: Alex George on October 04, 2010
BSNL provides Nokia Siemens C2110 ADSL Modem for users who opt not to take wireless modem. It has routing feature but does not have WiFi. Since it has DHCP server, we do not need to buy an extra router to share Internet among multiple computers. However, C2110 has just one LAN port and one USB port. So you must have an additional device known as a switch to share the Internet with multiple computers. Nokia Siemens C2110 ADSL Modem is best suited for BSNL customers who want Internet on just one computer. This tutorial explains how to configure broadband on Siemens C2110 ADSL Modem and instructs how to connect a switch to share the broadband among multiple devices.


Boost BSNL Broadband Speed

Configure Broadband On Nokia Siemens BSNL C2110 ADSL Modem
  1. Connection

    Connect LAN port of C2110 to a computer using an Ethernet cable. Make sure the device is on.

  2. Login

    Type 192.168.1.1 on the address bar of your browser and press enter.

    When a user login window comes it will prompt you to enter a username and password.


    Default Nokia Siemens BSNL Modem login username and password are:

    • Username: admin
    • Password: admin

  3. Configure Internet

    To configure the Internet in Nokia Siemens BSNL Modem, you should follow the steps below.
    DSL

    • Click on Configuration

    • Click on Internet
      create

    You should delete all the default connections shown on this page. You can select the connection and click on delete symbol.

  4. Create a new connection

    • Click on add to create a new connection

    • Enter the following details.

      1. PVC Name: PPPoE
      2. VPI : 0
      3. VCI: 35
      4. After entering the details click on Next.

    • Now enter the following details.

      1. Encapsulation Type: LLC/SNAP
      2. Encapsulation Mode: Bridged

      Then Click on Next.

    • In this page, you may need to select Obtain an IP address automatically.


      You should enable NAT and Default Route if you wish to connect a switch and share Internet among multiple PCs. After selecting this, click on next.

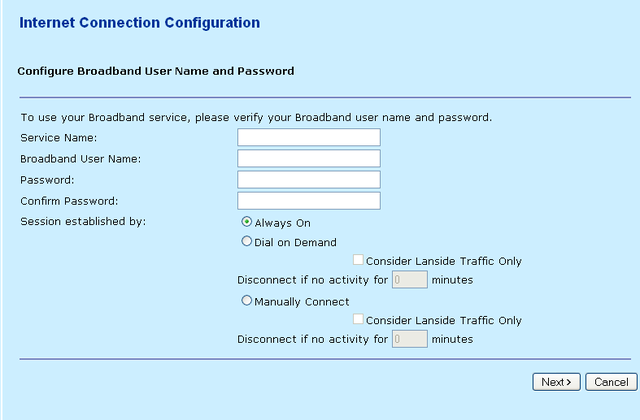
    • Here you should enter the username and password given by BSNL. Service name should be BSNL. After entering the details click on next and on confirmation page click Apply. It is important to type the broadband service username in the right form. Do not forget to add @ part if you are given the username as an email address by ISP. If you have any doubts, you must contact technical support immediately.
      user

  5. Reboot

    After finishing the setup you should reboot Nokia Siemens BSNL modem. To reboot, follow the steps below.

    • Click on Admin

    • Click on Reboot

    Select the option Reboot from last and click on Reboot button in the bottom. It may take a few minutes to come back your modem.

Other Articles
  1. How to Enable Wireless in BSNL Broadband Devices

  2. Setup Wireless in WA3002- g1 UTStarcom BSNL Type 2 Gateway

  3. How to Configure Belkin Wireless Router

  4. Setup BSNL Teracom Wireless and Security

Technology Blog

Author: Alex George

Author

Alex George is the Chief Editor and founder of CoreNetworkZ Tech Solutions. He is a senior software developer with 20 years of experience.

You can contact him at alex.george@corenetworkz.com.

Activate Disabled WiFi On BSNL Wireless Modem

Updated by: Alex George on September 03, 2010
BSNL is the leading Internet Service Provider in India. They offer wireless modem with routing capability for their users. Since the modem has DHCP server, users can connect multiple computers to it both by using Ethernet cable and WiFi. This tutorial explains how to manage BSNL WiFi by tweaking it. Issues like disabled WiFi and weak network security are addressed in this guide. It also explains the steps required to enable disabled WiFi functionality on a BSNL modem and strengthen the protection by preventing unauthorized people from accessing it.


Steps to Manage Wireless in BSNL Wireless Modem
  1. Login

    Type 192.168.1.1 on the address bar of your browser and press enter.


    Now you need to enter the user name and password set for your BSNL modem. By default it is:

    Username: admin
    Password: admin

  2. Click on Configuration

  3. Click on Wireless Network

    Here you can manage basic settings of WiFi. You can either turn off or turn it on  from this page by selecting the right button. If you want to change the WiFi name, all you have to do is to delete the current entry at SSID and type the desired name.

    Procedure to Configure BSNL Wireless
  4. Prevent Unauthorized Users

    By default BSNL WiFi is unsecured and anyone can join it and share the broadband connection without your knowledge. You can prevent this by enabling protection. BSNL supports WPA and WEP. You can choose the suitable one from the list below. Do not forget to take note of the key generated because now onwards, you cannot join the network without entering the key.
    Secure

Filter Based On MAC Address

If MAC address filtering is activated on BSNL Modem, users will find issues with joining Wireless network even though they have the right username and password if MAC address of their devices is not in the white list. If anyone face issues with connecting to your network, you must go to the setup page and check under MAC filtering. Here you check the status of MAC filtering. If MAC filtering is activated, you must turn off it to resolve the issues with accessing BSNL WiFi network. It is important to note that BSNL modem supports two types of filtering, white list, and blacklist. If you have added a particular computer under blacklist, that computer will not be able to access the network. If you have enabled white list, only computers which are under white list are allowed to join the BSNl wireless network.

Wireless Channel

Another point we must check while facing connectivity issues is to change the current Wireless Channel. We can use channel 1, 6 and 11 for the best connectivity. If you are using channel 1, I recommend you to try channel 6 or 11.

Related Articles
  1. Configure Teracom Router

  2. Configure WA3002- g1 UTStarcom

  3. How to Setup Belkin Router

  4. How to Configure Linksys Range Expander WRE54G

Technology Blog

Author: Alex George

Author

Alex George is the Chief Editor and founder of CoreNetworkZ Tech Solutions. He is a senior software developer with 20 years of experience.

You can contact him at alex.george@corenetworkz.com.

How to Reset a Router or Modem - Hard Reset and Soft Reset

Updated by: Alex George on June 10, 2010
In many instances, we need to reset router or modem as the part of troubleshooting steps. Before explaining how to reset your router, you should understand what is reset. By resetting your Router / Modem, your device will go back to the factory default settings and again you may need to configure it. So before resetting your router, you should better learn how to reconfigure your router or take the backup of current device configuration.


When should I reset my router?
There are some situations like your router or modem stops responding or configured the device incorrectly, you may need to reset your device. Sometimes after upgrading to the latest router /modem firmware, you may need to reset your router/modem as instructed by the manufacturer.

In rare cases, if you forgot the router login password, you may need to reset the modem to set a new password. So the major reasons to reset a modem or router are:

  1. To reset incorrect Router/Modem settings

  2. Malfunctioning of Modem or Router

  3. Forgot Router or Modem password. To read more about this scenario click on the link below.
    I Forgot My Router Password and How to Recover It

  4. Reset a modem or router as part of the firmware upgrade process


Different methods to reset your router


There are three different types of router resetting.

1. Soft Reset

2. Hard Reset

3. Power Reset


1. Soft Reset
Soft reset is done by selecting the reset options through the router administration page(web interface). Depends on various firmware and manufactures, these options come in various forms like a reset to factory default, reboot with factory settings etc.

You should select the particular option and click OK. Now the router starts rebooting and within one minute it will be back with default factory settings. This kind of reset is known as soft reset.


2. Reset by holding the reset button (Hard Reset)
If a soft reset is not working for you, next option is holding the reset button of your router for 30 seconds and release your hands after it.

You can find reset button usually near the power button a small hole which can be pressed by pen tip or pin. Procedure to hard reset your router and modem are:

  1. Hold reset button using a pen tip or pin for 30 seconds

  2. Make sure power light is blinking while pressing the reset button

  3. Release your hands after 30 seconds and wait for one min(make sure power light is steady).
    Now your router has factory default settings.


3. Power Reset a Modem or Router
If the normal reset didn't work on your router, you can perform a hard reset. It is the most powerful reset form for any kind of Small Office Home Office devices(SOHO) like routers and modems. Steps to power reset your router are:

  1. Hold reset button for 30 seconds (make sure power light is blinking)

  2. Unplug the power cable (never release your hands from holding reset button) for 30 seconds

  3. Connect the power cable and still hold the reset button for 30 seconds

  4. Release your hands now (you are continuously holding the reset button for 90 seconds)

  5. Now wait one minute and make sure power button is steady.

It is recommended to perform a power cycle after resetting your modem. To learn how to do this, click on the link below.
How to Power Cycle a Modem or Router

Author: Alex George

Author

Alex George is the Chief Editor and founder of CoreNetworkZ Tech Solutions. He is a senior software developer with 20 years of experience.

You can contact him at alex.george@corenetworkz.com.

How to Check My Tata Photon Plus Internet Usage and Bills

Updated by: Alex George on January 25, 2010
I have been using Tata Photon Plus service for one month while my roommate is using Reliance Netconnect for his Laptop. We have chosen different wireless broadband services for our laptops because of the concept "Don't put all your eggs in one basket". I purchased my Tata Photon Plus wireless USB modem from their online store instead of the local dealer. It is because there was an offer (Laptop bag worth of 1.5K ) for every online Photon Plus purchase.

Update: Special offers are purely up to the time to time decisions made by Photon plus marketing team and I am not sure they offer the same at this point in time.


I received the packet including Photon plus modem (with a small delay) and the Internet is working fine (Though I am not getting 3.1Mbps what they offered) with reasonable speed. Seems everything fine but now only I noticed one issue how to check my Internet usage ?. In the manuals I received, it is written that you can check the Photon Plus Internet usage by login to online Photon Plus account but I didn't receive any online account details. Then I followed the online instructions and found that we need to create an account first using our connection number and tata photon plus account number instead of a ready-made account usually provided by ISPs.


Then the second problem... I don't know what is my account number and connection number. The local Tata photon plus agents activated the device on my computer and went without giving any clues. Somehow I found the Photon Plus account number by checking the mails (e-bill) and find the connection number via photon plus customer support. Now only I understood I am in time-based plan instead of data based plan. Right now I send a request to tata photon plus customer support to change the plan and waiting for their response.

Update: Successfully changed to data based plan (Took just one day only).


Tips to Increase your Photon Plus Broadband speed

You can increase the actual speed of your photon plus Internet connection. To know the tip click on the link below.
How to Increase Broadband Internet Speed on your Computer


Useful details and links for Tata photon plus users:
  1. Tata Photon Plus Customer Support number: 1800-266-121 (Toll-Free number)
  2. Troubleshoot Photon Plus connectivity issues: Check connectivity issues in a Network
  3. Tata Photon Plus Customer Care email address: customer.care5@tatatel.co.in
  4. Tata Photon Plus Online Store: http://www.ichoose.in/etrade/
  5. Check you Photon Plus Speed: Check Internet Speed
  6. Supported Photon Plus Modems in Linux: Linux Supported Tata USB Modems
  7. How to create a new Photon Plus user account: http://www.tataindicom.com/myaccount-new-user.aspx
  8. Customer care number for prepaid Photon Plus users can be found in:

    http://www.tataphoton.com/customer-service.aspx

    PS: Select the Tata service and your location to get the customer care number.
  9. How to configure your Tata Photon Plus Modem is Linux computer: How to Configure Tata Photon Plus USB Modem in Linux PC
  10. Check Photon plus Internet usage and Bills :

    Log in to my account in http://www.tataindicom.com/ by entering the photon plus phone number and password created.

Compare Tata Photon Plus With Other Mobile Broadband Services

I think if you are not yet started using Photon Plus service, you may be wondering to have a comparison between other wireless broadband services. Let me tell you frankly the speed and reliability of any mobile broadband service depends on the signal quality at the user location. So it may not be true if I say Photon plus is faster than BSNL Wireless broadband (WiMAX )or vice versa. It purely depends on how good the signal quality of WiMAX service and Photon Plus service. So my recommendation is to tell the service provider to show a live demo of the Internet speed at your location before taking the final decision. Nowadays you can see a lot of advertisements about the unlimited Internet Usage Plans by Photon Plus and Other service providers. Before biting the ads it is your duty to read carefully the conditions to use unlimited usage plans. You may not expect the same speed after crossing the threshold (for example 3GB download) and after crossing the threshold download value, your service may be degraded to 2G automatically. I think it will be helpful for you if I leave links to my articles about other major wireless broadband service providers.

  1. Photon Plus and Reliance Netconnect:

    If you are looking for a comparison of Tata Photon plus service and Reliance Netconnect, I suggest you read my article about the later by following the link below.
    Reliance Netconnect Wireless Broadband Service

  2. Photon Plus and Idea Net Setter:

    Just like Photon plus service, another market leader in wireless broadband service is Idea Net Setter. Though Photon Plus use CDMA, Idea Net Setter is 3G (GSM). To learn the speed difference between Photon Plus and Idea 3G at your location, better you can go to their official sites or ask the representatives to give a live demo. To read about Idea 3G broadband, click on the link below.
    How to Configure Idea 3G Broadband On your Handset

  3. Photon Plus and BSNL WiMAX (3G EVDO):

    Just like Photon Plus by Tata, BSNL also has 3G broadband service. One of the differences between BSNL EVDO service and Photon Plus is the difference in technology. Photon Plus use HSIA while BSNL uses "Evolution-Data Optimized". To learn about BSNL 3G follow the link below.
    BSNL 3G Wireless Broadband Configuration
Technology Guide

Author: Alex George

Author

Alex George is the Chief Editor and founder of CoreNetworkZ Tech Solutions. He is a senior software developer with 20 years of experience.

You can contact him at alex.george@corenetworkz.com.

Newer Posts Older Posts Home