menu
close

How to Hide Windows Computer From Other Devices On The Network

If you don't want other network computers and devices to find your Windows PC, you can simply do it by turning off Network Discovery on your computer. Network discovery is a Windows feature which lets your PC to see other devices on the LAN and let others see your PC too. If you turn off network discovery on your PC, you will be invisible to other devices on the LAN. The downside is, your computer will also not find any other devices on the LAN. So if you are OK to be invisible to other devices and be ready to don't find other too, proceed further.

How to Turn Off Network Discovery On Windows & Make Your Computer Invisible
To turn off this feature on a laptop with Microsoft OS, you should go to advanced sharing settings. Steps to go there and disable this feature are:
  1. Go to Control Panel

  2. View Control Pavel icons by Large icons.
    invisible

    Click on Network and Sharing Center

  3. Click on Change advanced sharing settings
    Prevent others

  4. Check Turn off Network discovery under current profile.
    Turn off

    You may need to click on chevron to expand the current profile.

After selecting the radio button to turn off network-discovery, other devices in the LAN will be prevented from seeing your laptop. This may make file and printer sharing a little difficult between your laptop and another device in the LAN because you are invisible to them. If you do not share anything with other devices, this feature is additional security for you. If you are sharing resources with others, these settings will make you work difficult.

Turn On Network Discovery to Make Your Computer Visible
To make your computer visible to other devices connected to the same LAN, follow the steps1 to 3 and then select the checkbox Turn on network discovery. Now onwards there will be no issues for other devices in the same LAN to see you.

We have seen how simple to make a windows computer invisible to other other members in the same LAN. Similarly, it is very easy to enable default user logon picture to all users in a laptop. To learn the trick click on the link below.
Enable Default User Login Picture to all users in Windows 7, 8 and Vista

Posts You Might be Interested
  1. Different Methods to Access Services Window On Your Laptop

  2. An Error Occurred While Trying to Share Folder Over a LAN

  3. How to Disable USB Ports from Registry On Your Laptop

  4. List of Best Free LAN Messengers With Download Links

No: Recent Posts
Access Services Window in Windows 10
You Don't Have Administrative Rights To Run The Command
Getting 169.254.X.X (APIPA) Windows Automatic Private IP Address
Ping Gives Hardware Error
Disable iPod Service On Windows
Default User Login Picture to all users in Windows 10
PING: Transmit failed. General Failure
Ping Request Could not Find Host
Error 628: The Connection was Terminated by the Remote computer
Error 797: A Connection to the Remote Access Server was not Made
Adobe Flash Player has Stopped a Potentially Unsafe Operation
A lot Of Backlinks Suddenly Disappeared
Disk Boot Failure
How to Reset BSNL WiFi Modem
Check Reliance Netconnect Usage Bill
Destination Net Unreachable


How to Check Optimium MTU Size Value Of Your Network

MTU (maximum transmission unit) tells the maximum possible size of the packets to send from your network. It is important to set the optimum MTU size to achieve the maximum throughput through your network. As the packet size increases, we can expect more efficiency with a downside of increasing lag time. So it is important to have the correct Maximum Transmission Unit size set for your network. Different media have different MTU value. For example, 1500 is the optimum value for EthernetV2 but 1492 is the optimum MTU value for PPPoE. There is a ping command to check whether your current Maximum Transmission Unit value is the optimum size for your network.

Ping Test to Determine Correct MTU Size of a Network
As we know it is important to have the correct size set. We can determine if the current value set is correct by doing a simple ping test.
  1. Open Command Prompt

  2. Type ping [Destination Address]–f –l [Testing MTU Value]

    Eg: ping www.corenetworkz.com -f -l 1472

  3. If you receive proper replies from the destination, the size you have tested is the standard/optimum value for your network.

  4. If you have received an error message Packet needs to be fragmented but DF set, the MTU size you have tested is too big for your network.
    Test your current MTU size

    To learn more about this message, visit the link below.
    Packet needs to be fragmented but DF set
The above image tells the result of the ping test to determine the optimum MTU value for the network I am using. 1480 is too big for my network and that is why here I received the error message instead of replies from the destination. Similarly, you can change the TTL value for ping packets send from your computer.
How to Change Default TTL Value Set On Ping Packets

If you find the current Maximum Transmission Unit value set for your network is not the optimum value, you must change it immediately to get the maximum throughput for your network. You can change it on your Modem or Router which is used on your network. Similarly, you can change the size of ping request packets sent from your computer.
How to Change Default Size of Ping Echo Request On Your Computer

How to View Computers Connected to Netgear Wireless Network

Netgear wireless router has an awesome feature to find the connected devices to the router. That includes computers and other devices connected by wireless as well as by Ethernet cable. This feature helps to find if any unauthorized device is connected to your wireless network. It is very important to ensure that no other device is connected to your wireless network and your wireless network is safe. You can check the connected devices to your Netgear wireless router from "Attached Devices". Attached Devices is a table which shows the device name, IP address and MAC address of all the connected devices to your Netgear router.

How to Check Connected Devices in Netgear Wireless Router
To check the connected devices in your Netgear wireless router, follow the steps below.
  1. Login to Netgear Wireless router. To learn how to login to Netgear router click on the link below.
    How to Login and Configure Netgear R6300 Gigabit Router

  2. Click on Attached Devices (You can see this under Maintenance)
    how to see unauthorized computers connected to my wireless network

  3. Check the IP address, MAC address and device name from the attached device table.
    Check someone intrude my wireless network

    So it is easy to find out if anyone intrude your wireless network.

Make Sure Netgear Wireless Network is Safe & Prevent Intruders
This tutorial tells the procedure to check computers connected to a Netgear Router. By checking device details it is easy to find out unauthorized computers and other devices connected to the Netgear router either by wireless or by cable. Having secure wireless encryption enabled on your wireless network, you can protect your Netgear wireless network from hackers and other intruders. To learn this click on the link below.
Enable Wireless Security (WPS & WPA)On Netgear R6300 Wireless AC Dual Band Router

Attached Devices and Internet Usage Though Netgear Router
We know by periodically checking the connected devices, we can ensure the safety of our Local Network. Netgear attached Devices feature helps to monitor devices connected to our router. Netgear router also tells the total Internet usage through Netgear router. To learn more about it click on the link below.
Check The Internet Usage on Netgear Router By Traffic Meter

Calculate Normal AdSense Click Though Rate ( CTR ) Of Blogs & Forums

Once approved by Google AdSense, every blogger starts calculating the possible income from their blogs and websites. One of the important factors that decide revenue from Google AdSense is the Click Through Rate or simply CTR. It is the number of clicks on Ads displaying on your blogs out of 100 page views. If if you have 4 clicks on your ads out of 200 Ad views, the AdSense CTR is 2%. It is difficult to say a standard AdSense CTR for bloggers because there are many factors affecting the ClickThroughh Rate. However, we can say any value from 1% to 3% are normal.


How to Calculate CTR
CTR is the acronym of Click Through Rate and is very important in calculating the total income generated. It is calculated by dividing total clicks on your ads by the total ad impressions. So in a nutshell


CTR = Total Clicks/ Total impressions


Factors Affecting Normal AdSense CTR Of Blogs and Forums
Number of clicks on advertisement units can be varied depends on many factors like Ad placement, the relevance of advertisements showing on your blog with the content etc. Normally targeted traffic like visitors from Search Engine to your blog tend to click more on ad units. List of factors influencing normal Google AdSense Click Though Rate of an average blog are:
  1. Ads placement

  2. Relevance of Ads displaying

  3. Number of Advertisement units displaying

  4. Niche of the blog

  5. Blog theme

How to Find CTR of AdSense Ads On Your Blog
You can find it by using the simple formula below.


CTR = (Total Clicks on AdSense Ads/Total Ads views ) * 100


Average CTR Of a Blog & Forum
We know CTR plays an important role in total AdSense income of a blog and forum. This article just discussing the average Click Through Rate of blogs and forums. As we discussed above, it depends on various factors and the type of visitors it attract. If your website is a technology oriented or webmaster oriented, the number of expected clicks is very less. It is because technology savvy visitors tends to don't touch advertisements showing. It is same for webmaster forums and blogs too. Anyone who is familiar with online advertisements, usually avoid them. If your website attract less tech savvy people, you can expect a high number of click. It is because those users usually do not know the difference between user generated content and advertisements unit. They click every links including advertisements. So if you run a website which targets less tech people, chances of getting higher AdSense Click Through Rate compared to a tech website. To learn steps to have better  AdSense revenue follow the tips mentioned in the link below.
Increase Ad Revenue by Improving CPC and Click Through Rate of Ads On Your Website

 Tutorials You May be Interested
  1. How to Calculate CPC of Ads Displayed on Your Blog (Cost Per Click)

  2. How Much Traffic Needed to Earn $100 Per Day From Google Ad

  3. Tips to Increase Google Ad Revenue from HubPages
Home

How to Fix Broken Links Issues On Blogger Blog & Retain Search Rank

If your blog or website has broken links, that can hurt its search rank. Search Engines do not like websites and blogs with a lot of broken links because Search Engine spiders often get not found the result when they crawl websites with them. That prevent spiders from crawling them smoothly. Broken links occur when someone mentions a page that does not exist or removed. In Blogger, you can easily fix the broken link issues. To learn how to stop showing page not found when someone comes to your Blogspot site by clicking a link to the non-existing page and show a proper custom page to redirect the visitor.

Create Custom Page Not Found to Fix Broken Links On Blogspot Blog
We can create a Custom Page Not Found to display when a visitor comes to your blogger blog by clicking a broken link.
  1. Login to blogger account and go to the dashboard

  2. Click on settings and select Search preference under settings

  3. Now click on edit button near "Custom Page Not Found "
    Fix all blogspot damaged link issues with one click

  4. Here you can set a custom message or redirect for visitors who followed a broken URL.
    Blogger link not found issues and search rank

    Click on save changes

Now onwards any visitor comes to your Blogspot site by following a broken link will be redirected to the custom page instead of the post not found. You can add some of the popular page links on the custom page to retain the visitors. If you want to learn how to remove digits from blogger URL, follow the steps mentioned in the link below.
How to Remove Year and Month Date Figure From Blogspot URL

Redirect a Visitor Following a Broken Link to Specific Blog Post
In this tutorial, you have learned steps to deal with broken links in a blogger blog. However, these steps are not enough to redirect a visitor comes by following a link that was removed or modified to a specific post. To do that follow the steps mentioned in the link below.
How to Redirect a Blog Visitor to Specific Blogger Post

Dealing With Broken Links As Part of Changing to Custom Domain
If you add a custom domain name for your Blogspot blog, if something goes wrong, all the visits to your blog following the old URLs will be shown blog not found. So if you are planning to use a custom domain name for your blogger blog, to avoid page not found issues, you must do it correctly. To learn this visit the link below.
How to Set Up Custom Domain Name For blogger  Without Shattered URLs

Is Rundll32.exe a Spyware Or Threat

Rundll32.exe is one process you may see all the time in your Windows Task Manager. Many people doubt if this process is genuine or not. Rundll32.exe is a valid Windows process located at Windows\System32\rundll32.exe. The main function of this process is to start codes in dll files stored on your computer as the part of installed programs. We cannot use the functionality of dll files spread in our computer without rundll32.exe process. Since it is a Windows host process, to execute the functionality of dll files stored on your computer as the part of software installed, it is not a threat. However, there are some instances where some malware programs imitate the name and cause trouble on your PC. So it is always important to ensure the location of this program on your computer. If the location of it is not Windows\System32\rundll32.exe, you can ensure that the process is not genuine and your computer might be infected.


How to Check the Location of Rundll32.exe Host Process
To open the location of this program running on your PC, follow the steps below.
  1. Start Windows Task Manager by pressing [Alt] + [Ctrl] + [Delete] buttons together

  2. Click on the processes tab

  3. Right click on Rundll32.exe and click on open file location
    If Rundll32.exe is infected, how to fix

If you see the process is not running from the actual location, it is the time to start a full system scan using a reputed security program. If the location is Windows\System32\rundll32.exe, we do not need to worry. It is genuine and it is doing the legitimate duty assigned to it. However, any change in the location must be watched carefully. If it is not originated from the designated place, you have to act immediately to prevent further infection. Another important service on Windows computer is WLAN AutoConfig. To read more about it click on the link below.
Steps to Start WLAN AutoConfig on Windows Laptop

Without the help of Rundll32.exe, we cannot use the functionality and features of any dll (Dynamic Link Library) files on our computer. By using the feature of this Windows host process, we can tell any program installed on our computer to start automatically. To learn more about it, visit the link below.
How to Set a Program Run Automatically On Our Laptop

No: Recent Posts
Turn Off / On Windows Security and Maintenance Popups
Start WLAN AutoConfig (WLANSVC Service)
Getting 169.254.X.X (APIPA) Windows Automatic Private IP Address
Ping Gives Hardware Error
Add More Locations in Send To Menu
Destination Net Unreachable
Disable or Enable USB Ports from Registry & BIOS
Getting Error Code 0x80070424
How to Check Your Tata Photon Plus Internet Usage
Make Sure your Computer and Network are Safe
Don't Get Fooled by MacDefender a Fake Anti-Malware Program

Multiple Mozilla Firefox Browser Tabs Closing Warning Is Disabled

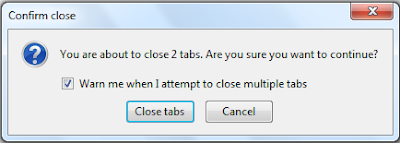
By default when you attempt to close Mozilla Firefox browser, you will get a warning you are about to close multiple tabs. Are you sure you want to continue? if more than one tabs are opened. You can disable this message by unchecking the checkbox at, warn me when I attempt to close multiple tabs. After unchecking the checkbox, you will not receive the alter again. Now the question, how to re-enable the alert while you attempt to close the browser when more than one sessions are open? You can always enable this option back from the options.

Just by unchecking the checkbox, you can disable this warning.
confirm firefox browser multiple tab closing

This alert is intended to prevent unexpected browser closing by a user without knowing the other open sessions. Some users find it annoying when they see this but sometimes this warning is very helpful because it reminds us of the presence of other open sessions. If you are not seeing the warning when closing Firefox, you are about to close multiple tabs. Are you sure you want to continue? by default or you have disabled it by yourself and wants to bring it back, follow the steps below.

How to Enable Warning While You Close Firefox When Multiple Tabs Open
  1. Press [Alt] and [T] together and click on Options
    Stop warning when I close multiple tabs on Firefox browser

  2. Click on Tabs and check the checkbox at warn me when closing multiple tabs
    enable multiple Firefox tab closing warning

  3. Click on OK to save the change

This tutorial is one of the easiest browser tutorials in CoreNetworkZ. Though it is very simple to re-enable the disabled alert when you close the browser when more than one sessions are opened, some users find it difficult to find where to enable it back. From Mozilla Firefox options we can enable or disable this warning. In certain cases, you may face issues with closing it completely on your computer. It means browser might be closed but some instances of it might be running on your computer. The below link tells more about this issue.
Firefox is not Closing, Another Instance of Mozilla is Already Running

While browsing, certain websites will show annoying popups as ads on their website. You can close this popup automatically in Firefox. To perform this click on the link below.
Steps to Enable Or Disable Popup Blocker

Industry's Top Rated Best Free Antivirus With Download Link

Nowadays it is a big risk to have a computer/laptop without an Antivirus. Actually, Antivirus is just a basic layer of protection from computer viruses, for advanced computer users we recommend a complete Internet Security Suite. However, it is better to have an Antivirus on a computer rather than having no protection. We need to use reputed trustworthy security software on our computer otherwise there is no use of having one on our computer. Having a trustworthy Antivirus does not mean a paid commercial product but one with regular virus signature updates and real-time protection with a high degree of malware detection. There are many free Antivirus products which are rated equal or above-paid ones in case of features and protection. In this post, I would like to introduce some of the Industry's best free Antivirus software products. Though these products are free, installing more than one on your computer at a time may cause conflicts. So it is better having one Antivirus product on your computer at a time.


Industry's Best Free Antivirus Software Products
  1. avast! Free Antivirus

    Avast is one of the most reputed free Antivirus in industry. Avast has a live update with real-time virus definition update. One of the important features I like in Avast is the boot time Scan. Browsing with Avast is safe because it has web shield which protects our computers from harmful websites. With features like file system shield, web shield, mail shield, network shield, P2P shield, IM shield, behavior shield, and script shield, Avast is one of the best free Antivirus right now. To download non-paid version of Avast security, visit the link below.

    http://www.avast.com/index

  2. Avira Free Antivirus:

    Avira Free Antivirus is another reputed free Antivirus with real-time malware detection, privacy tools, pop up blocker etc. It is light weight and suitable for old and low performing computers. You may get occasional ads in the free version of Avira. To download Avira non-paid version on your computer, visit the link below.

    http://www.avira.com/en/avira-free-antivirus

  3. AVG Free Antivirus:

    Another reputed non-paid security tool is AVG which supports both 32-bit and 64-bit architecture. File Shredder feature of AVG ensures the complete deletion of sensitive data to prevent unauthorized use of them. PC Analyzer checks junk files, registry errors, broken shortcuts etc. AVG non-paid version offers email protection, Resident Shield (against malware) etc. To download a free version of AVG Antivirus, click on the link below.

    http://free.avg.com/in-en/download-free-antivirus

    It is risky to keep sensitive data like passwords, usernames etc on your computer especially if your computer is a shared one. To learn how to pick sensitive data from browsers, click on the links below.
    1. How to view saved passwords from Mozilla Firefox
    2. How to View Saved Username and Passwords From Google Chrome

  4. ZoneAlarm Free Antivirus + Firewall

    ZoneAlarm is another reputable Antivirus with a free version of Antivirus and Firewall. They update their virus definition in every 24 hours for the free version. Free ZoneAlarm Antivirus offers download protection (detects whether the downloading file is malicious or not), Identity Protection, private browsing feature, and advanced firewall protection. ZoneAlarm is the only company which provides advanced 2-way firewall with the free version. To download the free Antivirus + Firewall pack, visit the link below.

    http://www.zonealarm.com/security/de/zonealarm-free-antivirus-firewall.htm

    In older versions of ZoneAlarm while ping from your computer, there was a chance to get ping error code instead of a valid reply from the destination address. To learn more about it, click on the link below.
    PING: Transmit Failed, Error Code 65 - ZoneAlarm Effect

  5. Comodo Free Antivirus:

    Comodo offers heuristic detection, real-time scan, and spyware protection. Comodo is well known for its treatment of unknown files as threats rather than safe. Sometimes it gives false alerts due to its very strict protection. It also prompts users to use COMODO Secure DNS server instead of your ISP's default DNS server. To download a free version of Comodo, visit the link below.

    http://antivirus.comodo.com/

With these free Antivirus products, you can secure your computer against most of the threats. Some script based infections can be removed from your computer manually without the help of security software. To learn how to remove malware from your computer manually, click on the link below.
WScript.exe is Infected By Malware and Firefox Opens Harmful Websites

Prevent Others From Copy Your Adsense Code & Show On Their Websites

There are some situations like when someone copies the content of your website or the design with the AdSense code itself, you will be in trouble for showing ads on unauthorized low-quality web pages. Sometimes it might be an AdSense attack by one of your competitors to get you banned by copying your code and display it on websites which are not complying with Google AdSense TOS. In either case, it is you, who are in risk. It is your duty as a publisher to check these matters and ensure the safety of your account. Luckily Google gives you an opportunity to show them a list of authorized websites on which only Ads must show. Any websites which are not listed in your authorized website's list shall not cause the problem to your publisher account.

Steps to Add a Website to The list of Sites Authorized to show Ads
  1. Login to your Publisher account

  2. Click on Account Settings (On the left-hand side)

  3. Click on Edit on "Sites authorized to show ads" under Access and authorization

  4. Enter the domain names of your websites and click on save

Now onwards Google code may show ads on the websites which are not in the authorized sites list but they never generate any income or risk to your account. In other words, your account is protected from AdSense attackers who put your code on low-quality web pages. Though ads may show on those sites, they no longer affect your account.

There is one risk that, enabling this feature may prevent you earning from ad unit impressions generated on any domains which are not in the authorized list. Google itself warns about this risk and tells to enable AdSense authorization with caution. As you know the relation between a number of Ad impressions and the earning, the below link may help you to calculate the approximate earning from this program.
How Much Traffic Needed to Earn $100 From Google

It is important to make sure that you have added all domain names you own and control to the list before activating this feature. Otherwise, you may lose the potential of earning from impressions received from unlisted domains. To learn more about adding websites to the list of authorized websites to show ads, you may read the support link from AdSense itself.
https://support.google.com/adsense/answer/65062?hl=en

Sometimes you may receive a few impressions from blogs which are unknown to you. There are many reasons like copying your entire content with AdSense code, simply displaying your blog posts on their website etc. To read about possible reasons for getting additional impressions, visit the below link.
https://support.google.com/adsense/answer/179827