menu
close

You Don't Have Administrative Rights To Run The Command & Make Sure You Are in Administrative Account

At least once in your life, you might have encountered the error message You don't have administrative rights to run the command and make sure you are in Administrative account while running certain DOS commands on DOS window. The funny part is, you are already logged in to the administrative account. Though you are logged in to an admin account, DOS is not able to run certain commands due to lack of admin privileges. One of the major reasons to get this error message even though you are in the administrative account is User Account Control issues. In this article, we can check the reasons and solution for the error message.
You Don't Have Administrative Rights To Run The Command & Make Sure You Are in Administrative Account


Reason For Error You Don't Have Administrative Rights To Run The Command

To run certain codes on DOS, User Account Control requires us to start the command prompt as an administrator. So the solution for the error message you don't have administrative rights to run the code and make sure you are in Admin account is to execute DOS on your computer as admin.

Steps to Run Command Prompt as Administrator

  1. Click on Windows Start and click search

  2. On search type cmd

  3. Right click on the command prompt icon and select Run as administrator.
    admin privilege

On the new DOS window, you will not receive the same error message while trying to execute a code which needs admin privilege. So now onwards if you receive any privilege related issues while executing any commands on Command Prompt you can overcome that by simply running the command prompt as administrator.

Other Technology Tips
  1. How to Access Services On Your Laptop

  2. An Error Occurred While Trying to Share. The Server Service is Not Started

  3. Method To Open DOS In Any Drive & Change Working Directory

  4. List of Free Proxy Tools

No:Recent Tutorials
1 Hide Windows Computer From Other Devices On The Network
2Edit Boot Menu Option in Windows
3 View Event Log in Event Viewer On Windows
Open System Volume Information Folder
Reliance Netconnect Bill

Unlock Secret Windows Administrator Account Using Windows Hack

Not so many users are aware of the default administrator account present on their computers. This default admin account is created while installing Windows on their computer. In most cases, it is not password protected especially in  Vista and XP. So it is important to assign a password to ensure the safety of your computer. This tutorial explains how to unlock the hidden default admin account available on a Windows computer. If you do not set any password for it while installing Windows 8 and 7, it will be unprotected without a password. However, this tutorial just focuses on introducing the concept of secret Windows user login on every computer and the Command Prompt trick to enable or disable it.

How to Find Secret Profiles

Before explaining how to activate secret profiles on a laptop, let us learn how to get the list of all Microsoft profiles. We can print the entire Microsoft OS profiles on DOS window using net user. To run this code, you have to start DOS window as an administrator. Type it and press enter key to get the list of all Microsoft OS profiles created on the laptop.

How to Unlock Default Administrative Account On Windows PC

To turn on the default Administrative Account in Windows 7 and Vista computers, follow the steps provided below.
  1. Start Command Prompt in Admin mode

    Right click on Command Prompt from Start menu and click on Run as Administrator. To learn more about it, visit the link below.
    Open DOS Prompt in Run as Admin Mode

  2. Type Net user administrator /active:yes on Command Prompt and press enter.
    Start hidden Microsoft profile
Now onwards you will be able to see default Windows User profile on the welcome screen.

Disable Default Windows Administrator Account

If you do not want to list the default administrative account on the welcome screen, you can disable it by a simple Command Prompt command.
  1. Start DOS Prompt in Run as Administrator mode

  2. Type Net user administrator /active: no and press enter
Disable default Windows administrator account

Here in this picture, I have disabled the default Administrator account using the command net user. If you have any doubts about the profiles created on your computer, by simply typing net user on the command prompt, you can find them. The same trick will reveal all hidden users on a laptop. On the command prompt, all user profiles will be shown after running the net user command. If there any disabled admin account, you can simply enable it by using the command Net user [user profile name] /active: and you can reclaim your access.

To enable or disable the default Windows admin profile, you must be an administrator account. If you forgot the password to log in, follow the instructions provided in the link below.
How to Bypass  Admin Password Using ER Disc


No: Recent Posts
Broadband Hack Tricks
Network Address Translation( NAT)
What is Smurf Attack & How to Prevent it
How to Setup MTNL Broadband ADSL Modem
Setup Idea 4G on Android Phone
Delete Beneficiary Fund Transfer in HDFC Netbanking
Setup Asianet WiFi Router
Denial of Service (DOS) attacks
View & Clear Saved Username and Passwords In Mozilla Firefox
Setup Log Files for IP Messenger
Make Sure your Computer and Network are Safe and Secure
Omiga Plus Browser Infection Removal Guide
Error 797: A Connection to the Remote Access Server was not Made
How to Reset BSNL WiFi Modem
How to Check Your Tata Photon Plus Internet Usage
Destination Net Unreachable

List Of Free Proxy Software and Web Proxy Servers To Browse Anonymously

A proxy server is a middle man acting between your computer and the web server. For example, if you are accessing Google from your computer using a proxy named X, your computer is not receiving information directly from Google but X is receiving services and send it back to your computer. So naturally the web server does not know your computer and it thinks it served X. So by using a proxy server, theoretically you can browse anonymously and also help you to bypass firewall restrictions too. This guide gives a short introduction of Proxy Servers with a number of popular server addresses. There are two types of Proxy services.
  1. client based (Software Installed on your PC)

  2. Web-based proxy servers (No is software installed on your PC)
If you are expecting high anonymity, you must go for premium servers but for normal users, a web-based proxy server is enough. Here I give a list of free popular servers.

1. Client Based


Please note that some proxy software products might contain malware and user should use it at their own risk. CoreNetworkZ is not providing any guaranty for the proxy software provided below.

  1. CCProxy

    You can download and install on your computer to start to browse anonymously. In addition to anonymous surfing, CCProxy offers features like DSL sharing, cable modem sharing, wireless sharing, satellite sharing, parent proxy server connection sharing etc. To download and install CCProxy, click on the link provided below.
    http://www.youngzsoft.net/ccproxy/

  2. u.exe - ultrasurf

    Another famous free proxy software is u.exe. We can install this proxy software on our computer (Windows-based) and surf anonymously. To download U.exe -Ultrasurf clicks on the link below.
    http://www.10001downloads.com/s/ultra-surf/u.exe.html

  3. A4Proxy

    This is a free proxy software which you can download and install on your Windows-based computer. Download link of A4Proxy is:

    http://www.inetprivacy.com/a4proxy/

  4. JonDonym - Browse Anonymously

    It is an open source free software proxy which helps you to browse anonymously and bypass firewall restrictions. To download it, click on the link below.
    https://www.jondos.de/en/download

  5. I recommend Tor Proxy if you are looking for a free highly anonymous service. You can read more about it here.
    Tor Proxy Review

2. Free Web Based Proxy Servers

  1. Some tested United States proxies

    1. http://anonymouse.org/

    2. http://samiak.info/

    3. http://www.protectboy.com

    4. http://hidecash.info

    5. http://www.sharpfuzz.com

    6. http://kproxy.com/

    7. http://www.securegate.org/

  2. Some Tested Indian Proxies

    1. http://surfhappy.info

    2. http://espressonow.info

    3. http://phoenixshare.com


  3. Some Tested United Kingdom proxies

    1. http://newproxforyou.info

    2. http://defilter.co.uk/

    3. http://unblockmyspacee.info


  4. Malaysian Proxies

    1. http://artsucks.info


Working

Proxy servers are iterating between your computer and rest of the Internet. The request from your computer goes to the proxy server and it resubmits the request to the actual destination. So they will get the IP address of the proxy server instead of your computer's IP address and your privacy will not be compromised. The same principle is used for bypassing the firewall. The firewall detects the address of the proxy server instead of the blocked website. So the packets will go through the firewall.

Your computer------------->Proxy Server------->Website


Major Uses

There is two kind of uses from a real proxy server.
  1. Hiding your Identity in the Internet

  2. Bypassing restrictions


Advanced Services


Proxy servers have many uses other than just anonymous surfing and bypassing the firewall restrictions. In large enterprises, the proxy server is associated with a gateway server that separates the enterprise network from the outside network and protects the enterprise network from outside intrusion. That means a good proxy server can act as a firewall. It can also act as a cache and so virtually the Internet speed can be increased.


Types Of Proxy Servers

They are classified according to the way, they operate.
  1. Caching

  2. Web-based

  3. Content-filtering

  4. Hostile

  5. Intercepting

  6. Transparent and non-transparent


Testing a Proxy

It is better you check your IP address when you are using a proxy server to detect how much anonymous you are. So of the IP address checking tools I use are:
  1. http://www.ipaddresslocation.org/

  2. http://www.ip-adress.com/


References:

  1. en.wikipedia.org/wiki/Proxy_servers

  2. http://www.azproxies.com/

  3. http://www.azproxies.com/proxy-lists/

  4. http://www.freeproxylisting.info/


New Topics

How to Add a Wireless Router to Cable Modem and Share Restricted Broadband

Cable broadband is as popular as DSL broadband but the steps to add a WiFi router to both connections are different. This article explains the steps to add a wireless router to a cable modem to extend the network. Modern cable modems have WiFi feature but if you are using standard one without WiFi feature, you can use this guide to add WiFi to your current home or office network. Here I use a cable modem, Linksys WiFi router, one desktop PC and a laptop to demonstrate the configuration.

Current Network Diagram

Without telling the current network diagram, I cannot explain the procedure. I have a cable modem connected to my desktop PC. MAC address of the Desktop is registered with my cable broadband company and I do not think they want to share the Internet connection with other devices in my home. Now I want to share this restricted Internet connection to my laptop without registering the MAC address of the laptop.  I have bought a Linksys router for this purpose and want to extend the Internet to my Wireless Laptop through it.

The procedure to add Linksys Wireless Router to a cable modem

  1. Make sure that you are able to go online through the modem.

  2. Connect the output line of the modem to the WAN port of your router.

  3. Connect the first computer to the LAN port of the router.

  4. Power on the Router and wait until the WLAN and Ethernet light are on.

  5. Open the browser window and type http://192.168.1.1 but please note that the login IP will be different for different vendors.

  6. It will ask you for username and password. Enter the default values provided by the vendor.
    add tablet to wifi with Comcast combination modem/router

  7. Setup page looks like below.
    Configure


    The configuration

    • Automatic configuration - DHCP should be selected
    • The IP address should be 192.168.1.1
    • The DHCP server should be enabled

  8. MAC address clone

    Under Setup, you can see the MAC address clone. Click on that.
    MAC

  9. Click on clone MAC address and save settings.
    MAC clone

  10. Set a router password

    We need to change the default password to a good one. After typing the new password, click on save settings.
    Change password

  11. Configure Wireless

    Click on Wireless tab and you can give any name as SSID. You may choose wireless channel 6. Other two possible channels are 1 and 11.

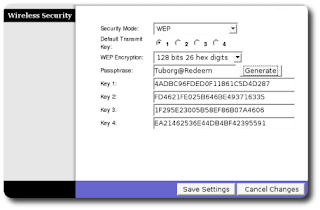
  12. Now under wireless security, you can enable encryption.
    encryption on cable modem

    After saving the settings reboot the device.

You have successfully configured your router with a cable modem. Right now the broadband connection from the cable ISP is shared between my laptop and desktop computer. I have bypassed the restriction to use the Internet on a single computer by cloning the MAC address of my registered computer to the router and use it to divide the connection. MAC address registering is an old trick played by cable broadband service providers to limit the number of devices accessing their broadband connection. I have written an article about it a few weeks ago. You can read that article by visiting the link below.
Why Cable ISP Demands MAC Address Registering

Popular Articles

  1. How to Conduct Successful Cascading

  2. Different IEEE 802.11 Standards

  3. How to Start WLAN AutoConfig

  4. How to Setup Linksys Range Expander WRE54G

No:Recent Tutorials
How To Power Cycle a Modem
Setup Linksys WRT54G Wireless Router
3 How to Configure Idea 3G on Android Phone
PING: Transmit failed. General Failure
The solution for Destination Net Unreachable - Error
Destination host unreachable
How to Enable Disabled Adapter
Router Cascading Tutorial
Asianet Dataline Cable Broadband Modem WiFi Connectivity
How to Solve TTL Expired in Transit
Ping Request Could not Find Host
How to Block Websites Using D-Link Router In Home
How To Setup Cisco DPC2320 Cable Modem
How to Setup Reliance DSL Broadband Modem
How to Setup D-Link Wireless Router in to Bridge Mode
How to Setup D-Link Wireless Router Manually
How to find Login IP Address of a Router or Modem
How to Reset a Router Manually
How to Restart WZC

Basic Wireless Connection Troubleshooting Guide

This tutorial is a complete guide to fix almost every wireless connectivity issues on a computer. If you face issues like Wireless Network not found or Windows cannot found any wireless networks, I recommend you to follow the steps provided in this guide in the same order listed here.

  1. Make sure there is a WiFi broadcast

    If there is no broadcast, you may follow the instructions provided in the link below.
    No SSID Broadcast From Access Point

  2. Check whether WiFi adapter is configured properly.

  3. Start WZC

    Make sure that the service Wireless Zero Configuration (for Windows XP) or WLAN AutoConfig (Later Windows versions) is started on your computer. If you do not know how to start these services, follow the instructions provided in the links below.

  4. Refresh Wireless Network lists

    This step is valid for Windows XP only.

    • Double click on the WiFi Icon on the system tray (a PC propagating radio signals)

    • Click on View Wireless Networks

    • Click on the option Refresh Network list


  5. Delete all preferred Networks

    This step too valid only for XP. If you are using later Microsoft OS versions, I recommend you to follow the instructions provided in the link below.
    Delete Saved Preferred Network Profiles On Windows 8

    • Select " Change the order of Preferred Networks"

    • Delete all the networks saved under preferred Networks

    • Make Sure that the checkbox" Windows to configure my Wireless Network settings" is checked

    • Click OK

  6. Disable Firewalls

    Windows Firewall and third party firewalls installed on your computer may block WiFi connection. Here we need to disable Firewalls on your computer and check for the issue. Steps to disable Windows Firewall are:

    • Double click on the wireless Icon on the system tray(a computer propagating wireless signals)

    • Click on View Wireless Networks

    • Click on change advanced settings

    • Click on the advanced tab

    • Click on the button settings under Windows Firewall

    • Select off button and click on OK.

    For third-party firewalls, follow respective manuals.

  7. Unplug and reconnect WiFi Adapter (USB adapter)

    If you are using USB  Adapter, you should unplug it from your computer and reconnect it after 30 seconds. This might bring back the available WiFi networks. Make sure the LED on the adapter is on.

  8. Check the presence of any Interference

    There is a chance that someone is using cordless Phone or any other devices which sends a signal having the same frequency of the  Access Point near to you. If so, you should ask them to switch off that device.

  9. Restart your computer

  10. For Laptops

    If you are using a laptop instead of a desktop computer, you can follow another guide which explains steps specifically for laptops and netbooks. Link to that tutorial is provided below.
    My Laptop is Not Getting Signals and Internet

  11. Update Adapter Driver

    Outdated drivers show issues and it is very important to use the latest driver software released by the adapter manufacturer. To learn how to update driver, visit the link below.
    Update Adapter Driver
No: Recent Posts
Wireless Network Getting Disconnected
How to Setup MTNL Broadband ADSL Modem
Setup Idea 4G on Android Phone
Delete Beneficiary Fund Transfer in HDFC Netbanking
Setup Asianet WiFi Router
Manage and Delete Wireless Filters On Windows
Wireless Router Shows Wireless Packet Drops
Setup Log Files for IP Messenger
Wireless N is backward compatible with wireless G
Remote Procedure Call (RPC)
Error 797: A Connection to the Remote Access Server was not Made
How to Reset BSNL WiFi Modem
How to Check Your Tata Photon Plus Internet Usage
Destination Net Unreachable
CoreNetworkZ

Images Are Disabled On Mozilla Firefox Browser

Right now Firefox is one of the most popular browsers available. This tutorial is the part of our Firefox browser tweaks articles and here we explain the steps to disable images on Firefox browser. The same procedure can be followed if you are facing issues with viewing images on it. Steps to disable and enable photos on Firefox can vary depends on the different version running on your computer. If you are using a slower Internet connection and do not want to use the precious bandwidth to load unnecessary pictures on a web page, you can prevent the browser from loading them. Another scenario is where you are not seeing any pictures on web pages loading. There is a chance of accidental blocking of pictures. Follow the instructions below if you are having trouble loading Images on it.

Failed to Load Images On Firefox Browser
  1. Start browser

  2. Press [Alt] and [T] buttons to load Tools option
    Block

  3. Click Options
    Disable

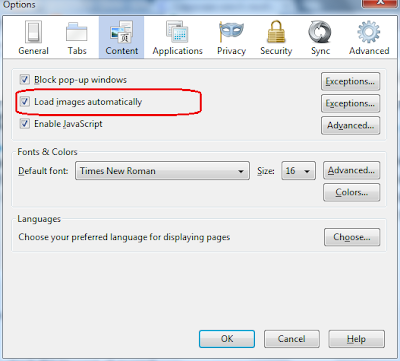
  4. Check the box near Load Images Automatically
    Not

  5. Click OK and refresh the page
After refreshing the page, you will not face any issues with loading pictures from the Internet on the browser window. These steps are for the latest versions and it is not uncommon many users still don't update browsers to the latest versions. After the starting of fast releasing of newer versions by Mozilla team, many users disabled the auto-update feature on their browser due to various reasons. I too did it for a long time because of the lack of product support from some of my favorite toolbar manufactures. If you have an older version of Firefox installed on your computer, follow the steps provided below.

How to Disable Pictures on Older Versions Of Firefox


To disable pictures on older Mozilla browser versions, follow the steps below.
  1. Open Mozilla

  2. Go to Edit

  3. Go to preferences

  4. Under Privacy and Security

  5. Go to Images

  6. In "Permissions on the images" uncheck "Accept all images" to block all pictures from the Internet.
As I said before if you are looking for a procedure to display pictures (if they are blocked), you may reverse the steps. To enable pictures, check the "Accept all images" box.

Other Mozilla Tutorials
  1. Different Methods to Clear Cookies

  2. Spell Check is Disabled And How to Enable Back

  3. Enable Disabled Multiple Mozilla Firefox Tabs Closing Warning

  4. A Script On This Page May be Busy, It May Have Stopped Responding
No: Recent Posts
This Device is Not Configured Correctly. (Code 1)
Getting Device Manager Error Code 10
Getting 169.254.X.X (APIPA) Windows Automatic Private IP Address
How to Setup MTNL Broadband ADSL Modem
Setup Idea 4G on Android Phone
Bypass Windows Admin Account Password Of Vista, XP, Windows 8
Error 1747: The Authentication Service is Unknown
Reasons for Unexpected Automatic Reboot of Your Computer
Use Flash Memory (USB) as Virtual RAM in Windows
Setup Log Files for IP Messenger
Adobe Flash Player has Stopped a Potentially Unsafe Operation
FTP Error 503 Login Authentication Failed
Best LAN Messengers
How to Reset BSNL WiFi Modem
How to Check Your Tata Photon Plus Internet Usage
Destination Net Unreachable

How to Configure Huawei MT880 CPE & MT882 CPE Modems

Huawei MT880 CPE and Huawei MT882 CPE are modems with DHCP function. So these modems have the benefits of routers. We do not need to purchase a router to share the Internet connection between computers if we have Huawei MT880 CPE or MT882 CPE modems. This tutorial explains the procedure to configure Huawei MT880 CPE & MT882 CPE modems without using setup disc. Before starting to set up Huawei CPE modems, make sure you have the username and password provided by your ISP. It is not the device log on details but the broadband connection username and password. If you don't have them right now, you must contact your ISP before proceeding to the next steps.


Setup Huawei MT880 CPE Modem

  1. Connect your computer to MT880 using an Ethernet cable

  2. Power on MT880

  3. Open Internet Explorer and type 192.168.1.1

  4. You will be prompted to enter the username and password.

    User name = admin
    password = admin

  5. When you log in to the home page, you can see WAN settings

  6. Locate the parameter WAN Type and select PPP

  7. select Connection Type PPPoE.

  8. Select the box Default Route ‘Enabled’.

  9. Scroll down the screen and locate Username and Password fields. Enter the username and password provided by your ISP. If you don't have them, you must contact your ISP.

  10. On left panel select Tools and go to System Settings

  11. Click on Save and Restart the modem

Manual Steps to Setup Huawei MT882 CPE Modem
  1. Connect your computer to MT882 using an Ethernet cable

  2. Power on MT882

  3. Open Internet Explorer and type 192.168.1.1 on the address bar

  4. You will be prompted to enter the username and password.

    User name = admin
    password = admin

  5. Click WAN settings under home
    Setup MT880 CPE &  MT882 CPE router

  6. The WAN type would be PPP

  7. The connection type would be PPPOE

  8. Enter the username and password provided by the ISP

  9. Set the maximum idle time

  10. Click apply and save

  11. You may need to restart the Modem for proper working.

How to Connect a Router to Huawei Modem

Since Huawei CPE modems have routing feature, you need to learn router cascading before connecting another router to the modem. To learn more about connecting an additional router to Huawei modem, visit the link below.
How to Perform Router Cascading

To check whether the Huawei modem is configured correctly and connected to the Internet, visit the link below and follow the instructions provided there.
How to Check If Modem is Connected to the Internet

Technical Portal

Getting Error Code 0x80070424 After Running Windows Live Update

After running the recent Windows Live Update many users complained about getting a new error code 0x80070424. If you too received the same error message on your computer, there is a registry trick to resolve it. Before going to Windows registry we must run wuaueng.dll. To learn the complete fix to solve the Windows Live Update error 0x80070424, follow the steps below.

  1. Open Run by pressing [Windows] and [R] buttons together and type regsvr32 wuaueng.dll and press enter.

  2. Click on OK button when the RegSvr32 dialogue box appears

Now it is time to proceed with registry fix to resolve the error code 0x80070424.
  1. Type regedit on Run or Windows Search

  2. Take a backup of current registry settings.
    How to Take Backup of Registry Settings and Restore

  3. Go to the following registry location.

    HKEY_LOCAL_MACHINE\SYSTEM\CurrentControlSet\Services\wuauserv

    Look for a DeleteFlag value at this registry location. In most cases you will find the value, then right-click on it and select Delete.

After deleting the flag value you will no longer receive the error code 0x80070424 on your computer.

PS: If you cannot find the run window in Start menu, you can bring it by pressing both Microsoft Start and R keys together. Now Run window will be opened.


New Topics

Error 1747 : The Authentication Service is Unknown in Vista

Yesterday I encountered a strange error with Windows Vista laptop while troubleshooting WiFi connectivity problems. We were at a public hotspot but his laptop failed to join the network. It displayed a message Windows cannot find wireless networks. While opening Dell Wireless utility, it shows the status of the Dell adapter as disabled. However, in Device manager, it shows the device is working properly. A possible issue might be with Wireless Zero Configuration service. For Vista and later versions, WLAN AutoConfig is doing the same function. We accessed the services page and found the specific service in the stopped state. We pressed the button start but it failed with a strange error. It is given below.

Service cannot be started Error 1747: The Authentication Service is Unknown


Though it was the first time I encountered such an error, we fixed it quickly. This tutorial explains how to deal with the error Service cannot be started Error 1747: The Authentication Service is Unknown and solves it quickly.


Troubleshooting steps
  1. Make sure the Wireless button on the laptop is ON

  2. Check Firewall settings

    Faulty settings on the Firewall installed on your computer may prevent it from accessing the Internet. So for troubleshooting purpose, we need to disable it.

  3. Services must be running with full permissions

    It is important to make sure the services are running on the PC with full permissions. To verify it, follow the registry path and make sure your current user has full permissions.

    HKEY_LOCAL_MACHINE\SYSTEM\CurrentControlSet\Services


  4. Try Windows Socket reset

    To do it, type the following command on DOS prompt and press enter.

    netsh winsock reset

    To go with advanced Windows Socket permissions follow the registry.

    HKEY_LOCAL_MACHINE\SYSTEM\CurrentControlSet\Services\Winsock

    HKEY_LOCAL_MACHINE\SYSTEM\CurrentControlSet\Services\WinSock2

    Right click on the registry entry and click on permissions. Make sure that Winsock and Winsock2 have full permissions. Before testing with Registry, I recommend you to read the article provided below by visiting the link.
    How to Backup Registry


  5. Perform clean boot

    While clean boot, check if any third party software is causing the issue or not. If any third party is causing the issue try the system restore to a date before the date when that particular software installed. To do it, I suggest you follow the instructions provided in the link below.
    How to Perform Clean Boot

  6. System Restore

    Does System Restore to a day when the wireless was working(Before the error 1747)? If still the issue persists we need to perform the final parts of solutions.
    System Restore Lessons

  7. Run Windows Update

    If you are using Windows Vista on your computer, upgrade it to Windows Vista SP1. Even if the issue persists we need to reinstall the OS on your computer. So the last resort is:

  8. Reinstall Windows Vista on your computer.

Resources
  1. How to Access Services Window

  2. PING: Transmit failed. General Failure

How to Test Local Network For Connectivity Issues

It is very frustrating when you are unable to access the Internet on your computer but the ISP technical support repeats everything is fine at their side. There are so many reasons which can prevent connectivity on your local network like DNS issues, faulty Ethernet cable or modem etc. This article explains basic troubleshooting steps you can follow to test your local network when you face Internet connectivity or file sharing issues. To test a local network, we do not need high networking knowledge. If you read this tutorial carefully, you will find it very simple.
  1. Find Network Topology

    At first, you must understand how devices are connected to the LAN before starting the troubleshooting. In this example, I assume the PC is connected to the router using an Ethernet cable. The router is connected to the modem. So the network topology is as below.

    Modem----Router---PC

  2. Ping Router

    We need to ping the first device connected to your PC. Here in this example, it is the router. So you must type the following command on Command Prompt and press enter.

    ping [router IP]

    If you do not know the router IP address, type the following command on Command Prompt and press enter.

    ipconfig

    Now you will get the Default Gateway address. It is the router IP address(I assume it is 192.168.1.1). So to check the connection between the router and your computer execute the following commands.

    ping 192.168.1.1

    We need to ping the router even if you are getting default gateway because this value may be shown on DOS from the cache. If you are getting a reply then we can proceed to step2.

  3. Ping the Modem IP

    If you do not know the modem IP address, I suggest you follow the instructions provided in the link below.
    How to Find Log on IP Of a Device

    Here I assume the respective IP address is 192.168.0.1 and to ping modem, use the following command.

    ping 192.168.0.1

    If you are getting replies from the destination, the connection between your computer and modem is perfect. The issue must be at ISP side.

  4. No Reply From Modem

    What if you are not getting valid replies from the modem. In this case, you must change the way of troubleshooting. While your computer is receiving replies from the router and not from the modem, we can pinpoint the issue as follows.

    • Your modem has no connection to the router.

    • Modem is faulty

    To fix the issue follow the steps below.

    • Check the Connection

      Check the connection between modem and router. Make sure the LAN lights for respective ports are on. If you are not sure, unplug the cable and reconnect it.

    • Power cycle

      We need to power cycle the entire network or at least modem. Disconnect power from the device and wait for one minute to reconnect power. To learn more about this step, I suggest you to read the instructions provided in the link below.
      What is Power Cycle and How to Do It

Popular Tutorials
  1. No replies from global DNS and Loop Back address

  2. Cannot go online and No replies from global DNS but getting a reply from Loopback Address

  3. Getting Replies From Global DNS Server

These four steps are the very basics to test a local network. This tutorial just gives guidelines only because here I showed one of the simplest network to troubleshoot. As the number of devices connected to the network increases, it will be difficult to test the network.

New CCNA Topics

Cannot Ping 127.0.0.1 and No Reply From Local Host

When we send ping packets to localhost or loopback address (127.0.0.1 to 127.255.255.254), they will be rerouted to the PC. Even if your Ethernet adapter is not connected to any modem or router, you will get a valid reply when you ping loopback IP. However, in some cases, you may not get replies from 127.0.0.1 and this article explains the reasons for it.


Reasons For No Replies From 127.0.0.1

There are two reasons which prevent your computer from getting replies from 127.0.0.1. They are provided below.
  1. TCP/IP suit installed on your laptop is corrupted

  2. Ethernet adapter is not working

Fix

Now let us troubleshoot each case.
Important Network Commands

  1. Reset TCP/IP

    To fix the issue with the TCP/IP suite on your computer, use the following commands. You can type them on Command Prompt one by one and then check for the issue.

    • ipconfig /flushdns

    • netsh int ip reset c:\tcp.txt

    • netsh winsock reset

    After resetting the windows socket and TCP/IP suite, we need to restart the PC. After restarting the computer we need to check whether the issue persists or not. If still, we cannot ping the loopback address the only possible chance is corrupted Ethernet Adapter.

  2. Test Adapter

    Since the TCP/IP suite is installed properly, the only reason that may prevent the local host from communicating properly is the faulty Ethernet adapter. We can test the status of an adapter in the device manager. To learn it properly, I recommend you to follow the instructions provided in the link below.
    Test an Adapter in Device Manager
Ping Global DNS Connectivity Issues Configure Idea 3G
PING: Transmit failed Destination Net Unreachable Destination host unreachable
Enable Disabled Adapter Windows Automatic IP Asianet Dataline
TTL Expired Couldn't Find Host Reset Winsock

Getting Reply From Loopback Address But Can't Ping Other IP Address

Loopback address also called localhost is a reserved IP address. If we send packets to this IP address it will be rerouted to the computer itself. So loopback address is used to troubleshoot TCP/IP related issues on a PC. This article explains a rare situation where you cannot ping any IP address including the DNS server but can successfully ping loopback address. Before explaining this issue, I would like to explain the concept of loopback. The IP address in the range 127.0.0.1 - 127.255.255.255 are private and can be used as loopback but we normally use 127.0.0.1 as the loopback or localhost. Now let us check the scenario where you can successfully ping 127.0.0.1 but not any other external IP.


Explanation

Here I ping 4.2.2.2 from the command prompt but it failed to get a valid reply from it. However, when I ping 127.0.0.1, I am getting valid replies. Possible reasons from no valid reply from DSS server though I get replies from loopback address are:
  1. The TCP suit on your computer might be corrupted

  2. Connection Issues in the network

  3. There is no internet connection from your service provider.

If you are getting a reply from the loopback address it shows the TCP/IP suite is working on your computer. However, it is important to verify it by sending ping packets to 127.0.0.1 and analyze the reply.
  1. Click on start

  2. Click on run and type cmd on it then click OK(On Vista type command on search and press enter)

  3. Ping Loopback

    On the command prompt type, the following command ping 127.0.0.1 and press enter key. If you are getting replies, then the TCP/IP suite is fine. If not, you must reset the TCP/IP suit on your computer. To learn how to do it, I recommend you to visit the link below.
    There is No Reply From Loopback

After verifying the status of the TCP/IP suite, we must check the network connection. Here we must make sure there is no loose connection or faulty cable. Verify the Ethernet cable connected properly between your LAN port and Modem/router. Also, verify the quality of Ethernet cable. To get more inputs about this issue, I suggest you visit the link below.
How to check my Local Network Connection issues

If you are getting valid replies from localhost, next you must ping any DNS address. You may go through the instructions provided in the link below to learn more about it.
I Am Getting Replies From DNS Server

No:Recent Tutorials
Can Ping Global DNS Server IP Address But Unable To Open URL
How to Test Local Network For Connectivity Issues
3 How to Configure Idea 3G on Android Phone
PING: Transmit failed. General Failure
A solution for Destination Net Unreachable - Error
Destination host unreachable
How to Enable Disabled Adapter
Resolve Windows Automatic IP Address
Asianet Dataline Cable Broadband Modem WiFi Connectivity
How to Solve TTL Expired in Transit
Ping Request Could not Find Host
Steps to Reset Winsock On Your Computer
Important Network Commands

Can Ping Global DNS Server IP Address But Unable To Open URL

Domain Name System (DNS) converts website address we type on the address bar of a browser into a corresponding IP address to enable Internet access. It is very important to establish a connection between your computer and a web server. It is one of the common issues to block access to the Internet on a PC. We can identify this issue by pinging website IP address. Users can successfully ping public DNS addresses like global or open DNS but they cannot open a webpage with URLs if they are facing domain to IP conversion issues. It is like you can successfully open a website by typing the IP address of that website but you cannot open the website by using the domain name. This tutorial explains how to deal with this situation where you can ping website IP address successfully but unable to open it on a browser by typing its URL.

Can Open Website by IP address But Cannot Access With Domain Name

If you want an example of this issue, see the example below.
  1. When I try to access the Internet through a browser, I failed to go online

  2. When I ping global DNS server, I get replies

Troubleshoot Wrong DNS Settings Issues
  1. Go to command prompt try the following commands

    ping www.corenetworkz.com

  2. If you are not getting a reply from www.corenetworkz.com, try to ping public servers like global DNS server or Google DNS server.

    ping 4.2.2.2

    Now we have two chances either you got valid replies or no valid replies.

  3. Solve the DNS Issue

    If you are getting valid replies when you ping global DNS server, the issue can be concluded as follows. You are able to communicate with the Internet server but cannot communicate with a website(eg: www.corenetworkz.com). The reason is the wrong settings on your computer. To fix the issue we need to assign correct settings on your computer by following the steps provided in the link below.
    How to Assign Correct Server Address On Your Computer

Global DNS Server Addresses

The Verizon Global DNS Server Addresses are 4.2.2.2 and 4.2.2.1

  • The Preferred DNS server address should be 4.2.2.2
  • The alternate DNS address is 4.2.2.1

Now try to go online by opening your web browser and type www.corenetworkz.com.If you are not getting valid replies from the public Domain Name System, follow the instructions provided in the link below.
What if I Am Not Getting Replies From Global DNS Server

This tutorial is a part of my complete Internet Access Trouble tutorial. To read the complete tutorial to troubleshoot and solve any issues to access Internet, visit the link below.
I Cannot Go Online- Troubleshoot Complete Internet Access Issues

Example

Here I am going to explain it with an example. Here I am going to ping Google by both its domain name and IP address.

Domain Name: www.google.com
IP address: 74.125.236.165

  1. Ping Google.com

    My computer doesn't resolve URL to IP address conversion properly and thus it failed to find the host google.com. You can verify it by analyzing the image given below.
    cannot open google

    If you cannot open Google.com on your browser, you will get this reply while pinging the URL from the command prompt. However, if you ping the IP address of Google, your computer will get valid replies. It clearly tells the issue is with converting the hostname to respective IP address.

  2. Assign Valid Domain Name Server Address

    After changing the Domain Name System details on PC, there won't be any issues with opening Google on the browser by typing www.google.com.

New Topics