menu
close

How to Redirect Traffic and Links Pointing Old Blogger Post URL to New URL

Blogger introduces a new feature called Custom URL Redirect. By this feature, we can provide a permanent redirect for old nonworking URLs to new working URLs. The main benefit is, we can still utilize the backlinks pointing to the old posts (which may about to get deleted ) to the appropriate blogger blog posts. We can also successfully redirect the users who click the old post links (links which are no longer working) to the respective new updated posts. So we can retain the traffic and backlinks using this blogger Custom blog post URL Redirect feature. Steps to use Custom URL Redirect on your blogger site are provided below.

Redirect Traffic from broken Links to Working Blog Posts
  1. Login to Blogger Account

  2. Click Blogger Dashboard

  3. Click on Settings

  4. Click on Search Preference
    Perform 301 redirect for blogger posts

  5. Click Edit link on Custom Redirects
    Redirect traffic from one published post to another using 301 redirect

    Here you should enter the broken links to which external links are pointing on "From" field. You should enter the working URL on the "To" field. Do not forget to select checkbox near "permanent" if you are planning to provide a 301 redirection. After entering the details click on "Save Changes".

How does this Trick Work
Here I am going to explain this trick with an example. Suppose I have a blog post with link www.corenetworkz.com/article-publish.html but accidentally I have changed its link structure. Consider its new link structure as www.corenetworkz.com/new-article-publish.html and it is live. There is no way to return to the old link structure but I don't want to lose the backlinks pointing to the old post. In this situation, I can use this new Blogspot trick to perform 301 redirection to the new link from the old link. Google spiders will treat the old post and new post as same.

This article tells how to send users from old broken blog post links to new working posts. Similarly, the following article tells steps to configure the custom domain name for your Blogspot blog. To read more about it, follow the link below.
How to Setup Custom Domain Name For a Blogspot Site

  1. Remove Date Number From Blogger Post URL
  2. Find The Location of Temporary Internet Files Folder On Your Computer

After setting up a custom domain, most of the users face the issue of redirecting the blogger blog with www version and without www version. We fixed the issue by following the steps provided in the link below.
How to Redirect Naked Domain Name to WWW Version of Domain Name

  1. A Lot Of Backlinks Suddenly Disappeared
  2. Prevent Others From Copying Your Adsense Code

This Custom Redirect feature helps to redirect backlinks and traffic pointing to your blog that does not point to existing posts or pages to new working relevant pages. So you will not lose traffic and link juice. In addition to this, it is better you optimize your blogger blog for better traffic. To read about it, click on the link below.
How to Optimize Blogger Template for Better Rank and Traffic

How To Delete Beneficiary Fund Transfer in HDFC Netbanking Account

If you are using HDFC bank for online transfer of money to another account, you should add the beneficiary details (account number and other details of the receiver) first. Then you should wait till HDFC enables the new beneficiary for fund transfer. After they enable the beneficiary, you can start transferring money. The time to enable a beneficiary account depends on the bank policy (right now it is 12 hours).

 It is important to note that there is a maximum number of beneficiary registration for each type of fund transfer in HDFC bank (Currently it is 50 beneficiaries per each type of transfer).

 This article is about deleting a no longer needed beneficiary from your HDFC net banking account.

Steps to Delete a Beneficiary from HDFC Account
Update (05-04-2015): It seems HDFC has removed the feature to delete existing beneficiaries, but we can use the edit feature to alter all information we added. The instructions listed just below this update explains this procedure.

Automatic Deduction Of Money From Account
  1. Login to HDFC net banking using the link http://www.hdfcbank.com/

  2. Click on Funds Transfer on the top menu


  3. Click on Enquire on the left-hand menu and then click 'View List of Beneficiaries'


  4. Click on Go button under the Transaction Type. If you are going to edit a beneficiary created for NEFT, you must click the Go button under NEFT.  The same rule applies to IMPS, RTGS, etc.

  5. Scroll to the bottom of the list where you can see two buttons Delete and Add New. Select the beneficiary name by choosing using the radio button and click the delete button to remove it from your account.


  6. Now select the beneficiary by choosing the radio button and click Edit. Here you can edit the account type, name, and email id. Please note that you cannot change the beneficiary type or the account number.

< ------------------ Old Outdated Steps ----------------------->


  1. Login to HDFC Netbanking account

  2. Click on Third Party Transfer
    how to delete beneficiary in HDFC net banking account

  3. Click on View List of Beneficiaries on the left-hand side
    Send fund from HDFC account

  4. Select the Transfer type and click View
    select or create a beneficiary account in online banking

  5. Select the beneficiary and click delete
    HDFC payment gateway

  6. Now you need to confirm the deletion of the beneficiary
    eCommerce

How to Add a new Beneficiary

If you want to transfer money to another account via net banking, you must add him first to your account as a beneficiary. It is necessary for both NEFT and RTGS.
  1. Log in to your account

  2. Click on Third Party Transfer
    how to delete a beneficiary in HDFC net banking account

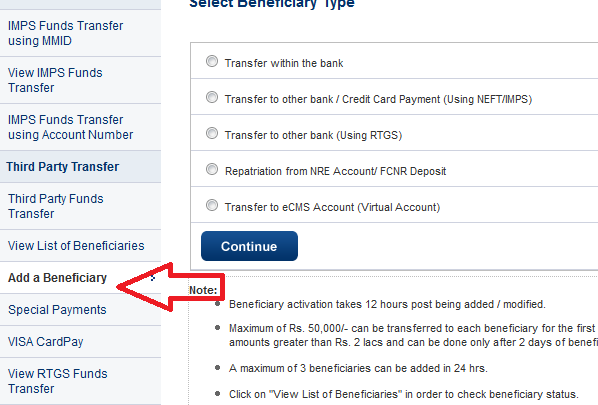
  3. Click on Add a Beneficiary
    NEFT transaction failed

  4. Click on the Continue button and enter the account details to which you want to send money.

Money transfer methods RTGS and NEFT are different in the way they work. If you want to transfer money real time without delay, you must use RTGS option. RTGS stands for Real Time Gross Settlement, and you can transfer money by online to accounts in any banks within India without any delay.

You do not need to wait for clearance to accomplished the process. However, banks charge a fee for this type of money transaction and currently, HDFC charges RS 25 for any transaction between 2lakh to 5lakh. If the amount is higher than 5lakh, you must pay Rs 50 as the fee.
  1. Modify SBI Inter-Bank Beneficiary
  2. Kerala Vs Gujarat Development Models
 RTGS doesn't work on holidays and non-banking time though banks claim real-time transfer. Another issue with RTGS is the higher minimum amount to transfer. We can start RTGS request only if the amount is at least 2lakh.

Another mode of online money transfer by HDFC is NEFT. It stands for National Electronic Funds Transfer, and you can send payments to any third party accounts in India with few restrictions. HDFC charges a small fee for NEFT money transaction depends on the transaction amount.

Difference Between Configuring Modem in Bridge Mode and PPPoE Mode

As I mentioned in my old posts, I started my career in computer networking as a SOHO consultant. In the first few months, we were assigned to configure Local Networks in small offices. During the period the first thing I learned was the differences between configuring a DSL modem in bridge mode and PPPoE mode. It is because the mode of modem configuration entirely affects the router configuration. You need a dialer to access the Internet if you configure the modem in bridge mode.

Then every time you must enter the Username and Password provided by ISP. If your modem is in PPPoE mode, the connection is always on. It means you do not need to use any dialer to access the Internet.

Below you can see a summary of differences between a modem in bridge mode and PPPoE mode.


Differences Between PPPoE Mode and Bridge Mode

  1. Bridge Mode Supports only one computer, but PPPoE supports multiple computers

  2. In bridge mode, you need to dial every time to connect Internet. PPPoE mode is always connected.

  3. PPPoE is more secure than bridge mode.

  4. In Bridge mode, there is no need for port forwarding. In PPPoE mode, you may need port forwarding

  5. PPPoE mode supports NAT. There is no NAT in bridge mode.

  6. The computer connected to the modem in bridge mode gets the public IP address. Your computers get private IP addresses in PPPoE mode.
The most important difference between PPPoE mode and bridge mode is the number of computers supported in each mode. We can connect only one computer to a modem configured in bridge mode.

Since PPPoE mode supports NAT, we can connect multiple computers to a modem in PPPoE mode. Computers connected to the modem in PPPoE mode can access the Internet directly because the modem has the ISP username and password saved.

  1. Duplicate Name Exists Error While Connecting to a Network
  2. How to Power Cycle a Router
  3. Ping Request Could not Find Host

The computer connected to a modem setup in bridge mode need you to log in with username and password provided by ISP and dial to access the Internet every time. A modem in PPPoE mode can work as a router with feature like NAT, Firewall, DHCP, etc.

With these additional features modem in PPPoE mode is more secure than a modem in bridge mode. You may need to perform port forwarding on a modem configured in PPPoE mode for the proper working of certain applications. You do not need to do port forwarding on modems in bridge mode.

  1. Resolve Destination Host Unreachable
  2. Router Cascading Guide
  3. Asianet Dataline Cable Broadband Modem

As per the above post, we can see it is better to configure your modem in PPPoE mode unless you have other priorities. In case if you want to learn a practical example to configure a DSL modem in PPPoE mode, click on the link below.
How to Configure Reliance DSL Modem in PPPoE Mode

  1. Turn On a Disabled Wireless Adapter
  2. Connecting Multiple Routers to a Network
  3. Getting 169.254.X.X (APIPA) Windows Automatic Private IP Address
  4. Reasons For TTL Expired in Transit

If you are looking for another practical example to configure a modem in PPPoE mode, follow the link below.
How To Configure BSNL Modem in PPPoE Mode

A Lot Of Backlinks Suddenly Disappeared From Google Webmaster Tools

Have you checked the backlink count of your website reported in webmaster tools? If not, I recommend you to log in and make sure there is no big difference in the number of external links pointing to your websites. Right now in my webmaster tools account, most of the backlinks to my blog are not appearing. You can understand the sudden shock it can give to a blogger. However, I recovered from the shock very soon because this issue happened for many website owners.

Many webmasters are reporting the same issue in the Google product forum, blogs, and other webmaster forums. So my guess is Google may be changing the way to display external links pointing in webmaster tools or it might be a bug in their system.

Update: Google seems fixed the issue. Now I can see the backlinks again in Webmaster Tools.

How to Check Backlinks to Your Website in Google Webmaster Tools

Responsible webmasters always monitor the backlinks to his websites discovered by Google. After the Penguin update, lower quality backlinks can harm your website's performance in Google Search results. If you are not sure how to check the backlink count of your website, follow the steps below.

  1. Login to Webmaster tools account by following the URL
    http://www.google.com/webmasters/tools/

  2. Select your Website

  3. Click on Traffic (on the left-hand side of the window)

  4. Click on Links to Your Website
    Check links to your blog

What if Still No Backlinks are Discovered by Google Webmaster Tools

if your website is new or if it does not have any backlinks so far, Google Webmaster Tools will not show any. All you have to do is to wait.

  1. How much does Google Adsense pay per click in India?
  2. Can Guest Blog Posts Attract Penalty

It is recommended to register websites in Webmaster Tools for every webmaster to understand how big G sees our websites. You can see a log of useful information like crawl errors, search queries, HTML errors, etc.

This information is very important for a professional Internet marketer to optimize his website. Similar to this if you want to set safe search permanently on your browser follow the instructions provided in the link below.
How to Enable  Safe Search Permanently on Your Browser

  1. Submitting the Same Article in Multiple Article Submission Directories
  2. How To Promote a Real Estate Website

Internet marketers work hard to increase the traffic to their websites. It is because the hike in traffic increases the income. AdSense is one of the most popular PPC programs which lets bloggers earn money from their traffic.

It is true that getting an Adsense account is difficult nowadays. To learn more about it click on the link below.
Keeps Rejecting My Adsense Request

  1. Redirect Traffic and Links Pointing Old Blogger Post URL to New URL
  2. Duplicate Name Exists Error

Google personalized search results are one of the important feature provided by Google. Sometimes you may want to see search results without any personalized effect. In that case, you need to turn off this feature. The following link tells the steps to disable this feature on Google Search.
How to Turn Off  Personalized Search Results

Duplicate Name Exists Error While Connecting to a Network

Have you ever received an error message Duplicate Name Exists while trying to connect your computer to a Local network? If yes, it is because another computer in the network is already using the (hostname used by NetBIOS) name of your computer. You can fix Duplicate Name Exists error by simply changing the NetBIOS name (Network Basic Input/Output System) of your computer ( it should be unique in the Local network ).

Sometimes you may receive this error message even if your computer has a unique name. The reason is the outdated WINS Server.

It is because WINS server is responsible for verifying the NetBIOS names of the computers in the same network. So the possible solutions to fix the error Duplicate Name Exists are provided below.

How to Solve Duplicate Name Exist Error

  1. Change the name of the computer (assign a unique name) and reboot.
  2. Update WINS server
  3. Update to the Newer version of Windows Operating System

It is important to have a unique name for every computer in a network created as Windows Workgroup. If you have manually given the same name for more than one device in your Local Area Network, it will result in the duplicate name exists error.

It happens when two computers with the same name start operating at the same time. Another reason to get the error message duplicate name exists is the outdated/corrupted WINS server. WINS server manages the NetBIOS name map.

Any error in it will result in the total misleading information. So, It is important to update the WINS server.


  1. Difference Between Configuring Modem in Bridge Mode and PPPoE Mode
  2. How to Power Cycle a Modem
  3. Destination Net Unreachable
  4. Asianet Dataline Cable Broadband Modem

This issue usually appears on the older Windows version. So if you are consistently receiving this message, it is the time to upgrade your computer with the latest Windows Operating System. This error does not appear on newer Windows OS versions.

  1. Configure Reliance DSL Broadband Modem
  2. Change Wireless Network Name (SSID) On D-Link Router
  3. Cannot Access Some Websites On Reliance Jio 4G Network
  4. Setup Cox Cable Modem

As we see one of the major reason for getting the error message Duplicate Name Exists is the outdated WINS server. To learn more about it, click on the link below.
How to Configure WINS From Command Prompt

  1. Setup MTNL Modem
  2. How to Solve APIPA Issue
  3. How to Find Log in IP of a Modem
  4. Manage Cisco DPC2320 Cable Modem

You have seen how much influence NetBIOS has in generating the error message Duplicate Name Exists. To learn more about its effects, you need to go through its very basics.

 It works in the session layer of the OSI reference model. To read more about it click on the link below.
Session layer and Its Importance in The OSI Reference Model

How to Power Cycle Router & Modem In a Local Home Network

In this article, we discuss the importance of the power cycle in solving network connectivity issues. It is the process of turning off and turning on networking devices in a systematic order. Network devices mean the Router, Modem, Switch, etc.. It sounds simple but effective to solve connectivity issues. We recommend you to perform a power cycle after you set up a new router in the local network. In this tutorial, you will learn how to power cycle devices like modem, router, switch, Access Point, etc..


How to Power cycle Modem or Router
Let us check how to power cycle a modem/router. As I explained before, power cycling is the process of the turnoff and turn on a device in systematic order. To do it, follow the instructions provided below.
  1. Disconnect Power from your Modem /Router (unplug Power Cable)
  2. Wait 30 seconds
  3. Reconnect the Power supply
  4. Wait for one minute and ensure the active LED lights on the device are not blinking (Power light, Internet light, etc.. )


How to Power Cycle Entire Computer Network
Let us check how to power cycle a small network. Consider a small home network which has two computers, one modem, and a wireless router. Steps to power cycle this network are:

  1. Unplug Power Cable from Modem
  2. Unplug Power Cable from Router
  3. Now we need to wait one minute before connecting power cable back.
  4. Power on the Router and wait till lights are steady on Router (WAN light will not light as Modem is not on).
  5. Power on Modem and Wait till all modem lights are on and steady.
One of the major benefits of performing power cycle on a local network is the synchronization of all devices in it. Once all devices on a network are synchronized properly, a lot of connection issues will disappear. In simple words, we can fix a lot of Issues like slower Internet connection, WiFi connectivity error, LAN connection problems, etc.. by a proper power cycling.

  1. Duplicate Name Exists Error While Connecting to a Network
  2. Differences Between PPPoE Mode and Bridge Mode
  3. Change Wireless Network Name on D-Link Router

Once you are power cycling a network, it is important to note that you should start with the first device. In most cases, the first device is the modem. Once you have switched off the modem, you should power off the next device connected to it.

  1. Configure Reliance DSL Broadband Modem
  2. A network cable is unplugged
  3. PING: Transmit failed. General Failure

Once you have turned off every device, you should wait for one minute. You should power on the last device turned off. Repeat the process until you have turned on every device in the network.
How to Increase The Speed of Your Internet Connection