menu
close

How to Set Canonical Tag to Fix Duplicate Blogspot Blog Post URL Issues?

If you have a Blogspot blog, one of the SEO problems you might see in your blog is having multiple URLs pointing the same post.

Blogger generates different Blog post URLs for both desktop and mobile views. Blogger also creates a different URL that displays with comments.

For example, have a look at the three links I show below.


If you visit the links, you can see they are pointing to the same post. According to Google Search Quality guidelines, it is a duplicate content issue.

How can we fix the duplicate content issue created by this automatic Blogger post URL generation? The answer is by adding the Canonical tag In the Blogger source code.

By adding a canonical tag, we can tell the search engines which link is the preferred link. Search Engines will avoid other links and save our blogs from the duplicate content issue.

Adding the canonical tag to a static web page is easy. But, how can you add canonical tags on a dynamic website run on Blogger?

It is very simple. I will show you how to add a canonical tag in your Blogger blog.

How To Add Canonical Tag for Multiple Blogger Blog Posts?

A Blogspot blog might have hundreds of posts and a handful of pages. However, we can add canonical tags to all the blog posts and pages by adding two simple lines in the Blogger header tag.

To add the canonical tag on your Blogger blog, follow the steps below.

  1. Login to the Blogger account and select the blog

  2. Click on Theme from the left side menu

  3. Click on the vertical ellipsis (the vertical three dots)


  4. Click on Edit HTML

  5. Check for the line <b:include data='blog' name='all-head-content'/> in the header using the search feature.

    PS: You can open the Blogger search by pressing the [Ctrl] and [F] buttons together after clicking the blogger code window.

    If you find the code in the header, add this line <link rel='canonical' expr:href='data:blog.url'/> below it.

    Have a look at the screenshot provided below. You can see how I added the code.


    PS: both lines must be between <header> </header> tags.


How Does The Canonical Tag Fix the Blogger Duplicate URL issue?

Once we pasted the codes <b:include data='blog' name='all-head-content'/> and <link rel='canonical' expr:href='data:blog.url'/> in the header, Blogger will tell Google to ignore other variations of the post links.

  1. How to Remove Date Numbers From Blogger Post Links?
  2. How to Setup Custom Domain Name For a Blogspot Blog?

All major Search Engines like Google, Bing, and DuckDuckGo respect the canonical tag.

  1. How to Position AdSense Ad Just below the Blogger Post Title?
  2. How to Unblock Banned Websites on Airtel Network?

So, you have the fixed the multiple post links issues of the Blogspot blog for all major search engines.

How to Display AdSense Ads Below Blogger Post Title With Google Auto Ads

After the introduction of Blogger Responsive themes and Google Auto Ads, AdSense optimization for a Blogspot blog is very simple. Google AdSense Auto Ads helps a lot to an ordinary blogger, but we can improve the AdSense revenue by some extra steps.

This article explains how to get maximum revenue by combining the Google Auto Ads and manual AdSense units on your Blogspot Blog.

My experience with Google Auto Ads is very positive, but I have made more income by adding an extra manual AdSense unit just below the Blog post title.

I have explained in my previous article that one of the most important places to display AdSense unit on a blog post in just below the post title.

Google Auto Ads sometimes misses this position as there is no way to manually position the auto ads to display on a page.

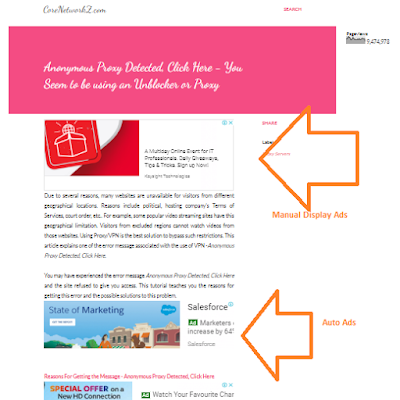
The screenshot provided below will give you a clear idea of this point.

You can expect a higher Click Through Rate (CTR) on the Ad unit showing just below the blog post title.

  1. How Much Page Views Required to Earn $100 From AdSense?
  2. How to increase CPC?

Let us check the step by step instructions to place a Google AdSense Ad unit between the Blogger post title and the beginning of the content.

How to Place AdSense Ads below Blogger Post Title?

Before proceeding, you must have a responsive AdSense Display Unit code generated from your AdSense account.

The following steps teach you where to paste your AdSense code to display Ad Unit below the post title.

  1. Open Blogger Theme Editor

    To Open Blogger theme editor, follow the instructions below.

    • Login to the Blogger account and select the blog where you want to display Ad units

    • Click on Theme from the left side menu

    • Click on the vertical ellipsis (the vertical three dots)

    • Click on Edit HTML

    I am using the Blogger Notable theme for CoreNetworkZ.com. It is a free responsible theme from the Blogger team.


  2. Add Google AdSense Code in the Blogger Responsive Theme

    You need to know the exact location on the Blogger HTML to paste the AdSense code to show the ad units just below the post title.

    • Search for <data:post.body/> from the HTML page


      You might see more than one time this code on the template. In the Notable theme, you should select the second <data:post.body/> search result.

      PS: Click on the Template HTML Edit window and press [Ctrl] and [F] buttons together to search for a code.

    • Paste the responsive AdSense Display Unit code just above <data:post.body/>.

    • Look at the screenshot below. I have pasted the Google AdSense Code.

    • Do not forget to click the save button at the bottom of the Edit window.

Once you have completed the procedure, Blogger will display an AdSense Ad unit just below the blog post title.

  1. How to Remove Date Figure From Blogspot Post Links?
  2. How to Setup Custom Domain Name For Blogspot Blog?

Google Auto Ads feature is very helpful for bloggers who do not have a lot of time to try different manual ads placements.

  1. How to Open Blocked Websites On Airtel Network?
  2. How to Open Blocked Ports In Cox Cable Modem?

Google automates this process and displays ads at the best places available on a page.


How to Open Blocked Websites On Airtel 4G Internet Connection?

Airtel is one of the popular 4G Mobile Service Providers in India. Their faster Data Connection helps to access the Internet and download video files hasslefree.

However, some Airtel users find problems with accessing some websites using their Internet connection. Thousands of genuine websites are blocked for Airtel 4G users either by technical problems or by the Government regulations.

This tutorial will help you with unblocking blocked websites on the Airtel 4G data connection.

CoreNetworkZ team has a handful of tutorials that teaches how to access banned websites including torrents and video sharing sites your computer.

However, this tutorial teaches you how to open all websites on an Airtel Internet connection.


Why Can't I Access a Website On Airtel Mobile Connection?

If you are looking for the reasons for not able to open a website on your Airtel Phone, the below list will help you.

  1. Airtel blocks some websites due to Government and court orders.

  2. Technical errors lead to the ban of an entire website

  3. Airtel may block torrent websites to prevent piracy and save the bandwidth

  4. If a website server IP address belongs to the pool of banned IP addresses, Airtel users cannot open that site

Let us check how to fix the above problems.


How To Open Blocked Websites On Airtel 4G Network?

Let us check the different solutions to open a banned website on Airtel 4G Network.

  1. Change the Default Airtel DNS Server:

    If the problem with loading a website on your computer is due to DNS issues, the best solution to open that website is to change the default DNS server address of the Airtel 4G Connection.

    If you don't know how to change the DNS server address details on your computer having Airtel Mobile internet, follow the instructions provided in the link below.
    How to Change the DNS Address on a Computer?


  2. Use The Google Cache Technique:

    If it is an information site you want to open with your Airtel connection, you can use the Google cache to view the content. To do Google Cache trick to view website content, follow the steps below.

    • Open https://www.google.com on your browser.

    • Type cache: link address and press the enter key.

    For example, if you want to see the cached page of the CoreNetworkZ blog on Google, use the following code on Google Search.

    cache:https://www.corenetworkz.com


  3. Using Tor Proxy to Bypass Airtel Blocks

    Tor proxy is a free proxy tool which helps you to bypass almost every ISP firewall restrictions. To read more about it, visit the link below.

    Tor Proxy Review


  4. Use the Opera Browser to Unblock Airtel Website Ban

    The Opera browser offers free VPN service which helps you to open blocked sites on your Airtel Mobile Phone. Follow the steps below to use the Opera VPN to open a blocked website on Airtel Network for free.

    • Download the Opera browser using the link below.

      https://www.opera.com/hi/download

    • Once you installed the Opera browser on your laptop, open it.

    • Click on the Easy setup icon on the right-hand top of the Opera browser.

      how to open torrent sites on airtel data connection
      Scroll down the Easy setup window and click on the browser settings.

    • Click on the Advanced link and toggle the Enable VPN button.
      how to open porn websites on airtel

      Wait for a few seconds. Once the VPN is on, you can access all blocked websites on your Airtel connection.

  5. Use the Puffin Secure Browser to Unlock a Domain

    Puffin Secure Browser helps to unblock a website on your Airtel data connection. You can simply bypass the Airtel firewall using the Puffin browser.

    To download the Puffin browser, visit the link below.

    https://www.puffin.com/secure-browser/

CoreNetworkZ.com has dozens of tutorials related to Cybersecurity.

  1. Idea 4G APN Settings
  2. BSNL 3G APN Settings For Your Android Phone

We have similar articles like how to access a blocked website on the Jio 4G network, open a web port in Cox WiFi modem, etc.

  1. How to Configure Airtel Broadband Modem?
  2. How to Deactivate BSNL Value Added Services?

About The Author:

Alex George is a Cisco and Microsoft certified Network Engineer. He has been working in the Network Engineering field since 2006.

He has hands-on experience in configuring and troubleshooting various mobile networking products for both corporates and small IT firms.

To learn more about his qualifications, please check the About Us page.

How to Configure Idea 4G & 3G With Faster Internet APN Settings on Android Phone?

After merging with Vodafone India, Idea Cellular Services formed a new company called Vodafone Idea Limited. The new company is offering high-speed data services for its customers.

This article teaches you how to configure your Android Phone with the fastest Vodafone Idea Limited APN settings. By activating the correct 4G APN settings, you can increase the average Idea Internet speed on your handset.


Let us check where to get the latest Idea 4G Net Settings for your device.

How to Get Latest Idea 4G Internet Settings?

  1. Get Idea Net Settings Automatically
    When you activate Idea GPRS, 4G or 3G Internet on your Android phone, your phone will receive the automatic settings.

    If you have not received it automatically, you may visit the link below on another device and enter your Mobile Connection Number.

    https://www.ideacellular.com/mobile-internet/2g/gprs-settings

  2. Manual APN Settings

    Sometimes you may need to configure the Access Point and GPRS settings for Idea (both GSM second and third generation) connection manually on your Android phone.

    To enter the APN Settings manually, follow the instructions provided below.


Steps to Configure Idea 4G/ GPRS/ 3G on Android
  1. Click on Applications

  2. Go to Settings

  3. Click on Wireless and Networks

  4. Click on Mobile networks

  5. Go to Access Point Names (APN)

  6. Create New APN (you can get this option by pressing the left button)

To activate the Idea Data service, you need to enter the following details. Once you entered the details, the Idea will activate 4G data service on your Phone.


Name Idea gprs
APN internet
Proxy < - not set - >
Port < - not set - >
Username < - not set - >
Password < - not set - >
Server < - not set - >
MMSC < - not set - >
MMS proxy < - not set - >
MMS port < - not set - >
MCC 404
MNC 19
Authentication type none
APN type default, supl

In case if you delete the previous configuration, it is better to know how to set up the same settings again by yourself.

A wrong Access Point Name can stop you from accessing their mobile broadband service.

So if you deleted the existing Idea GPRS APN, you should re-insert the SIM again to get automatic settings from the Vodafone Idea LTD.


What If The Idea 4G APN Is Not Working?

In rare cases, some Idea 4G customers find the default APN is not working on their Phones.

If the above settings do not work on your Phone, you should visit the idea cellular website and request auto APN for your Idea SIM.

You can do it by visiting the link below.

https://www.ideacellular.com/mobile-internet/2g/gprs-settings


how to Increase Idea Internet Speed?
There are multiple factors affecting the net data transfer speed from Idea Cellular Network.

  • Signal strength is the most important factor which affects the Idea 4G Internet speed.

  • Big constructions and natural barriers (like hills) between the tower and your Phone will reduce the speed.

  • Sharing Idea 4G among multiple devices will reduce the Net speed on each device.

  • If you are looking for the steps to get maximum speed from Idea 4G, you may click the link below and follow the instructions.

    The below Idea 4G Speed hack will give you better data speed on your PC using Mobile WiFi.

    Boost Idea 4G Data Transfer Speed


Important Tips
  1. Steps to Activate Idea 3G on Android

    This manual setting valid for every mobile broadband connection.

    To activate data connection, follow the steps provided in the link below.

    How to Activate Mobile broadband on your Smart Phone

  2. How to Recharge Idea 3G on a Handset

    You can recharge Idea 3G and 4G using the existing balance on your account or by recharging with a specific amount.

    To get the latest Idea Offers type *121# on your Mobile Phone.

    PS: The below USSD codes no longer works
    Dial  *150* 107#  to get 300MB 3G Bundled Usage valid for 30 days
    
    Dial  *150* 199#  to get 600MB 3G Bundled Usage valid for 30 days
    
    Dial  *150* 249#  to get 1GB 3G Bundled Usage valid for 30 days
    
    Dial  *150* 348#  to get 1.5GB 3G Bundled Usage valid for 30 days
    
    Dial  *150* 448#  to get 2GB 3G Bundled Usage valid for 30 days
    
    Dial  *150* 595#  to get 2GB 3G Bundled Usage valid for 60 days
    

    Vodafone Idea LTD may change the tariff plans over time. Click on the link below to get the latest plans.

    For the wrong recharge amount, they may send invalid request error.

    https://care.ideacellular.com/wps/portal/account/online-recharge


  3. How to Check The Remaining Idea 3G Data Balance

    The idea doesn't send alerts of remaining data balance.

    So we may continue to use the Internet even though the data balance is exhausted.

    Then the Idea Cellular network deducts money from the main balance for the rest of the data.

    To avoid this situation, you must check the remaining data balance. Use the USSD code to check the remaining data balance.

    Dial *125#  


  4. To configure BSNL GPRS on your Android phone, click on the link below.
    How to Configure BSNL GPRS on Android Phone

  5. Speed differences in 2G, GPRS, and HSDPA

  6. How to Avoid Idea Prepaid SIM Number Monthly Rent by Re-enabling The Lifelong Validity


How to Activate Idea 3G Broadband and Get Latest Plans

For the Idea to migrate from 2G to 3G, we do not need to change the SIM. All we need to do is activate 3G and get an Internet setting from Idea.

To activate 3G broadband on Idea, follow the steps below.

  1. Make sure your Mobile Phone supports 3G

    If you are not sure whether your handset is 3G compatible, type "CHECK" and SMS to 12345 (without ""). This number is a toll-free number.


  2. Send SMS "ACT3G" to 12345 (without "")

    Now you will get a confirmation message from Idea about the status of the 3G activation process.


  3. Configure 3G Internet setting from Idea in the handset

    To configure Internet settings in your mobile phone, type "SET" (without "") and SMS to 54671 (toll-free number).


How to get the latest 3G Idea Internet Plans
To get the latest 3G Internet plans, dial *147# and follow the instructions provided by Idea.


About The Author:

Alex George is a Cisco and Microsoft certified Network Engineer. He has been working in the Network Engineering field since 2006.

He has hands-on experience in configuring and troubleshooting various Vodafone Idea products for both corporates and small IT firms.


How to Set Auto Resume Failed File Download Feature On Chrome Browser?

You might see the error message Failed -Network Error on Chrome browser while downloading a big file from the Internet. So the download process would end up on failed, and if you are lucky, you will see a Resume button to resume the download. Even though the resume button will help, you might not feel good if the download interruptions are too frequent. You will tire with pressing the Resume button every time.

There is a solution provided by Google Chrome to deal with the frequent download error.

We can set an auto-resume option on the Google Chrome browser to continue the download without further issues.

Why Am I Getting Frequent Download Error On Google Chrome Browser?
Let me explain, most of the times it is not the browser's fault.

Either the slow Internet connection or the busy server causes frequent download interrupts. Chrome has a Resume button to restart the failed download.

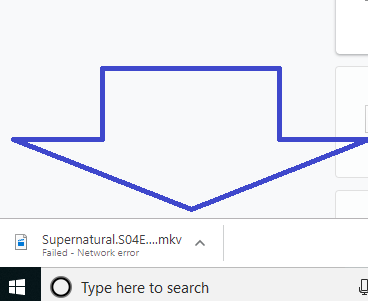
Look at the image below. You can resume the download by pressing the arrow button near the error message Failed - Network Error.

You need to click the Resume from the menu.

If you do not see the download error message at the bottom left corner of your browser, you need to open the Chrome download window.

To open the Google Chrome download window, press [Ctrl] and [J] buttons together.

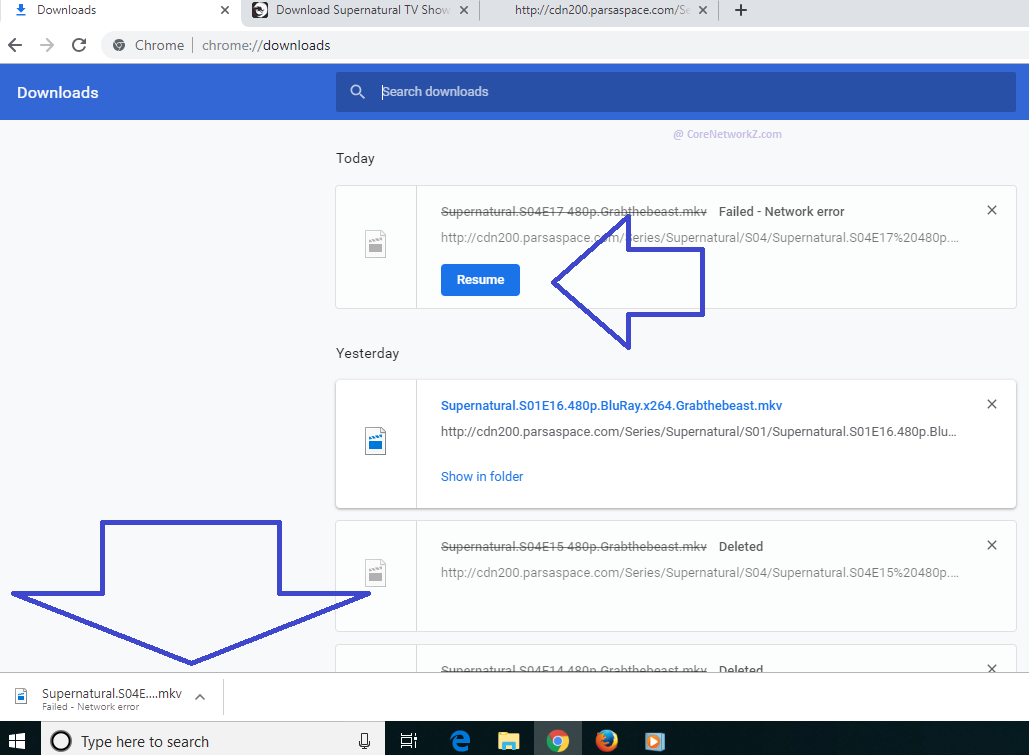
You can see the Chrome Full Page Screenshot below.

On the Downloads window, you can see the Resume button. To continue the download, you need to press it.

It will be hectic to press the resume button all the time if you face continues network errors.

The best solution to reduce the effects of frequent Download error is to set auto-resume.

How to Auto Resume Google Chrome File Downloads?
There is a Google Chrome Extension to add the auto-resume download feature. All you have to do is to follow the instructions provided below.

  1. You need to visit the Chrome Web Store and search for Auto-resume Downloads. Or you should click on the link below.
    https://chrome.google.com/webstore/detail/auto-resume-downloads/cklhieaaomjcmlaeopmeidpfdjjogjaf

  2. You need to add it to your Chrome browser.

  3. After you have installed the Chrome Auto Resume Downloads extension, Chrome will resume the failed downloads in every one minute.

If you no longer require this extension, you can either disable it or remove it.

  1. How to Download the Latest Google Chrome Offline Installer?
  2. How to Setup Siemens SpeedStream Modem?
  3. How Can I Migrate Google Plus Comments to Blogger Comment Fields?

To open the Google Chrome Extensions window, visit the link below.
chrome://extensions/

You can Open Recently Closed Google Chrome Browser Tabs by pressing [CTRL] + [Shift] + [T] buttons together.

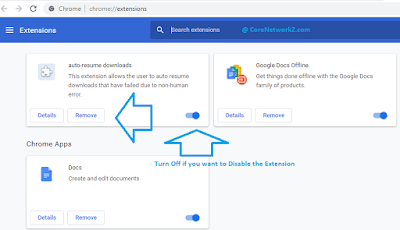
On the extensions window, you can either disable or remove the Auto-Resume App.

If you want to disable the Auto=resume Downloads extension, you may turn off the toggle button.

  1. The Best Cash Back Coupons For JioFi Recharge
  2. What is the Destination Port Unreachable Error Message?

If you want to remove this extension permanently, you should press the Remove button.

Setup Siemens SpeedStream Modem With Bell PPP DSL Internet

Many Internet Service Providers like Bell Internet ( Sympatico) supports Siemens SpeedStream Modems and Routers for their customers. There are different models like SpeedStream-6520, 4100, 4200 series, etc.. Technicians from ISPs will configure it at the customers' house and support all the necessary cable works. However, customers may need to reconfigure the SpeedStream modem once a while as part of the regular troubleshooting. This tutorial teaches you how to set up a Siemens SpeedStream Modem by yourself.


How to Configure Siemens SpeedStream Modems and Routers

Before configuring the SpeedStream Modem with your DSL Internet, you must connect it properly with your telephone line. There are two types of telephone connections - Standard and Wall-Mount.

  1. How to Connect SpeedStream Modem With Bell DSL Internet Line
    Illustrations provided below will teach you the procedure.

    For Wall-Mount Filter, you need to remove the telephone and connect the wall mount filter to the wall plate. Then reconnect the telephone.

  2. Physical Connection Of Sympatico Siemens SpeedStream Modem

    1. Connect the WAN port of the Modem to Telephone Filter using Telephone cable

    2. Connect LAN port of the SpeedStream device to the computer using Ethernet cable

    3. Power on the computer and the modem

  3. How to Login Siemens SpeedStream Router
    Open a browser and type http://speedstream on the address bar. Now press the Enter key to continue to the login window.

  4. Setup Username and Password On Bell Siemens SpeedStream Modem
    You can create a new username and password on the Gateway Administrator Setup window.

    Username and Password are case sensitive. You need to re-login using the new Username and Password.

  5. Configure Bell Internet PPP Connection With SpeedStream Modem
    On the PPP Login window, you need to enter the DSL Username, Password, Service Provider name, etc.. If you do not know this information, you need to contact your DSL service provider.

    This picture shows the PPP configuration window of Bell Internet. You need to enter the details supplied from them on this window. After entering the necessary details, you should click the connect button.

This article covered the basic configuration of the Siemens SpeedStream modem.

  1. How Can I Migrate Google Plus Comments to Blogger Comment Fields?
  2. How to Make JioFi Wireless Network Invisible From Others?

For advanced settings, you need to contact the technical support of the respective Internet Service Provider. Here I used the Bell Internet settings to demonstrate the setup procedure.

  1. How to Fix Destination Port Unreachable Error?
  2. How to Fix Destination Net Unreachable Error?

How Can I Migrate Google Plus Comments to Blogger Comment Fields?

Google has decided to shut down Google Plus, and this decision has an unexpected effect on blogs running using Blogspot. Most of the Blogger bloggers enabled Google Plus comment feature on their posts. Since the Google Plus feature is going to its end, Blogger has no option to show Google+ comments. This change will not affect the Blogspot bloggers who have not activated Google+ comment feature, but for others, it is a piece of bad news.

This article checks the scope of migrating the Google+ comments to Blogger Comments or retain those comments under the blog posts.

Look at the screenshot below. It is the warning I have received from the Blogger team today.

According to this warning, Blogger will remove all Google+ buttons integrated with Blogger themes. Any custom made themes with the Google+ button will not work even if the button remains.

This message says that the support for Google+ comments will be turned down, and all blogs using Google+ comments will be reverted back to using Blogger comments.

Another shock is the removal of Google+ Followers and Google+ Badge from the template. We are no longer able to use them.

The Blogger Social Share button no longer shows the Google+ button.

The million-dollar question is whether we can migrate the comments made from Google+ profiles to our Blog and retain there? The important portion of the warning tells the Blogger view on this question.

I have highlighted the important part of the warning. That portion is, Unfortunately, comments posted as Google+ comments cannot be migrated to Blogger and will no longer appear on your blog.

To read more about this news from the official source, visit the link below.
https://blogger.googleblog.com/2019/01/an-update-on-google-and-blogger.html

How Can I Migrate and Keep Google+ Comments on Blogger Blog?
We do not have any tools available yet to migrate Google+ comments to Blogspot. However, there is a workaround for this problem.

It is a very boring process to copy the Google+ comments and publish them as new comments using the name and URL field.

As long as Blogspot is not ready to provide any automatic migration tool, it is the only option.

But before doing this, I recommend you to take the backup of the posts and comments using the Blogspot Comments and Posts Export feature.

It helps to save the existing posts and comments on our computer. To do this follow the steps below.

  1. Log in to your account and on the dashboard click on the Settings
    Export comments

  2. Click on the Other
    backup your Blogspot comments on your Phone

  3. Click on Export blog link
    Blogspot comment backup and migration

As far as I know, many bloggers are unhappy about this new policy change.

  1. How to Make JioFi Invisible?
  2. How to Analyze Windows 10 Local Hard Drive Storage Allocation?

However, we need to save the precious user comments first before they get deleted.

  1. How to Setup Siemens SpeedStream Modem With Bell PPP DSL Internet?
  2. Set Auto File Download Resume Feature on Chrome

Update: Google has changed the Google Plus profiles with blogger profiles.

How to Hide JioFi Wireless Network By Making Invisible From Others?

JioFi Hotspot is one of the most popular WiFi Hotspots available in India. Though the WiFi signal has WPA2-PSK encryption protection, we can do a little more. One of the extra precautions to avoid unauthorized access to your JioFi network is to hide them from other devices. Which means, no other devices will see your Jio Wireless broadcast while scanning for all available networks. This tutorial teaches you how to make JioFi WiFi invisible from others.

Let us see how to make Jio WiFi invisible from the public and hide from potential hackers.

How to Hide JioFi Wireless Network From Others

It is very simple to make Jio Wireless Network invisible from other devices and prevent them from connecting to it.

All you have to do is to disable the SSID broadcast from the GUI of Jio WiFi Hotspot. I suggest you connect the JioFi router to your computer using the USB cable to perform it.

Once you have connected PC and the Reliance Jio router using a USB cable, follow the step by step instructions provided below.

  1. Type http://jiofi.local.html on the address bar of a browser and click the Login link.

  2. Use administrator as both username and password.

  3. Click on the Login button


  4. Click on WiFi from the left menu. Click on the drop-down menu at SSID broadcast and select Disable.

  5. Click on the Apply button at the bottom of the window. Now the Jio wireless will restart. After the restart, no other devices will see this JioFi broadcast.

Is Your Jio WiFi 100% Hidden?

The answer is no. This invisible network will show as Hidden Network. However, no one without having the SSID (JioFi Wireless Network Name) can connect to this network.

  1. How to Change SSID and Password?
  2. How to Check JioFi Daily Data Balance Left In Your Account?

So the external device must need both SSID and Passphrase to connect to a hidden Jio Network. It provides an extra layer of protection.


How to Connect to a Hidden JioFi Network?

Once you have made the Jio 4G Hotspot WiFi signal invisible, you need its SSID to connect it. To connect to an invisible Jio 4G Hotspot WiFi, follow the instructions below.
  1. Click on the Wireless symbol on the system tray to scan all available networks.

  2. You will see the signal from Jio 4G Hotspot as one of the hidden networks. Click on the hidden network to connect.

    If there are multiple hidden networks, you can identify your Jio 4G Hotspot signal by analyzing the signal strength.

  3. You need to type the SSID (WiFi Name) to proceed. After typing the password, you can connect to the invisible JioFi WiFi signal.

Once you have made your JioFi signal invisible, no one can connect it without the SSID and Password. If you do not reveal the SSID to anyone, it will be difficult for someone to identify your WiFi.

  1. How to Analyze Windows 10 Local Hard Drive Storage Allocation?
  2. How to Keep Idea Prepaid Number Without Paying Monthly Rent?

I hope you like this trick to add one more layer of protection to your JioFi network.

  1. How to Setup Siemens SpeedStream Modem?
  2. How to Do Port Forwarding on Cox Cable Modem?

How to Analyze Windows 10 Local Hard Drive Storage Allocation?

You might have faced low storage space issues at least once in your life. In most cases, it is the junk files that consumed a large portion of your local hard drive space. Windows 10 provides an easy way to recognize the junk files which consume a lion share of local hard disk space on your computer. All you have to do is to check the Local Storage Usage feature. This tutorial explains how to use Windows 10 Local Storage Usage feature.

How to Find JunkFiles Taking Storage Space On Windows 10 Device?
By Running Windows 10 disk space analyzer tool on your laptop, you can find the Apps and Files which consume storage space.

To run Windows 10 Local disk space analyzer tool on your PC, follow the instructions below.

  1. Click on Windows Start Menu and Click the Settings button.

  2. Under the Windows 10 Settings window, you should click on the System.

  3. Under the System, click on the Storage.

    Once the Windows 10 Storage opens, you can click on the Local Hard Drive to inspect the space allocation for each App and file.

How to Delete Unwanted Files Which Consumes Windows 10 Local Hard Disk Drive?
To inspect and delete unwanted files on your PC, follow the above instructions and then follow the steps provided below.

  1. Click on the Local Disk from the menu. You can see the category of files consumes space on your device. The below picture will give a clear view of the statement.

  2. Now I am going to inspect the files which are present in the documents category on this local drive. To see the files present in a category, click on that category.

  3. To inspect the files which consume the storage space, you need to click them. If I click one category, Windows Explorer will show the exact location on the hard drive.

Now it is easy for you to decide whether a file needed or not. You can delete any files which are no longer required and free the space on your Windows 10 laptop.

  1. Tips to Avoid Idea Monthly Rental Fee
  2. Setup API Process Consumes Too Much CPU Resources

So any time you feel your computer is running out of storage space, you can easily decide which files should be deleted to clean the storage space by using this builtin Microsoft tool.

How to Avoid Idea Prepaid SIM Number Cancellation by Re-enabling The Lifelong Validity?

Due to the tough competition from other mobile networks in India, Idea Cellular Ltd has made huge changes to the current prepaid mobile plans.

Because of the better talk time plans from competitors, many Idea network subscribers kept their Idea number only to receive incoming calls without recharging. This trend forced Idea Cellular Ltd to change its current prepaid plans.

Now Idea prepaid mobile subscribers are required to recharge a minimum amount to keep the outgoing call facility.

If you want to check the current minimum rechange plans offered by Idea Cellular network for prepaid customers, visit the link below.
https://care.ideacellular.com/wps/portal/account/online-recharge

On this page, you can see the all available Idea Cellular prepaid plans. Under the headline Unlimited, you can see the Active plans which include unlimited Talktime, daily data limit, and SMS.
How to activate Idea Prepaid lifelong validity for free

Currently the minimum expenditure, Idea allows is the 49 rupee plan. Under the 49 Rupee plan, the prepaid customer will get 28 days validity with 100 MB data.

If you fail to recharge your Vodafone Idea number every month, there is a chance of cancelation of your Mobile number.

Look at the chart below to see the Idea Prepaid minimum recharge plans.

If you are looking for better Data Service Validity, we suggest you go for Unlimited plans from Idea Cellular Network.

How to Pay Bill Bill For Vodafone Idea Disconnected Number?
If Vodafone Idea canceled your prepaid number due to inactivity, you can recover the number by paying the bill using the link below.

https://care.ideacellular.com/wps/portal/account/disconnected-number


How to Activate Idea Prepaid SIM Lifelong Validity?
If you want to retain the lifelong validity of your Idea Mobile Phone number, you should go for the Lifelong offer from Idea Cellular Network.

This lifelong offer is valid for both Idea Prepaid and Postpaid customers.

According to the latest news release from the company, the Lifelong offer includes many perks. To read more about it, you may visit the link below.
https://www.ideacellular.com/media-centre/news/national-news/ideas-lifelong-offer-for-prepaid-and-postpaid-customers

Both Idea Prepaid and Postpaid customers can activate the lifelong offers by recharge of Rs 995. After the 995 recharge, both Prepaid and Postpaid customers do not need to pay the monthly rental fee.

  1. How to Setup Idea Data Service On Android Handset
  2. Windows Setup API Process Consumes Too Much CPU Resources

Once you have activated the lifelong plan, you will receive the most economical tariff plans available in the industry.

  1. How to Check All Unaccepted Facebook Friend Requests I Sent
  2. How to Check JioFi Daily Data Balance Left?

Local Mobile phone calls will cost 99 paise / Minutes under Lifelong Postpaid plans and 1.99 paise / Minutes under Lifelong Prepaid Tariff.

For STD calls, Under the Lifelong validity plan, Prepaid customers must pay 2.99 paise / Minutes, and Postpaid customers pay 99 paise / 30 seconds.

About The Author:

Alex George is a Cisco and Microsoft certified Network Engineer. He has been working in the Network Engineering field since 2006.

He has hands-on experience in configuring and troubleshooting various Vodafone Idea products for both corporates and small IT firms.