While testing the correct MTU size of your current network, sometimes you may receive the error message "Packet needs to be fragmented but DF set". In this tutorial let us check the reason and solution for this error message. If the MTU size you have set on the ping test is too high, you will get this message. Let us check this by an example. Here I am testing whether the MTU value 1480 is the proper value for my network. The ping command to perform this test is:

ping www.corenetworkz.com -f -l 1480

  1. Here www.corenetworkz.com is the ping test destination

  2. -l is used to switch the default ping packet size. You can learn more about it by following the link below.
    Use -l to Change Default Ping Packet Size

  3. -f ensures the packets send are not fragmented.


See the test result below.
Packet needs to be fragmented but DF set


Microsoft Windows [Version 6.1.7600]
Copyright (c) 2009 Microsoft Corporation.  All rights reserved.

C:\Users\sijugk>ping www.corenetworkz.com -f -l 1480

Pinging ghs.l.google.com [74.125.200.121] with 1480 bytes of data:
Packet needs to be fragmented but DF set.

Ping statistics for 74.125.200.121:
    Packets: Sent = 4, Received = 0, Lost = 4 (100% loss),

C:\Users\sijugk>


Reasons for the Message Packet needs to be fragmented but DF set
If the packet size you have entered is too high for your network, you will get the message Packet needs to be fragmented but DF set.

Solve the Error Packet needs to be fragmented but DF set
In order to solve the error, Packet needs to be fragmented but DF set, visit the link below and follow the steps mentioned on the tutorial.
Testing Proper MTU Size Of Your Network

Technology Portal
We all know the default size of ping ICMP echo request packet. That is 32 byte. Though the default ping packet size is 32 bytes, we can change it by a simple command while pinging a destination from your computer. By using -l option, you can decide the size of the echo request packets. The valid value of the size of ICMP packets is from 0 to 65500. So the size of the packet should fall in the range.

If you set any value, not in the range of 0-65500, you will get an error with warning bad value for -l, the value range is from 0 to 65500.

If you are facing issues with an MTU value of ICMP packets sent from your computer, changing their size may help you.

Let us check how to change the default packet size of ping echo request.

You need to use the command format provided below.

ping -l (value between 0 to 65500) [Destination Address]


Practical Example
Here let us check how to use this command to change the default size of ICMP echo request packets.

I am going to send packets to a destination address with manually configured value.

Here I use different values, and you can see the result on the screenshot provided below.

Example- ping -l 50 www.corenetworkz.com

Here I have changed the default value of 32 with 50.

Let us check how this command changes the size of echo packets send from your computer.
Change value

The above picture shows ping packets send with different sizes.

So I believe you have learned the procedure to assign any size for the ICMP request packets sent from your computer.

  1. Destination Net Unreachable
  2. Request Timed Out
  3. How to Solve APIPA?

Likewise, if you want to change the default number of Echo requests send from your computer, you can do it by following the instructions provided in the link below.
How to Perform Continuous Ping Operation to a Destination Until Manually Stop

Not just the default size of the Ping requests but the TTL value too can be changed from your computer.

  1. How to Set Chrome Auto Resume Failed File Download Feature?
  2. How to Setup Idea 4G On Android Phone?
  3. How to Bypass Vista Admin Password?

If you want to change the default TTL value of the ICMP requests send from your computer like you have changed the default size, click on the link below.
How to Change Default TTL Value Set

  1. PING: Transmit failed. General Failure
  2. Ping Request Could not Find Host. Please Check the Name and Try again
  3. Error 628: The Connection was Terminated by the Remote computer

Sometimes ping packets send from your computer with different packet sizes may bring you certain error messages instead of a proper reply from the destination.

  1. Error 797: A Connection to the Remote Access Server was not Made
  2. Adobe Flash Player has Stopped a Potentially Unsafe Operation
  3. Setup Siemens SpeedStream Modem With Bell PPP DSL Internet

Most of the time it might be related to some other issues.

  1. Enable Boot/ Shutdown/ Logon and Logoff Status Messages
  2. The Best Free LAN Messengers & Download Links
  3. Google Chrome Browser To Access A Remote Computer

The link provided below shows such an error.
Echo Reply Shows Hardware Error Instead Proper Reply
D-Link DSL-2520U ADSL2+ Ethernet/USB Combo Router is a high-speed ADSL Modem with routing feature. DSL-2520U can support up to 2 Mbps upstream and 24 Mbps downstream. You do not need extra Firewall protection If you are using DSL-2520U ADSL2+ Ethernet/USB Combo Router as ADSL modem. It is because DSL-2520U has its own built-in firewall. Another advantage of using D-Link DSL-2520U is the NAT firewall and SPI support for your network.

Since it is a modem cum router with DHCP feature, you do not need another device to share the Internet connection among multiple computers in your network. You can connect a computer to DSL-2520U ADSL2+ Ethernet/USB Combo Router with Ethernet cable(RJ 45), and USB cable.

Are You Facing Slower Internet With D-link?

Configure D-Link DSL-2520U ADSL2+ Ethernet/USB Combo Router


In order to configure D-Link DSL-2520U in your network, follow the instructions below.
  1. Connect the Phone cable (DSL line) to the WAN/Internet port of D-Link DSL-2520U ADSL2+  as specified by the ISP

  2. Connect D-Link DSL-2520U to Your Computer using an Ethernet cable

  3. Power on the device and type 192.168.1.1 on the address bar of a browser and log in to the web-based setup page using following details.

    Username: admin
    Password: admin

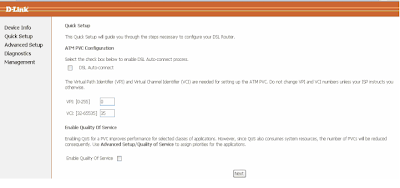
  4. Click on Quick Setup and check the box DSL Auto connect
    connection

    Click on Next

  5. Enter the VCI/VPI values provided by your ISP to configure Internet connection on your DSL Modem
    Enter VCI VPI details

    Click Next

  6. Select the connection type as specified by your ISP

  7. Configure D-Link DSL-2520U ADSL2+ Modem in PPPoE

    If your ISP provides username and password to connect to the Internet, you should configure D-Link DSL-2520U ADSL2+ in PPPoE Mode. The advantage of configuring D-Link DSL-2520U ADSL2+ modem is that you can connect multiple computers to this device and share the Internet connection among them. Steps to setup D-Link DSL-2520U ADSL2+ modem in PPPoE mode is provided below.

    1. Select the connection type PPP over Ethernet(PPPoE)

      PPPoE
      click on next.

    2. Enter the Username and password provided by your ISP
      configure PPPoE connection with your D Link modem

      click on next

    3. Check Enable NAT and Enable Firewall
       
      Enable firewall and NAT

      Click Next

    4. You must enable the DHCP server to connect multiple computers to this D-Link Modem. Modem IP address is 192.168.1.1 and Subnet Mask is 255.255.255.0
      Enable DHCP in Dlink modem

      Starting IP address is 192.168.1.2 and the end IP address is 192.168.1.254, Subnet Mask is 255.255.255.0. Now click next

    5. Now you are in the summary page.
      reboot Dlink modem

      Click on save, and D-Link modem starts to reboot.


  8. Configure D-Link DSL-2520U ADSL Modem in Bridge Mode

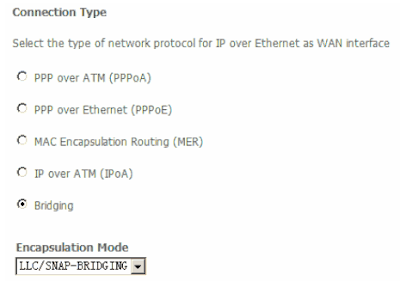
    If your ISP wants your modem configured in bridge mode, you can follow the steps mentioned here to setup D-Link DSL-2520U ADSL2+  in bridge mode. The issue with bridge mode is that you can connect only one computer to the D-Link DSL-2520U ADSL2+ modem and that computer will get the public IP address provided by ISP. Since there is no option to enable DHCP, you cannot use it as a router. You also need to use an external firewall if you are configuring D-Link DSL-2520U ADSL2+ modem in bridge mode because the built-in firewall is disabled in bridge mode.

    1. Select the connection type Bridging
      Connect mode

      click Next

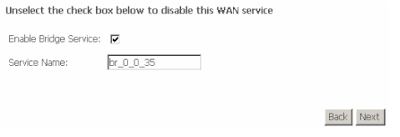
    2. Check Enable Bridge Service
      Enable Bridge service

      Click Next

    3. Enter the modem IP address as 192.168.1.1 and Subnet Mask 255.255.255.0

      Click Next

    4. Now we are at the final page of bridging D-Link ADSL Modem.

      Click Save. Now Dlink modem starts to reboot

Security Features of D-Link DSL-2520U

D-Link DSL-2520U ADSL2+ Ethernet/USB Combo Router is able to detect common attacks including DOS attack, port scan attack, etc.

  1. How To Reset Microsoft Notepad To Default Settings
  2. Turn Windows Search In to Instant Internet Search
  3. Reset BSNL Modem to Factory Default

To learn more about DOS attack and how to prevent, click on the link below.
What is DoS Attack and How to Prevent it

If you have configured D-Link DSL-2520U ADSL2+ Ethernet/USB Combo Router in bridge mode, you cannot use the router feature of this device.

  1. Precautions For ROM-0 Router Vulnerability
  2. Setup Linksys WRT54G in PPPoE Mode
  3. Make a Program Starts Automatically When Your Computer Boots

You need an additional router to connect and share the Internet among multiple computers in the network. To configure a D-Link router, visit the link below.
How to Setup D-Link Wireless Router Manually
In this article, we discuss the importance of the power cycle in solving network connectivity issues. It is the process of turning off and turning on networking devices in a systematic order. Network devices mean the Router, Modem, Switch, etc.. It sounds simple but effective to solve connectivity issues. We recommend you to perform a power cycle after you set up a new router in the local network. In this tutorial, you will learn how to power cycle devices like modem, router, switch, Access Point, etc..


How to Power cycle Modem or Router
Let us check how to power cycle a modem/router. As I explained before, power cycling is the process of the turnoff and turn on a device in systematic order. To do it, follow the instructions provided below.
  1. Disconnect Power from your Modem /Router (unplug Power Cable)
  2. Wait 30 seconds
  3. Reconnect the Power supply
  4. Wait for one minute and ensure the active LED lights on the device are not blinking (Power light, Internet light, etc.. )


How to Power Cycle Entire Computer Network
Let us check how to power cycle a small network. Consider a small home network which has two computers, one modem, and a wireless router. Steps to power cycle this network are:

  1. Unplug Power Cable from Modem
  2. Unplug Power Cable from Router
  3. Now we need to wait one minute before connecting power cable back.
  4. Power on the Router and wait till lights are steady on Router (WAN light will not light as Modem is not on).
  5. Power on Modem and Wait till all modem lights are on and steady.
One of the major benefits of performing power cycle on a local network is the synchronization of all devices in it. Once all devices on a network are synchronized properly, a lot of connection issues will disappear. In simple words, we can fix a lot of Issues like slower Internet connection, WiFi connectivity error, LAN connection problems, etc.. by a proper power cycling.

  1. Duplicate Name Exists Error While Connecting to a Network
  2. Differences Between PPPoE Mode and Bridge Mode
  3. Change Wireless Network Name on D-Link Router

Once you are power cycling a network, it is important to note that you should start with the first device. In most cases, the first device is the modem. Once you have switched off the modem, you should power off the next device connected to it.

  1. Configure Reliance DSL Broadband Modem
  2. A network cable is unplugged
  3. PING: Transmit failed. General Failure

Once you have turned off every device, you should wait for one minute. You should power on the last device turned off. Repeat the process until you have turned on every device in the network.
How to Increase The Speed of Your Internet Connection
One week ago one of my friends called me to fix wireless network issues at his home. He told me that his computer was receiving good network signals but once a while his device was getting disconnected without any reasons. I asked him whether his PC connected to the right network. His answer was yes. He had a D-Link router, and the wireless network name (SSID) was dlink. He was pretty sure his laptop was connected to the right network since the SSID was the same name configured on his D-Link router.

I asked him to switch off the router and check if he could connect to it. He did the same. Still, he was connected. It was another network his computer connected to with the same SSID.

To avoid this type of mistakes, you should change the default Wireless Network Name with a unique name. To change the SSID on D-Link Wireless Router, follow the steps below.

If you are looking for steps to configure Internet, follow the steps provided in the link below.
How to Setup D-Link WiFi Router

How to Change Wireless Network Name on D-Link Router

  1. Log in to D-link Router: Type 192.168.0.1 on the address bar of the browser and enter admin as the username. You can leave the password field blank.

  2. Click on the Wireless Settings tab

  3. Click on Manual Wireless Connection Setup button
    Change

  4. You can delete the default name and write a unique wireless network name
    D-link router

  5. Click on Save Settings

How to Hide D-Link Wireless Network from Others

You can have one more layer of protection by hiding your WiFi broadcast from others. Though it is not very effective against skilled intruders, there is no harm in trying this. To hide your D-Link Wireless network, follow the steps mentioned below.
  1. Log in the router and open manual wireless connection setup page.

  2. Select the visibility status as invisible

  3. Click on Save settings


Once you have completed the steps, your D-Link WiFi network will be invisible. To connect to a hidden WiFi, you have to type the SSID manually and click the connect button. So, it is important to remember the unique SSID you have set.

  1. Configure Reliance DSL Broadband Modem
  2. How to Power Cycle
  3. A Network Cable is Unplugged
  4. Ping Request Could not Find Host
  5. Setup Cox Cable Modem

This article is about how to change the D-Link router SSID. To learn more about configuring this device, click on the link below.
How to Configure WiFi on DLink

  1. How to Upgrade D-Link Router Firmware
  2. Getting Error 720 While Making a Dial-up Connection
  3. Block Websites Using D-Link Router In Home
  4. How to Reset a Modem
  5. Create Log Files for IP Messenger Installed

In case if you face any issues with connecting to the D-Link WiFi after changing the SSID, the steps mentioned in the link below can help you.
WiFi Keeps Disconnecting

How to Manually Setup D-Link Wireless Router

Updated on November 05, 2012
D-Link quick setup wizard is enough for an average user to set up his router but for advanced options, it is better to learn how to configure this device manually. This tutorial explains how to configure every model of D-Link wireless router manually for advanced features. Here we learn how to enable Internet access, WiFi and WiFi security. The first step of this guide is to make sure you can go online with the modem by connecting a computer to the Ethernet port of the modem.

If it is fine, disconnect the modem and connect the computer to one of the LAN ports of D-Link Wireless Router using an Ethernet cable. Now power on the device.

Configure Broadband Access On D-Link Router
  1. Access Setup Page:

    • Type 192.168.0.1 on Browser address bar and press enter.
      configuration

    • Enter username admin and leave the password field blank. Click on login to access setup page.

  2. Click on Manual Internet Connection Setup
    steps to setup d link router

  3. Select Internet Connection type:

    Using the drop-down menu, you can select the Internet connection type you are using.
    DSL

    Configuration details for each of the Internet connection types are listed below.

    1. Configure D-Link Router for Cable Internet Connection:

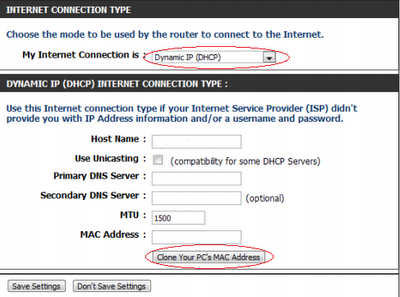
      To setup, your router with cable Internet, select the option Dynamic IP(DHCP).
      Cable broadband

      If you are using cable Internet connection the most important step is to click on the button Clone Your PC's MAC Address. To know the importance of this step, click on the link below.
      Why MAC Address Cloning Required for Cable Internet Connection

      If your cable ISP doesn't provide any details about Host Name, DNS Server, etc.. leave them blank or keep the default value. Do not forget to click on Save Settings button.

    2. Configure D-Link Router with DSL Connection (PPPoE):

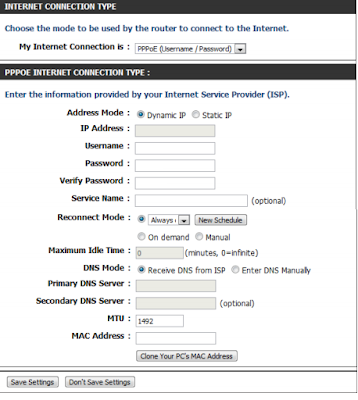
      With DSL broadband, you should select the option PPPoE(Username/Password) from the drop-down menu. Enter the Username and password provided by ISP.
      DSL broadband

      Keep the Address mode "Dynamic" if your ISP does not provide you any IP address details. Normally for a DSL connection, you do not need to clone computer MAC address unless asked by your ISP. Click on Save Settings after entering details.

    3. Configure D-Link Router with PPTP Connection:

      Steps to setup your router with PPTP connection is similar to PPPoE connection.
      PPTP Connection

    4. Configure D-Link with Static IP:

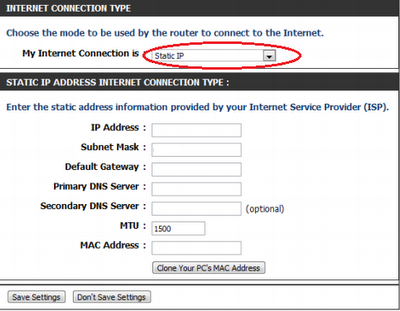
      Here you should enter the full IP address details provided by your ISP including Subnet Mask, Default Gateway, DNS Servers, etc.
      static

      After entering details click on Save Settings.

  4. Connect Modem to D-Link Router:

    • Connect the Internet port of D-Link router to the LAN Port of modem

    • Connect Computer to LAN port of Modem

    • Switch on Modem

  5. Power Cycle:

    I recommend you to perform a power cycle if you face any issues with going online. To do the power cycle follow the steps mentioned in the link below.
    How to Power Cycle Router and Modem

Configure Wireless & Security
Right after configuring Internet access on the D-Link router, you need to configure the wireless settings if you want to use it. Latest D-Link wireless routers support both 2.4GHz and 5GHz frequencies.

So it can extend its support for 802.11a, 802.11b, 802.11n, and 802.11g wireless standards. 802.11n supports both 2.4GHz and 5GHz where 802.11a supports 5GHz only. 802.11b and 802.11g work in 2.4GHz.

 Here we share the manual steps to configure wireless and security on the D-Link router.

  1. Login

  2. Click on Wireless Settings tab
    Dlink WiFi

  3. Click on Manual Wireless Connection Setup

  4. 2.4GHz Devices(802.11n,11g, and 11b):

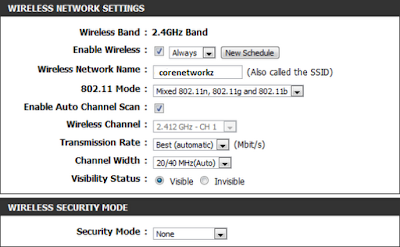
    1. Click on Enable Wireless and Select 802.11 mode (2.4GHz).
      configure 2.4ghz

      You can select one of the following 802.11 modes:

      • 802.11b Only
      • 802.11g Only
      • 802.11a Only
      • Mixed 802.11g and 802.11b
      • Mixed 802.11n and 802.11g
      • Mixed 802.11n,11g, 11b

    2. Check on Enable Auto Channel Scan:

      Now D-Link Wireless Router will automatically pick the channel with least interference.

    3. Wireless Network Name:

      Here you can write the name of your wireless network (SSID). SSID can be up to 32 characters, and it is case sensitive.

    4. Select Channel Width:

      20/40 MHz if you are using both 802.11n and non802.11n devices. If you are not using 802.11n devices, you can select 20MHz.

    5. Visibility of SSID:

      If you do not want to show your SSID, you can check the option Invisible.

  5. 5GHz Devices (802.11n and 11a):

    1. Enable Wireless:
      5 GHz frequency

In this article, you have learned to set up a brand new D-link router without the help of a setup disc.

  1. Error 633: The Modem is Already in Use or not Configured Properly
  2. Change COM Port Assigned to Modem on Your Computer
  3. Different Methods to Access Device Manager

Configuration with a DSL connection is different from a cable broadband connection.

  1. Remove Blogger Navbar from Your Blog
  2. Setup in Bridge Mode
  3. Port Forwarding in Nokia Siemens Residential

Do not forget to secure the device with a new login username and password.

  1. Setup WBR-2310 With WPA
  2. Access Point DWL-G700AP by Setup Wizard
  3. DIR-865L Amplifi Cloud 5700 With Cable & DSL

You should also set up a strong WiFi passphrase to prevent unauthorized use by intruders.
BSNL supplies modem with default firewall which prevents traffic through uncommon ports to ensure the security of devices connected to it. Sometimes it can be annoying because certain applications need some of these ports to work properly and the firewall settings prevent these applications from running properly. Port forwarding requires to fix issues with playing online games, online conferences or messaging, establishing a VPN connection through the BSNL modem. If you have installed an online camera on your network, you may need to open certain ports to it access through the Internet. Port forwarding for certain applications are already defined on BSNL modem and all you have to do is just enable them. For other applications, you should make sure you have the correct port number and the protocol type (UDP/ TCP) before starting the process. You can get this number either from the specific product manual or from their technical support.

Steps to Open a Port On BSNL Modem
  1. Login

    Type 192.168.1.1 on the address bar of the browser and enter the following details when it prompts.
    Open

    Username: admin
    Password: admin

    To learn more about it, visit the link below.
    How to Configure BSNL Teracom Modem

  2. Click on the Security tab

    The option port forwarding is under the Security tab.
    Open Age of Empires through BSNL

  3. Click on Port Forwarding

    It may prompt you to enter BSNL modem username and password to continue the process.
    Exception rule

  4. Click on Add
    Add

  5. Add a new Port Forwarding Rule

    You must specify which Port you want to open on BSNL Firewall.
    Angry birds bsnl

    Here you can select the specific application from the list of pre-defined rules. If you cannot find your application in this list, you can select user-defined option to open a port for your application. For that, you should have the port number and protocol type from the product vendor. After creating the rule, you have to click on "Apply".

  6. Reboot

    Under the admin tab, you can find the reboot option. You should select "reboot from last" option. Sometimes you may need to reboot your modem to take the port forward rule in effect.
    Fix

After rebooting the device, you might check whether the application is working properly. If not, you might need to make the computer as DMZ to stop all firewall restrictions. To do this, follow the instructions provided in the link below.
How to Make DMZ

Further Reading
  1. Setup wireless and security in Teracom Modem

  2. UT Starcom ADSL Configuration

  3. Setup Wireless Security On  Teracom Network
Nokia Siemens Residential Router 1600 is one of the common modems provided by BSNL. One of my friends lost the setup disc came with this device and struggled a lot at the time of reconfiguration. In this tutorial, you can learn how to setup BSNL Internet connection using Nokia Siemens Residential Router 1600. Just like other BSNL modem/ router models, we do not need setup disc to configure it. We can do it manually by following the steps provided in this tutorial. At the end of the tutorial, you can see the steps to activate WiFi and wireless security on Nokia Siemens Residential Router 1600.


Configure Nokia Siemens Residential Router 1600

In order to configure this device with BSNL broadband, follow the steps below.
  1. Connect Nokia Siemens Residential Router 1600 to the computer using Ethernet cable

  2. Power on the modem

  3. Type 192.168.1.1 on the address bar of Internet Explorer and press enter
    nokia modem

    Username: admin
    Password: admin

    Now you can access the web-based setup page of Nokia Siemens Residential Router 1600 by entering the login details given. You will be redirected to device info page where you can read basic information about it. You can select the right option to set up this device from the left-hand side menu.
    Network

  4. Click on Advanced Setup
    model

    Delete all connections except VPI/VCL 0/35.

  5. Click Edit button of 0/35
    atm

    Click next. Here we must make sure the value set for VPI is 0 and VCI is 35.
    pppoe

  6. Select PPPoE

    We need to configure PPPoE connection with BSNL modem. So we should select PPP Over Ethernet (PPPoE). Now we should enter the BNSL broadband username and password.
    selection

    We should check

    i. Enable PPP Debug Mode
    ii. Bridge PPPoE Frames Between WAN and Local Ports

    Now click on Next

  7. Enable NAT in Nokia Siemens Residential Router 1600
    Set NAT in Nokia Modem

    We should check

    i. Enable NAT
    ii. Enable WAN Service

    Click Next

  8. Click on Save and we will automatically redirect to the main page.


    We should click on Save/Reboot button there. After this step, we should go to Management (on the left-hand side) and click Save/Reboot to save the current settings properly.

Popular Tutorials
  1. Configure Teracom WiFi Device

  2. Nokia Siemens C2110 ADSL

  3. Setup Internet in WA 3002 g1 UTStarcom ADSL Type 2

Technology Blog
For the last few weeks, I have been getting an error message "Error 777: The Connection attempt failed because the modem (or other connecting devices) on the remote computer is out of order" while connecting to the Internet. I use Huawei Access Manager to connect to the Internet because the modem provided by Tata Photon Plus is from Huawei. Mainly the issue occurs in the evening (that means the peak time) and the error message prompt me to either redial to connect to the Internet or cancel. Here I would like to share the major reasons of "Error 777: The Connection attempt failed" and its possible solutions. After a few attempts, I would be able to go online but in some worse cases, I waited hours to get rid of the error.

If you are not sure how this error message looks like, have a look at the screenshot provided below.

Error 777: The Connection attempt failed because the modem on the remote computer is out of order


Reasons for Error 777: The Connection Attempt failed

The possible reasons for "Error 777: The Connection attempt failed because the modem (or other connecting devices) on the remote computer is out of order" are:
  1. Usage of the incorrect driver for your modem

  2. The number dialed by your modem is blacklisted

  3. Outdated modem driver

In addition to the above-mentioned reasons, I am getting this error message only in peak time. So I assume, the network users can also be a factor but I am not sure.
  1. Configure Airtel Broadband Modem
  2. Idea 4G APN Settings
  3. Destination host unreachable


The Solution for Error 777: The Connection Attempt failed

The major reason for "Error 777: The Connection attempt failed because the modem (or other connecting device) on the remote computer is out of order" is faulty modem driver. However, in my experience just restarting the computer itself fixed this issue. So here I would like to share a practical guide to fix this error message.

  1. Unplug the modem and reconnect (If you are using a USB modem or external modem )

  2. Restart your computer

  3. Update the driver

  4. Uninstall the current modem and reinstall it with the latest driver available.

Remedy Recommended by Readers

Two Airtel 4G dongle users ( allsubs99 & Ramesh Nagaraj ) shared their solution to fix this issue. According to them:
  1. Open the Airtel 4G Dongle utility

  2. Find out the Connection Type

  3. Change the connection type from RAS to NDIS
If the issue persists, it is advised to contact your ISP to fix it. Some of the related issues and solutions are provided below.
  1. Error 718: The Connection was Terminated
  2. Error 619: A Connection to the Remote Computer Could not be Established
  3. Error 619: A Connection to the Remote Computer Could not be Established
  4. Error 628: The Connection was Terminated by the Remote computer
  5. Error 797: A Connection to the Remote Access Server was not Made
  6. Error 651: The Modem (Connecting Device) has Reported an Error
Author

Published By Alex George

Today's post is an announcement for all my regular readers about the latest achievement of CoreNetworkZ Tech Solutions, which has crossed the milestone of 1,00,000 page views per month.

I want to thank all my blog readers who helped me achieve the goal of 1,00,000 Page Impressions per month.


Can I Run a Successful Blog in Blogspot?

I faced this question when I started CoreNetworkZ.com on the Blogspot platform. The answer is Yes.

There are Many Successful Blogs on the Blogspot platform.

One example is this blog. CoreNetworkZ.com is a blogspot blog with a custom domain. Right now, www.corenetworkz.com successfully maintains 1,00,000 page views per month for one month, and I would like to share this happy news with all my blog's readers.


Monthly Unique Visits and Page Views

With more than 72K visits, this blog received more than 100K Page impressions this month, and I can proudly say that www.corenetworkz.com joined the 100K club.

I will share the screenshots from Google Analytics with my readers. I hope this success will inspire other newbie bloggers, and I am grateful if this can bring more passionate bloggers.

How to get 100K traffic per month?

Nimin James, one of the regular readers, asked me when this blog crossed the 100K threshold. I saw the 100K cross one month ago but didn't announce it that day.

I wanted to ensure it was not just a temporary effect. So, I decided to wait at least one month to ensure it. With one month of steady analysis of received page impressions, I can state that my blog is getting 100K Page views per month.


The Country-Based Traffic Analysis

This blog is getting more visitors from the United States, and India is in second place. The United Kingdom is the third country, and Canada is in fourth place.

I believe the Map Overlay from Google Analytics will help you understand better. You can see the traffic map below to analyze the country-based traffic to this blog.

The major traffic sources of my blog

Major Traffic Sources

You must be curious to learn from which sources CoreNetworkZ Tech Solutions secure this 100K traffic. According to Google Analytics, the primary source is Google.

Critical Blog Traffic Sources

83.02% of traffic comes from Search Engines. As I said, Google is in the first position.

The second position goes to Yahoo, and Bing is in the third. My blog is getting 10.70% direct Traffic, and other sites contribute 6.23%.

Author: Alex George

Author

Alex George is the Chief Editor and founder of CoreNetworkZ EdTech Solutions. He is a software engineer and has 20 years of experience in the EdTech niche.

He graduated with a B.Tech in Computer Science & Engineering from CUSAT and worked with three leading IT companies before starting CoreNetworkZ EdTech Solutions.

He possesses sound knowledge of SOHO Network Engineering and has completed various IT certifications, including CCNA, RHCE, and CEH.

He developed and published more than twenty professional custom themes for Blogger and is an expert in software app development.

You can contact him at alex.george@corenetworkz.com.

BSNL provides Nokia Siemens C2110 ADSL Modem for users who opt not to take wireless modem. It has routing feature but does not have WiFi. Since it has DHCP server, we do not need to buy an extra router to share Internet among multiple computers. However, C2110 has just one LAN port and one USB port. So you must have an additional device known as a switch to share the Internet with multiple computers. Nokia Siemens C2110 ADSL Modem is best suited for BSNL customers who want Internet on just one computer. This tutorial explains how to configure broadband on Siemens C2110 ADSL Modem and instructs how to connect a switch to share the broadband among multiple devices.


Boost BSNL Broadband Speed

Configure Broadband On Nokia Siemens BSNL C2110 ADSL Modem
  1. Connection

    Connect LAN port of C2110 to a computer using an Ethernet cable. Make sure the device is on.

  2. Login

    Type 192.168.1.1 on the address bar of your browser and press enter.

    When a user login window comes it will prompt you to enter a username and password.


    Default Nokia Siemens BSNL Modem login username and password are:

    • Username: admin
    • Password: admin

  3. Configure Internet

    To configure the Internet in Nokia Siemens BSNL Modem, you should follow the steps below.
    DSL

    • Click on Configuration

    • Click on Internet
      create

    You should delete all the default connections shown on this page. You can select the connection and click on delete symbol.

  4. Create a new connection

    • Click on add to create a new connection

    • Enter the following details.

      1. PVC Name: PPPoE
      2. VPI : 0
      3. VCI: 35
      4. After entering the details click on Next.

    • Now enter the following details.

      1. Encapsulation Type: LLC/SNAP
      2. Encapsulation Mode: Bridged

      Then Click on Next.

    • In this page, you may need to select Obtain an IP address automatically.


      You should enable NAT and Default Route if you wish to connect a switch and share Internet among multiple PCs. After selecting this, click on next.

    • Here you should enter the username and password given by BSNL. Service name should be BSNL. After entering the details click on next and on confirmation page click Apply. It is important to type the broadband service username in the right form. Do not forget to add @ part if you are given the username as an email address by ISP. If you have any doubts, you must contact technical support immediately.
      user

  5. Reboot

    After finishing the setup you should reboot Nokia Siemens BSNL modem. To reboot, follow the steps below.

    • Click on Admin

    • Click on Reboot

    Select the option Reboot from last and click on Reboot button in the bottom. It may take a few minutes to come back your modem.

Other Articles
  1. How to Enable Wireless in BSNL Broadband Devices

  2. Setup Wireless in WA3002- g1 UTStarcom BSNL Type 2 Gateway

  3. How to Configure Belkin Wireless Router

  4. Setup BSNL Teracom Wireless and Security

Technology Blog
Newer Posts Older Posts Home