menu
close

Configure Automatic IP Addressing From Command Prompt & Adapter Properties

Without a layer three address(IP or logical address), your computer cannot communicate with other devices in the network. You can either assign a static IP to your computer or configure it to obtain an IP address automatically from a DHCP server. For a smaller network, it is easy to assign Logical addresses manually to devices connected to the network but it is not practical for a big network. For bigger networks, it is better to use the option to get automatic IP configuration from the DHCP server in the network. This tutorial explains different methods to configure a Windows computer to receive an IP address automatically.


DOS Prompt Command to Set Automatic IP Addressing

If your computer is not ready to receive Internet Protocol address automatically from DHCP server, you can fix it by a Command Prompt trick. Follow the instructions to configure your computer to receive logical number automatically.

  1. Open Command Prompt As Administrator

    Click Windows Start menu and right-click on Command Prompt. Click run as administrator. To learn more, visit the link below.
    Run Command Prompt As Administrator

  2. Type the command

    netsh interface ip set address "connected adapter name " dhcp and press enter.

The DORA will start now to get a logical address from the DHCP server. To learn more about DORA process, visit the link below.
DORA Operation In Dynamic Host Configuration Protocol


Obtain an IP Address Automatically From Adapter Properties

If you don't want to set your computer to receive automatic Internet Protocol number from the command prompt, you can do the same from adapter properties.

  1. Right click on the adapter icon in the system tray
    How to Set Your Computer to get Internet Protocol Automatically

  2. Click properties and select Internet Protocol version4 (TCP/IPv4)
    Dos command

  3. Click Properties

  4. Select the radio button Obtain an IP address automatically and click OK
    Obtain automatically

Benefits Of Using Automatic IP Addressing

Since DHCP is providing layer three numbers to computers enabled the option to obtain an IP address automatically, there won't be any Internet Protocol addressing error. DHCP assigns a unique IP address to every computer in the network without having an Internet Protocol address conflict. Another advantage of using automatic addressing is the reduction in network configuration time. We do not need to spend the time to assign static layer three numbers to devices in the network if all the devices are set to receive it automatically.

Recommended Tutorials
  1. Assign Preferred DNS  To Your Computer

  2. How to Assign Static Internet Protocol  To A Computer From Command Prompt

  3. Resolve IP  Conflict With Another System On The Network

  4. Find Layer Three Number Of a Website From Command Prompt

No:Recent Tutorials
Can Ping Global DNS Server IP Address But Unable To Open URL
How to Test Local Network For Connectivity Issues
3 How to Configure Idea 3G on Android Phone
PING: Transmit failed. General Failure
A solution for Destination Net Unreachable - Error
Destination host unreachable
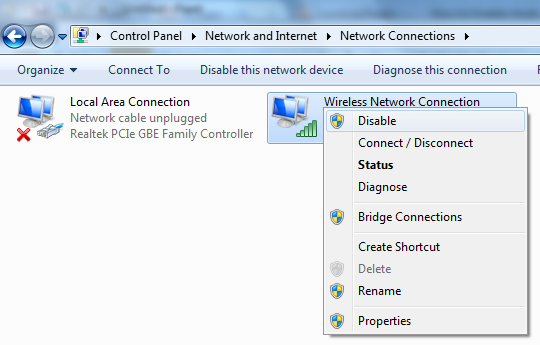
How to Enable Disabled Adapter
Resolve Windows Automatic IP Address
Asianet Dataline Cable Broadband Modem WiFi Connectivity
How to Solve TTL Expired in Transit
Ping Request Could not Find Host
Steps to Reset Winsock On Your Computer
Important Network Commands

Check the TCP/IP Configuration of All Interfaces From Command Prompt

If your computer has multiple network interfaces, there might be a chance of confusion while configuring them. It is better to understand the current configuration of all interfaces on your computer. While checking the configuration on an interface, you must verify the DHCP status, IP address assigned to the interface, subnet mask and default gateway with gateway metric, Interface metric, WINS Server configuration etc. There is a DOS Prompt command to display all these TCP/IP details of every interface on your computer. This tutorial explains the use of this dos command and checks the current TCP/IP configuration on all active network interfaces on your computer.


Steps to View TCP/IP Settings On An Interface

For a better understanding of the packet flow on a PC, we must know the current configuration on every NIC. Steps to view the TCP/IP configuration on an Interface are:
  1. Open DOS Window

    Type cmd on Windows Search and click it or type cmd on Run window and press enter.

  2. On DOS, type the command

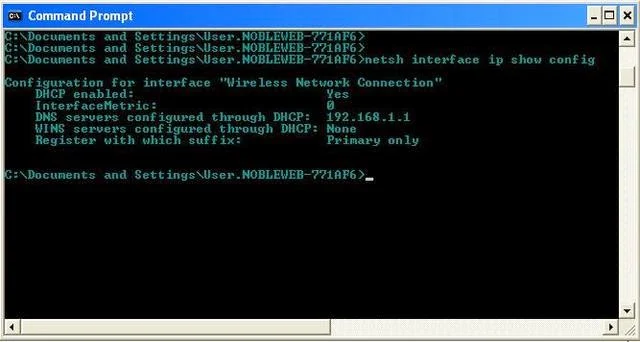
    netsh interface ip show config

  3. Now press enter.

If you are using Windows XP, network adapter details will be listed like this.
show

On Windows 8 and Windows 7 computers, network adapter (Interface) settings will be displayed on Command Prompt like this.
set

Which All Network Adapter Settings Can be Seen

By using the above command, we can see the following configuration information of every active adapter on a computer.

  • List of All Active Interfaces On the Computer

  • DHCP enabled or not.

  • Interface Metric

  • DHCP server address

  • WIN server status

  • IP Address of Interface

  • DNS Server Information

Command Prompt Tricks
  1. How to Assign Static  Address From Command Prompt

  2. How to Configure Automatic  Addressing From Command Prompt

  3. An Error Occurred While Trying To Share Folder Over a Network. Server Service Not Started

  4. How to Open DOS From Any Working Directory

No: Recent Posts
DOS Command To Open Command Prompt In Any Folder
Enable Copy Paste Feature On Command Prompt
What is Smurf Attack & How to Prevent it
How to Setup MTNL Broadband ADSL Modem
Setup Idea 4G on Android Phone
Delete Beneficiary Fund Transfer in HDFC Netbanking
Setup Asianet WiFi Modem
Important Network Commands
Assign Static IP To Any Interface From Command Prompt
Setup Log Files for IP Messenger

How to Disable Firewall on Linksys Wireless Router

If you are connecting your local network to the Internet, you must use a firewall to protect your network from external intruders. Most of the SOHO routers provide firewall protection and there is no need to add an extra one for your home network. However, if you are using multiple devices with inbuilt firewall, it is better to disable it on the routers except the first one. It helps to avoid issues with working of online applications like games from being blocked by multiple router firewalls. This guide explains how to disable default Linksys firewall protection.


Configure Firewall Protection On Linksys Router

  1. Login to the Setup page

    Type 192.168.1.1 on the address bar of your browser and press enter.

  2. Login Details

    Enter the username and password on the login page. The default settings are:

    Username: No username and leave it blank
    Password: admin

  3. Click on the Security tab
    no security

  4. Configure Linksys Router Firewall

    Under the Security tab, you can see the Firewall. Select Enable option to enable it on Linksys router. If you want to disable it, choose to disable option and click save button.

Reason to Disable Linksys Firewall

One of the major reasons to turn off the firewall is to avoid dual firewall situation. As I explained at the beginning of this tutorial, we do not need multiple firewalls to protect a home network. So if your network is already protected, you do not need an extra one. Another reason is to prevent issues with playing online games or running certain web applications through the router. However, in those situations, you may resolve the issue without disabling the firewall by doing port forwarding. To learn more about it, visit the link below.
How to Perform Port Forwarding Router

Related Guides
  1. How to Configure Wireless Router Without Setup Disc

  2. How to Setup Wireless Camera WVC80N

  3. Configure AP WAP54G In Access Point Client Mode

  4. Configure Range Expander WRE54G and RE1000

New Topics

How to Start Windows Wireless Zero Configuration (WZC)

If Wireless Zero Configuration (WZC) is not started on a Windows computer, it cannot detect any available wireless networks. It is an important Microsoft service which normally starts at boot time and this utility manage WiFi connections. If WZC is disabled on a device, it cannot find and join WiFi networks. So if you are facing any WiFi connectivity issues on your computer, the first step is to check whether WZC is enabled. This article tells how to enable WZC on a Windows computer and fix issues related to WiFi connectivity. Here we can see two different methods to activate this service. You can activate it either by executing a Command Prompt command or by following GUI instructions. These two methods are explained in this article.


Steps to Enable Wireless Zero Configuration
  1. Click on start

  2. Click on Run

  3. On Run window type services.msc press OK
    Service

    Now the services windows will be opened. The Wireless Zero Configuration is the third service from last.
    wzc 871122

  4. Open the service and click on start button to enable this service.
    in win7


Start WZC From Command Prompt

Here we use a DOS command to start Wireless Zero Configuration. The procedure is given below.
  1. Start Command Prompt

  2. Type the command net start wzcsvc and press enter
Now onwards it is started on your computer and it will work as long as you manually set its status stop. If you are using third-party utilities like Dell DW WLAN Card Utility or Linksys WiFi Network Monitor etc, they may set the status of WZC as stopped. As long as they work properly it is not necessary to enable it back but if these third-party tools show issues, it is better to disable them and start Microsoft Utility. I recommend this because, in my personal experience, this built-in Microsoft Utility works better than third-party utilities. However, you should not use two different network monitoring utilities at the same time.

Where to Find Wireless Zero Configuration on Windows 7 & 8

I am getting comments regarding wireless zero configuration on Windows 8 and 7 computers. They want to know where to find WZC in Windows 7 and 8 as they couldn't find it on the services page. Actually, there is no WZC on Windows 8, Vista and Windows 7. It is an important service on Windows XP and Server 2003 but discontinued on later versions. Instead of using it, they use WLAN Autoconfig to manage the wireless network. To know more about this service to find and manage WiFi, visit the link below.
How to Start WLAN AutoConfig Service

Popular Articles
  1. How to Check LAN Connectivity Issues

  2. How to Connect to an Ad-hoc Network

  3. My Laptop Doesn't Detect WiFi Networks

Home

An Error Occurred While Trying To Share Folder Over a Network. Server Service Not Started

In a Local Network, some users face issues with sharing folders over a network. In most cases, this issue occurs after running Windows updates or reinstalling Windows. Exact error message while trying to share a folder is" An error occurred while trying to share. The Server service is not started ". In rare cases without any Windows updates, users face this issue. Common reasons for failure in sharing folder are listed below.


Reasons For Getting Error While Sharing a Folder Over Network
  1. Stopped state of lanmanserver service

  2. Disabled Server service

  3. File and Printer sharing is disabled

Solution For Folder Sharing Error Over a Network

To solve the error message "An error occurred while trying to share. The server service is not started. The shared resource was not created at this time", follow the steps below.

  1. Start lanmanserver

    To fix the error "An error occurred while trying to share. The Server service is not started" we need to start the lanmanserver on your computer. The steps to start lanmanserver are given below.

    1. Run Command Prompt as Administrator
      To learn how to run command prompt as administrator, visit the link below.
      How to Run Command Prompt as Administrator

    2. On command prompt type "net start lanmanserver" and press enter.
      An error occurred while trying to share. The Server service is not started
    After starting the lanmanserver most of the issues with sharing a folder on your computer over a Local Network will be resolved.

  2. Make Sure File and Printer Sharing is Enabled

    If File and Printer sharing is not enabled on your computer, you cannot share a folder with other computers in the network.

  3. Enable Server service

    • Go to Services Window
      To learn how to go to the services window, visit the link below.
      How to Open Services Window

    • Right-click on Server and select start.
      How to start server service on a Windows 8 computer

    The same process can be followed to start server service on Windows XP, Windows 7 and Windows 8 computer.

Though this tutorial is written for issues where a user sees the warning "An error occurred while trying to share. The Server service is not started", the same procedure can be used in other computers in the network failed to view shared folders on your computer. If File and printer sharing is not enabled, no folder on your computer can be accessed by other computers in the network. The same situation happens if the server service is not started on your computer.

No:Recent Tutorials
How To Power Cycle a Modem
Setup Linksys WRT54G Wireless Router
3 How to Configure Idea 3G on Android Phone
PING: Transmit failed. General Failure
A solution for Destination Net Unreachable - Error
Destination host unreachable
How to Enable Disabled Adapter
Router Cascading Tutorial
Asianet Dataline Cable Broadband Modem WiFi Connectivity
How to Solve TTL Expired in Transit
Ping Request Could not Find Host
How to Block Websites Using D-Link Router In Home
How To Setup Cisco DPC2320 Cable Modem
How to Setup Reliance DSL Broadband Modem
How to Setup D-Link Wireless Router in to Bridge Mode
How to Setup D-Link Wireless Router Manually
How to find Login IP Address of a Router or Modem
How to Reset a Router Manually
How to Restart WZC
Resolve Getting 169.254.X.X (APIPA) Windows Automatic Private IP Address

How to Repair IP Address On Windows XP, Windows 7 & 8

Windows prompts users to repair the IP address when it detects IP addressing (Logical addressing) issues on their computers. Situations like limited or no connectivity, duplicate IP addresses, connection issues etc trigger the need of repairing current IP address on your Windows computer. In this tutorial, let us check how to repair IP address on Windows 8, Windows 7 and XP computers. This article covers different methods to repair Internet Protocol address by pressing the repair button on network connection status, repair from command prompt etc...


Method 1: Repair IP Address from Adapter Status

It is one of the easiest methods to repair issues with a logical number assigned to a PC running on Windows 8, 7 and XP. Adapter status window will show if there any issues with a logical address assigned. When your computer faces an addressing issue, on system tray you will be notified to repair it from the adapter status page.

  1. Repair IP address On Windows XP

    1. Double click on the network icon on the system tray
      drive

      Now network connection status window will open.

    2. Click on Support tab
      check

    3. Click on the Repair button

  2. Repair IP Address On Windows 8 & Windows 7

    1. Go to Network and Sharing Center

      Click Network icon on system tray and click the link Open Network and Sharing Center
      Steps

    2. Click on Connection type link
      Repair IP address on Windows 7 PC

    3. Click diagnose button to start repair process on Windows 8 and Windows 7 computers.
      Diagnose


2. Command Prompt Method to Repair IP Address

The second method to repair layer three number assigned to a computer is from the command prompt. This method to repair IP address is same for Windows XP, Windows 7 and Windows 8 computers.

  1. Release and Renew IP Address

    • Type iconfig/release on Command Prompt and press enter to release logical number assigned

    • Type ipconfig/renew on command prompt and press enter to renew logical number assigned

    After release and renew, your computer will get a new IP address from DHCP server. Most of the addressing related issues will be resolved after performing this step.

  2. Reset and Repair IP address

    • On Command Prompt type netsh int ip reset resetlog.txt and press enter
      renew

    • Restart your computer

    After completing restart your computer will get a fresh logical number and all the previous details are deleted.

Without a logical number, a device cannot communicate with another device. So whenever your computer fails to receive a valid layer three logical number, it is isolated. It cannot send or receive packets and totally isolates. In order to avoid the situation, we may have to start repaid process. This repair process will check all possible solutions to release and renew the current logical number. After the successful completion of the procedure, your computer will get another layer three logical number.

Further Reading
  1. There is an IP address conflict with another system on the network

  2. How to Track & Find Geographical Location Of an IP Address

  3. Network Did not Assign a Valid Logical number in a Given Time

  4. Getting 169.254.X.X (APIPA)Windows Automatic Private IP Address

No: Recent Posts
DOS Command To Open Command Prompt In Any Folder
Enable Copy Paste Feature On Command Prompt
What is Smurf Attack & How to Prevent it
How to Setup MTNL Broadband ADSL Modem
Setup Idea 4G on Android Phone
Delete Beneficiary Fund Transfer in HDFC Netbanking
Setup Asianet WiFi Modem
Important Network Commands
Assign Static IP To Any Interface From Command Prompt
Setup Log Files for IP Messenger

How to Find the IP Address of a Website Using Command Prompt?

You must know that a domain name of a website is simply a name which points to an IP address and display the content stored in that IP. This tutorial is a very basic level one which explains how to find the IP address of a website without using any third-party tools on your computer.

The purpose of this basic tutorial is to teach very basic IT operations to the people who are new to technology.


There are many methods to find the IP address of a website. Many online tools are there for this purpose.

But we do not need any extra tools to check the IP address of a website. In this tutorial, I will teach you how to find the IP address of a website using Command Prompt.

I will show how to do it from a Windows computer having an Internet connection.


Steps to Find the IP Address of a Website using Command Prompt

If you are using a Windows XP computer, follow the instructions provided below.

  1. Click on the start button at the left-hand bottom of the screen

  2. Click on the Run and type cmd on the run window.

  3. Press OK to open the command prompt window

  4. Type ping www.corenetworkz.com and press enter button

  5. You can see the IP address of the website www.corenetworkz.com from the ping replies

    You can type any website address instead of www.corenetworkz.com to find the IP address.


On a Windows Vista computer, follow the instructions provided below.

  1. Type command on the Vista search bar

  2. Click to open the command prompt window

  3. Type ping www.corenetworkz.com and press enter button


How to Find IP Version 6 Address of a Domain Name?
You can find both IPv4 and IPv6 addresses of a website using Command Prompt. All you have to do is to ensure that you have activated the IP version 6 (IPv6) in your Windows PC.

I have completed the below steps on my Windows 10 Acer laptop.

  1. Type Command Prompt on the Windows 10 Search and open it.

  2. Type ping www.corenetworkz.com on the Command Prompt screen and press the enter key


  3. You can see the Ipv6 address of www.corenetworkz.com from the ping replies

Look at the data to find the IPv6 address.

Microsoft Windows [Version 10.0.17134.885]
(c) 2018 Microsoft Corporation. All rights reserved.

C:\Users\ACER>ping www.corenetworkz.com

Pinging ghs.google.com [2404:6800:4007:810::2013] with 32 bytes of data:
Reply from 2404:6800:4007:810::2013: time=70ms
Reply from 2404:6800:4007:810::2013: time=59ms
Reply from 2404:6800:4007:810::2013: time=91ms
Reply from 2404:6800:4007:810::2013: time=67ms

Ping statistics for 2404:6800:4007:810::2013:
    Packets: Sent = 4, Received = 4, Lost = 0 (0% loss),
Approximate round trip times in milli-seconds:
    Minimum = 59ms, Maximum = 91ms, Average = 71ms

C:\Users\ACER>


Related Topics

  1. Ping gives error code 65 instead of replies

  2. Destination Net Unreachable while pinging to an Address

  3. ICMP error Destination Host Unreachable

  4. How to Increase the Speed of Broadband Connection

  5. Request Timed out while pinging to an Address - Ping Error

Configure Outlook Express With Dataone Account Email

Outlook Express is an email client from Microsoft which is outdated and no longer supported by them. If we reach Microsoft for any support, they will redirect to Outlook.com with similar features. Though this tutorial is outdated I am still keeping it as a legacy post. This tutorial explains how to configure Outlook Express for BSNL DSL broadband email ID. BSNL is one of the leading broadband service provider and the username provided to the customer is usually an email address. If you want to integrate this address with an email client on your PC, this article may help you.


To configure Outlook Express for Dataone customers with their email ID, follow the steps below.

  1. Open Outlook Express and click on Tools

  2. From Tools click on Accounts and select mail

  3. Now click on Add to add a new mail and select mail

  4. Now enter the display name and click next

  5. Enter the Dataone email address and click next

  6. Select POP 3 as the incoming mail server and enter the name of the mail server.

    For Dataone it is smma.sancharnet.in

  7. Enter the outgoing mail server (SMTP Server)

    For Dataone it is smra.sancharnet.in and click on next.

  8. Now fill the account name and click on finish.

Points to remember

Procedure to configure BSNL email address with Outlook Express is very simple. All you have to do is to follow the instructions provided. While configuring the BSNL ID, you may use the following information.

  • POP3 server for dataone account = smma.sancharnet.in

  • SMTP server for dataone account = smra.sancharnet.in

No: Recent Posts
This Device is Not Configured Correctly. (Code 1)
Getting Device Manager Error Code 10
Getting 169.254.X.X (APIPA) Windows Automatic Private IP Address
How to Setup MTNL Broadband ADSL Modem
Setup Idea 4G on Android Phone
Bypass Windows Admin Account Password Of Vista, XP, Windows 8
Error 1747: The Authentication Service is Unknown
Reasons for Unexpected Automatic Reboot of Your Computer
Use Flash Memory (USB) as Virtual RAM in Windows
Setup Log Files for IP Messenger
Adobe Flash Player has Stopped a Potentially Unsafe Operation
FTP Error 503 Login Authentication Failed
Best LAN Messengers
How to Reset BSNL WiFi Modem
How to Check Your Tata Photon Plus Internet Usage
Destination Net Unreachable

How to Enable Disabled Wireless Adapter On Your Computer

If your computer stopped receiving the wireless signal, one of the reasons is the disabled wireless adapter. If the Wireless adapter (WiFi Card) is turned off, it cannot receive signals from the WiFi hotspots and Access Points.

This tutorial explains how to turn on a disabled WiFi adapter on a Windows Laptop.

It also teaches you, What should you do when your WiFi adapter is disabled? To fix the WiFi card issues on your laptop, follow the instructions below.

This article covers the solutions to fix WiFi problems on all Windows versions like Windows 8, Windows 7, etc. Let us start with the quick fix to enable Wireless Adapter on Windows 10.


How to Enable WiFi Adapter in Windows 10 Laptop?

To enable the disabled wireless card on a Windows 10 computer, follow the instructions below.

  1. Type Device Manager on the Windows 10 search bar and click to open it


  2. Check for the wireless adapter under the Network Adapters

    You can see the Intel(R) Dual Band Wireless AC 3168 adapter is disabled in the Device Manager.

  3. Right-click on the disabled wireless adapter and click to the enable device option

1. Enable WiFi Adapter From Device Manager

The first step you must do when you found your wireless card disabled automatically is to access the Device Manager.

In Device Manager, you can turn it back on.

  1. Start Menu

    • Windows 7 & 8

      To go to the Device Manager on Windows 7 laptop, right-click on the Computer shown in the Start menu and click on properties.
      Enable WiFi Windows 8

    • Windows XP

      Right-click on My Computer and click on properties (XP).


      Now the system properties window will appear.

  2. Go to Device Manager

    • Windows 7

      In Windows 7, you can see the Device Manager link here.
      Device turned off


    • Windows XP

      1. Click on the Hardware tab on the system properties window.
        system properties

      2. Click on Device Manager

        To go to the device manager, we need to click on the device manager button.

        Here you can see all the hardware devices connected to the Windows XP computer.

        To see the status of the wireless adapter, click on network adapters.
        DM

  3. Enable Wireless adapter

    • To enable wireless adapter, right-click on it and click on enable.


    • Now the wireless adapter is enabled.


Once you have completed the above steps, your Windows 7 and XP computers will start picking the WiFi signals.

If the issue persists, I suggest you visit the solutions provided in the link below.

I Cannot Go Online


2: Enable Wireless Card From Network Connections

We can turn on the disabled WiFi card from the Network Connections window.

On the Network Connections window, you can see all the network cards installed on your laptop.

All you have to do is to right-click on the card and click the Enable button.

Follow the instructions provided below to activate the WiFi card on your PC.

  1. Go to Control Panel

  2. Click on Network and Sharing Center

    Select the icon view to see the Network and Sharing Center. Now you will see all the available wireless cards.
    Turn on WiFi card

3: Update Driver

If still, the adapter is disabled on your computer, you should update the driver to enable it. To perform it, follow the steps below.
  1. Right Click on the adapter in Device Manager

  2. Click on Update Driver Software
    Enable Ethernet card


4: Unplug the Card

If you are using a USB Wireless card, unplug it from your PC and reconnect it after one minute.

After you have reconnected it to the USB port, check for the issue.


5: Disable Internet Security and Firewall Applications
In many technology forums, users complain about the role of Internet Security programs like ZoneAlarm, Kaspersky Internet Security, Norton, etc.. in disabling the wireless adapter automatically.

After uninstalling the security program, the adapter started working.

As a troubleshooting step, I recommend you to disable the security programs installed and check for the issue.


6: Uninstall Driver and reinstall

If the wireless adapter on your computer is still disabled, you should uninstall the driver and reinstall it. It will enable the disabled wireless adapter. To uninstall the driver, follow the instructions below.

  1. Right-click on the adapter in Device Manager

  2. Click on the Uninstall driver option.

  3. After uninstalling the adapter driver, download the latest driver software from the adapter manufacturer's website and install it.

Popular Tutorials
  1. RPC Server is Unavailable

  2. Tools To Test Upload and Download Speed

Resolve IP Address Conflict With Another System On The Network

If you see the error message There is an IP address conflict with another system on the network on your PC, you need to understand that two devices on the same network are assigned with the same IP address. Since no two devices can share the same IP, we need to use a different one for the computer which shows this message. This tutorial explains the reasons for getting this error along with a solution to fix it. Mmost commonly, this issue appears on devices where there is no DHCP server to establish the LAN connection. However, we can see it rarely on a network where a router is used. Let us check the reasons for this error first.

  1. No DHCP Server is Used

    If you try to assign static IP to a PC where the same number is already assigned to another computer on the network, you will receive this error. This error message tells us to use a different address for the current computer.

  2. Router is Used

    Rarely we see this issue on a network where every devices are connected to a router. Possible reasons for this scenario are either the malfunctioning of the HCP server or a computer on the network failed to receive new IP assigned and still keeps the old number. Another reason is the use of static addresses in the DHCP range and the router (DHCP Server) automatically assigned the same IP to another device without knowing it.

How to Fix IP Address Conflict With another System on Network
  1. Router as the Central Device:

    In this scenario, all computers on the network are getting logical addresses automatically from the DHCP server. So you need to follow the steps below to resolve the problem.

    • Open Command prompt and type ipconfig /release and press enter.

    • Type ipconfig/renew and press enter

  2. Some Computers are assigned With Static Address:

    In this case, make sure the static IP assigned to computers are not in the HDCP range. If yes, it will again show conflicts.

  3. Static Addresses are Assigned to All Devices

    Here you must manually ensure the unique addressing on every laptops.


Popular Tutorials
  1. Destination Net Unreachable

  2. ICMP error Destination Host Unreachable

  3. How to Check the Connectivity Issues On Your Local Network

  4. Static Addressing For MAC OS


New Topics

Check and Solve Software Conflicts and Sytem Crash On Windows Computer

It is not unusual to see compatibility issues between two entirely different software products on a computer. I have seen this many times on my computers and I do not think it is easy to create any programs which do not cause any conflicts with other software tools installed. Anti Virus products are common conflict makers but in reality, we cannot assure any tool safe from issues. This tutorial explains different methods to find out the reasons for software conflicts and system crash on Windows computers and some tips to solve it. We discuss the clean boot and Windows Action Center warnings to find the product, which is responsible for the computer crash.

Clean Boot to Verify If Software Conflicts Cause System Crash

We cannot always blame software conflicts as the reason for the recent system crash unless we prove it by a clean boot. It is the procedure to start your Windows computer with essential Microsoft services only. If your PC does not shows any system crash while in clean booting, it is one of the third party products you have installed on your PC is the reason for recent crashes. Now let us check how to clean boot a Windows Laptop. You can follow the same instructions for Windows XP, Vista, Windows 7 and Windows 8 PCs.

  1. Open System Configuration
    Type msconfig on Search and click it to open (or type msconfig on Run and click OK)
    How to check the reasons for system crash

    Now you can access System Configuration Utility
    How to open System configuration window

  2. Click on Services tab
    How to perform clean boot on your computer

  3. Hide all Microsoft services

    Select the checkbox which says Hide All Microsoft Services
    Disable all third party services on your computer

  4. Click Disable All Button and Click Apply.

  5. Click OK to restart your computer when you are prompted

Check how your PC is working now. Are you seeing any computer failure or freezing? If not, it was one of the third party tools installed on your computer made all the troubles. We can find the real culprit by enabling suspecting third-party services at a time on System Configuration Utility and restart the computer. By repeating this process you can find the problem making software and take necessary actions to fix the issue. Here I check if Avast Anti Virus cause any system crash by enabling just Avast service and boot my PC.
avast safe boot

Avast is not affecting system performance and I decided to keep Avast active and continue the test by enabling another service with Avast service. This procedure may take time but it will find the software which causes software conflicts on your PC.

How to Disable Clean Boot

If you have resolved the problem and no longer needs your computer runs in clean boot, you can disable it. Follow the steps until 4 and click Enable All button. Click apply and restart your computer to recover from clean booting.

Windows Action Center Warning to Find Problem Maker

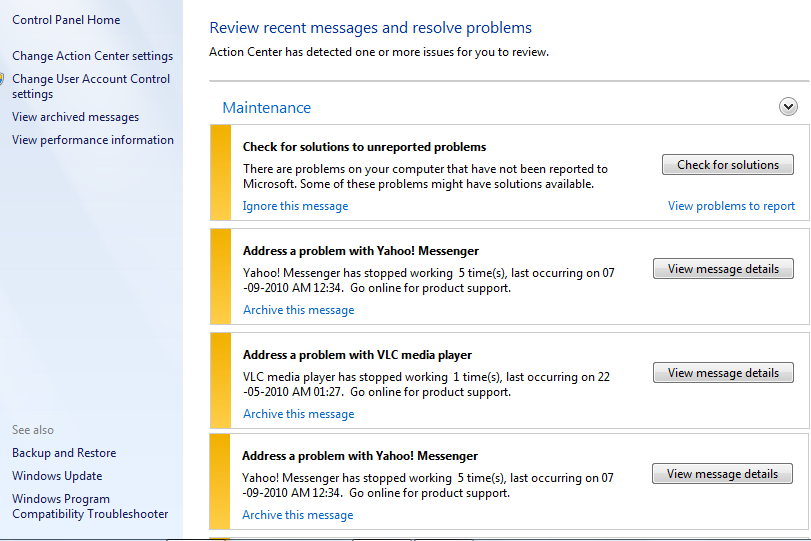
Now let us check the second method to find the real reason behind third-party application conflicts and system crash. Action Center warns all potential issues on your PC and by reading these warnings you can come to correct decision. To view the Action Center warning, follow the instructions below.
  1. Click Control Panel On  Start Menu

  2. Category View

    Click Review your computer's status link under System and Security
    Find reason for Software Conflict

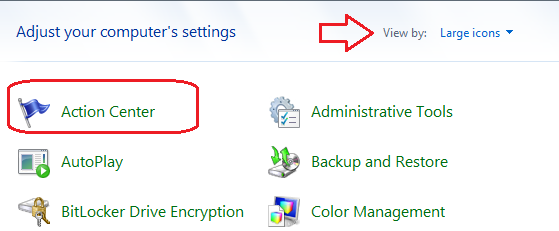
    Icon View

    If you have selected icon view of Control Panel items, click Action Center
    action center

  3. Action Center warning is a good source to find out the programs that are not working properly on your Laptop. See how the action center gives proper information about malfunctioning of tools installed on your PC.
    software malfunctioning warning in action center

    Microsoft may have a solution for the issues you are facing. You can use check for solutions button to get help from Microsoft to fix Software conflicts issue.

Out of these two methods, I prefer clean-boot procedure because there is a chance Windows has not reported the issues related to two conflicting programs installed. If Windows failed to find two conflicting applications installed and working, we cannot find any warning in the Action Center.

Related Tutorials
  1. Different Methods to Access Services Windows On a PC

  2. How to Enable Access to Secret Windows Administrator Account

  3. How to Edit Boot Menu Option On Windows 8

  4. How to Disable USB Ports From Windows Registry

  5. CMD Command To Open Command Prompt In Any Drive

No: Recent Posts
This Device is Not Configured Correctly. (Code 1)
Getting Device Manager Error Code 10
Getting 169.254.X.X (APIPA) Windows Automatic Private IP Address
How to Setup MTNL Broadband ADSL Modem
Setup Idea 4G on Android Phone
Bypass Windows Admin Account Password Of Vista, XP, Windows 8
Error 1747: The Authentication Service is Unknown
Reasons for Unexpected Automatic Reboot of Your Computer
Use Flash Memory (USB) as Virtual RAM in Windows
Setup Log Files for IP Messenger
Adobe Flash Player has Stopped a Potentially Unsafe Operation
FTP Error 503 Login Authentication Failed
Best LAN Messengers
How to Reset BSNL WiFi Modem
How to Check Your Tata Photon Plus Internet Usage
Destination Net Unreachable

Update Belkin Router Firmware & Resolve Issues With Firmware Update

If your Belkin router does not have the latest version of firmware, it may start showing performance issues over time. Most of the connectivity and performance issues on network devices are due to outdated firmware. In this tutorial let us check how to verify your Belkin router is having the latest version of firmware and if it is not, download and update the latest version released for the specific model. Sometimes you may receive an error while this process. You may receive error messages like unable to update router firmware or even software update test failed with the error message the update check could not be performed due to network conditions. At the end of this guide, I have provided some troubleshooting steps to identify and fix the issues.

How to Check Whether Belkin Wireless N Router has Latest Firmware Version
  1. Log on to Setup Page

    To know how to log on to the setup page to check if it is having the latest version installed, click on the link below.
    How to Access Setup Page and Configure it

  2. Click Firmware Update Under Utilities

    You can find this link on the left-hand side of the Setup page. It is under Utilities.
    Simple step to update software

  3. Click on Check Firmware

    Click on the button Check Firmware to test whether it is having the latest version.
    Check

    You will be reported by Belkin automatic Firmware checker if the device is having an outdated version. You will get information about the latest version with the direct download link to download for your model.
    check driver

Download Latest version of Firmware For Belkin Router

Belkin router firmware checker will inform you if there is an updated version of the model you have. At the bottom of this window, you can see a direct download link to download updated version for the device model you have. This direct link helps you to download the right software for your model automatically. Before this facility, we manually select the website for the new release. It was time-consuming and there was a chance to miss certain major updates.
download latest Belkin software

Now you need to save the downloaded file on your computer desktop.

  1. Click on Download Firmware Now

  2. Save the downloaded file on your Desktop


Steps To Update Belkin Router Firmware

  1. Select the downloaded file using the Browse button and click Update
    Update process of Belkin Access Point Firmware

  2. You will be asked if you are sure and want to continue.
    OK

    Click “OK” to continue and one more alert will come and click OK.

  3. After updating, the device starts rebooting. You keep waiting until the power light is steady. Once the power light is steady login to the web-based setup page and ensures if the update procedure is completed.

Getting Error While Updating Belkin Router Firmware

Rarely you may see issues and update process may fail. In that case, you may follow the tips provided below to identify and resolve the issues.
  1. Check Connection Type

    Make Sure the computer is connected to Router or Access Point using an Ethernet cable. You must never access the device using a wireless connection when you are attempting to update the firmware.

  2. Make sure you have downloaded the right software for your router model

  3. Make sure you have selected the right file before updating

  4. Perform a Power cycle and try to repeat the process. To power cycle, your Belkin router, follow the instructions provided in the link below.
    How to Power Cycle A Wireless Router

  5. Reset and Reconfigure

    The last resort is to hard reset the device and reconfigure it before repeating the same procedure. Steps to hard reset are provided in the link below.
    How to Hard Reset A Router

Set Belkin Router To Update Firmware Automatically

Belkin router also has a feature to update firmware automatically when a new version is released. It removes the pain to search the product website regularly for the latest software release. To enable automatic update on a Belkin router or Access Point, follow the steps below.
  1. Click on System Settings under utilities

  2. Select the radio button to enable at Auto Update Firmware Enable
    Automatic software Update

  3. Click Apply Changes

If the device is connected to your PC using an Ethernet cable, it is better you select the enable option to ensure the better performance. However, if your PC is connected via wireless, I recommend you to select the radio button to disable. It is not recommended to perform this procedure on a device which is not connected with a network cable.

New Topics

Enable MAC Address Filtering On Belkin Wireless Router

If you manage a WiFi network, it is important to make sure no one is accessing it without your permission. There is a different method to secure WiFi like enabling WiFi security, hiding SSID, MAC Address Filtering etc. This tutorial explains how to use the feature MAC address filtering to secure Belkin Wireless network. MAC address(media access control) or Physical Address is a built-in 48-bit Hexadecimal number assigned to an Adapter. There are two types of filtering whitelisting and blacklisting. MAC Address white-list allows only the selected Media Access Control address to join the wireless network. All other computers with different Media Access Control number will be blocked while accessing the wireless network. If you use the blacklisting option, computers with the listed Physical Addresses cannot join your WiFi.


Prevent a PC With Specific MAC Address To Join Belkin Wireless Network

To enable Media Access Control number filtering, we need to log in to the Router setup page.

  1. Log on to Belkin router

    Use 192.168.0.1 to log in to the setup page. To read more about it, visit the link below.
    How to Access Belkin Setup Page

  2. Click on Wireless Tab

    To prevent laptops with a specific physical number to join WiFi, you should go to the wireless page. Here you will options to either let or deny a specific Media Access Control number to your WiFi.

  3. Click on MAC Address Control

    Under wireless, you can see Media Access Control Address Control. Now a page look like below will be opened.
    turn on Belkin MAC filtering


    Here you can see two options:

    • Deny a particular MAC number (Blacklisting)
    • Allow a Particular MAC number (Whitelisting)


    If we deny a Physical number here, that computer cannot participate the WiFi anymore. If we enable the option Allow, addresses listed here will be allowed to participate the wireless network but all other Media Access Control numbers will be rejected from the network.

We must choose the options while-list or blacklist very carefully depends on our needs. If the WiFi you manage is public and daily people log in with the password you provide (like in a hotel), it is better uses the option blacklist to prevent already identified devices. If your WiFi is a private one, it is better to choose the option white list. If you select the option White List, you must enter the Physical numbers of the devices which are allowed to join. All other devices will be denied.

Further Readings
  1. How to Update Router Firmware

  2. I Cannot Go Online

  3. How to Auto-configure Belkin Wireless N Router


New Topics

Setup Belkin Wireless Router - Manual Configuration Guide

If your ISP provides a basic modem, you need a wireless router to share the Internet among multiple devices.

Belkin is one of the leading wireless router manufacturers which produces different types of wireless routers.

In this tutorial, you will learn how to configure Belkin Wireless Routers by accessing the web-based setup page without using the setup disc.

Though Easy Setup reduces our time to configure a device, manual configuration helps to make custom changes in the default settings.

Let us check how to manually configure various Belkin Router models like N150, N300, N600DB, N750DB, etc.


Steps to Configure Belkin Wireless AC Router

  1. Connect Belkin Router To Your Computer & Modem

    Connect the devices in the same order provided below.

    1. Connect the Internet port of the Belkin Router to the LAN Port of Modem using an Ethernet cable

    2. Connect the LAN port of the Router to the LAN port of Computer using an Ethernet cable

    3. Switch On the Router

    4. Power on the Computer

    5. Switch off the modem

  2. Access Belkin Router Setup Page

    To access the web-based setup page, type 192.168.2.1 on the address bar of the browser. The default Login IP address of Belkin WiFi router is 192.168.2.1
    Log on to Belkin router setup page

    There is no password set by default. Leave the Password field blank and click the Submit button.

    Belkin WiFi Router default login password

  3. Configure Internet On Belkin Router

    Click on Connection Type under Internet WAN and select the Internet connection you have from your ISP.
    Select Belkin Internet Connection Type

    There are mainly four different ways you can configure Internet connection on your Belkin Router. They are:
    1. Dynamic Connection to Configure For Cable Broadband

    2. Static Connection

    3. PPPoE Configuration

    4. PPTP Configuration


1. Setup Belkin Router for Cable Modem
  1. If you have a Cable Internet connection, you should select Dynamic option and click next. In most cases, you may need to type the hostname provided by Cable Internet Service Provider.
    How to setup Belkin router for cable modem

  2. In addition to this, to work with the cable modem, you may need to clone the MAC address of your computer using the link/button Change WAN MAC Address.
    How to clone Your Computer MAC Address On Belkin Router

    Use the clone button to copy the MAC address of your computer. Click Apply Changes after entering the details. After having this step, Belkin will be ready to work with your cable internet connection.

    This step is important because your Internet Service Provider recognizes registered users using the MAC address of the PC used while activating the connection.

    Your ISP will not allow it to access the Internet on a different computer because of the nonregistered MAC address.

    We can override this restriction by using the MAC address cloning feature.


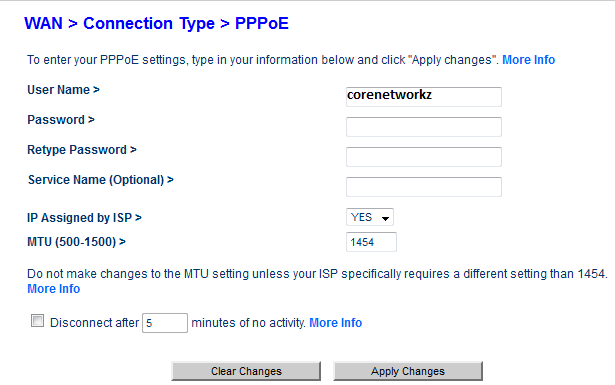
2. Setup Belkin Router for DSL Modem Using PPPoE

  1. You must select PPPoE for most of the DSL Internet connections.

    Setup Belkin Router With PPPoE

    Click Next

  2. Enter the Username and password provided by your DSL Internet Service provider.
    Belkin Router Configuration Guide For DSL broadband

    Here you should enter the user name and password provided by your Internet Service Provider. You should click on the Save Settings button after entering the details.

    Now your Belkin router is configured in PPPoE for DSL broadband connections. If you do not configure in PPPoE(means in bridge mode), you may need to enter username and password (provided by ISP) on your PC whenever you access the Internet.

    Another problem with the bridge mode is the inability to share broadband.

3. Configure Belkin Router With Static IP Address

  1. Select Static and click Next
    Assign Static IP Address

  2. Enter the Static IP Address provided by your ISP
    Belkin Static IP

    Click Apply Changes

Setup Wireless Feature On Belkin Router

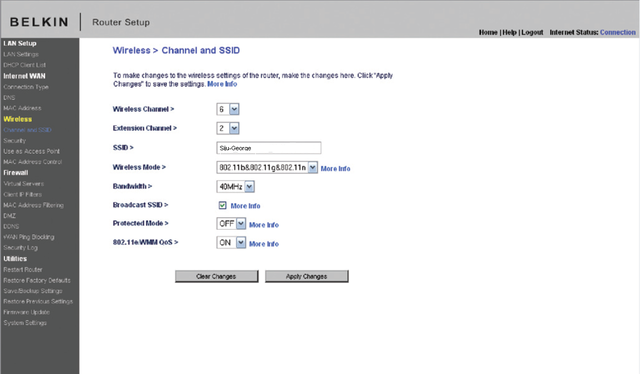
To edit the wireless settings, click on the Wireless tab on the setup page. You can edit the Wireless network name and wireless channel here.
Here I have customized certain WiFi settings with personalized information.
WiFi

Wireless name (SSID) is the name of your wireless network. The most recommended wireless channel is 6. You can use channels 1 and 11 too.

You can use a new name for your WiFi network at the wireless name (SSID) field.

The most recommended wireless channel is 6. Other recommended wireless channels for Belkin WiFi router are 1 and 11.

It is good to change the default SSID with something another.


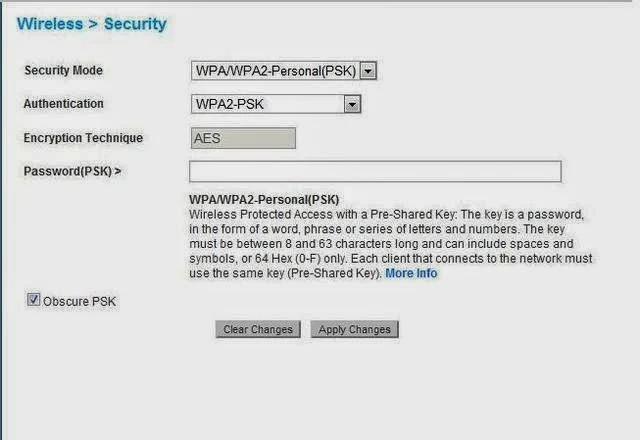
6. Enable Wireless Security
To enable WiFi security, click on security under the wireless tab, and follow the instructions in the link below.
How to Enable wireless security To Prevent Unauthorized Entry

WiFi problems


Do not forget to Update the Firmware

How to Update the Firmware 

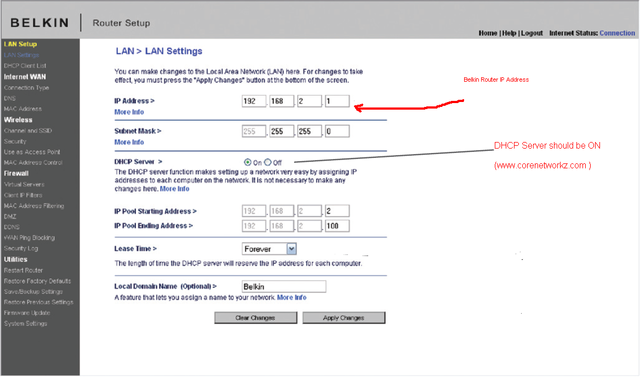
Change the LAN settings on the Belkin Router

You can change the router IP address from this window. By default, Belkin router IP address is 192.168.2.1, but you can change it to any other valid IP address.
Change Local IP

There are some other points you must care about configuring the device. One of them is to ensure the safety of the wireless network.

It is a nice practice to enable MAC address filtering to avoid any unauthorized access to your WiFi network. To learn how to enable the MAC address filter, follow the link below.
How to enable MAC Address Filter


Can not Go Online After Installing Belkin Router

Some users say they were able to access the Internet before adding a Belkin router in their network.

After installing the router, they are not able to go online. There are so many reasons for this issue, and we have an article about how to deal with such a situation.

If you face such an issue on your network, follow the link below to fix it.
I cannot go online after installing the router