How to Manually Setup D-Link Wireless Router

Updated on November 05, 2012
D-Link quick setup wizard is enough for an average user to set up his router but for advanced options, it is better to learn how to configure this device manually. This tutorial explains how to configure every model of D-Link wireless router manually for advanced features. Here we learn how to enable Internet access, WiFi and WiFi security. The first step of this guide is to make sure you can go online with the modem by connecting a computer to the Ethernet port of the modem.

If it is fine, disconnect the modem and connect the computer to one of the LAN ports of D-Link Wireless Router using an Ethernet cable. Now power on the device.

Configure Broadband Access On D-Link Router
  1. Access Setup Page:

    • Type 192.168.0.1 on Browser address bar and press enter.
      configuration

    • Enter username admin and leave the password field blank. Click on login to access setup page.

  2. Click on Manual Internet Connection Setup
    steps to setup d link router

  3. Select Internet Connection type:

    Using the drop-down menu, you can select the Internet connection type you are using.
    DSL

    Configuration details for each of the Internet connection types are listed below.

    1. Configure D-Link Router for Cable Internet Connection:

      To setup, your router with cable Internet, select the option Dynamic IP(DHCP).
      Cable broadband

      If you are using cable Internet connection the most important step is to click on the button Clone Your PC's MAC Address. To know the importance of this step, click on the link below.
      Why MAC Address Cloning Required for Cable Internet Connection

      If your cable ISP doesn't provide any details about Host Name, DNS Server, etc.. leave them blank or keep the default value. Do not forget to click on Save Settings button.

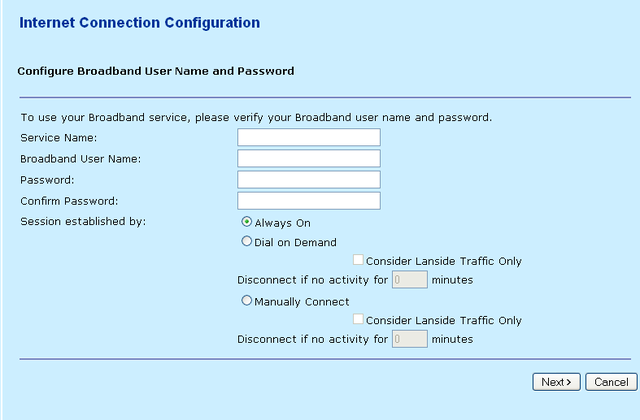
    2. Configure D-Link Router with DSL Connection (PPPoE):

      With DSL broadband, you should select the option PPPoE(Username/Password) from the drop-down menu. Enter the Username and password provided by ISP.
      DSL broadband

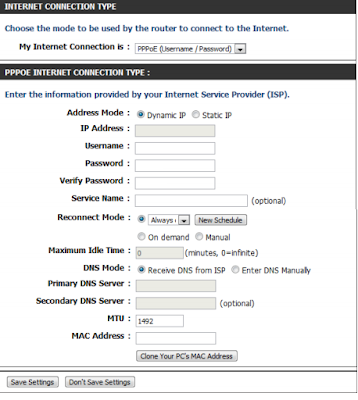
      Keep the Address mode "Dynamic" if your ISP does not provide you any IP address details. Normally for a DSL connection, you do not need to clone computer MAC address unless asked by your ISP. Click on Save Settings after entering details.

    3. Configure D-Link Router with PPTP Connection:

      Steps to setup your router with PPTP connection is similar to PPPoE connection.
      PPTP Connection

    4. Configure D-Link with Static IP:

      Here you should enter the full IP address details provided by your ISP including Subnet Mask, Default Gateway, DNS Servers, etc.
      static

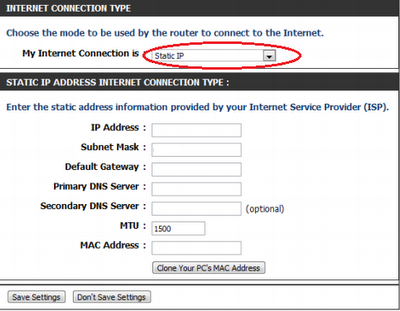
      After entering details click on Save Settings.

  4. Connect Modem to D-Link Router:

    • Connect the Internet port of D-Link router to the LAN Port of modem

    • Connect Computer to LAN port of Modem

    • Switch on Modem

  5. Power Cycle:

    I recommend you to perform a power cycle if you face any issues with going online. To do the power cycle follow the steps mentioned in the link below.
    How to Power Cycle Router and Modem

Configure Wireless & Security
Right after configuring Internet access on the D-Link router, you need to configure the wireless settings if you want to use it. Latest D-Link wireless routers support both 2.4GHz and 5GHz frequencies.

So it can extend its support for 802.11a, 802.11b, 802.11n, and 802.11g wireless standards. 802.11n supports both 2.4GHz and 5GHz where 802.11a supports 5GHz only. 802.11b and 802.11g work in 2.4GHz.

 Here we share the manual steps to configure wireless and security on the D-Link router.

  1. Login

  2. Click on Wireless Settings tab
    Dlink WiFi

  3. Click on Manual Wireless Connection Setup

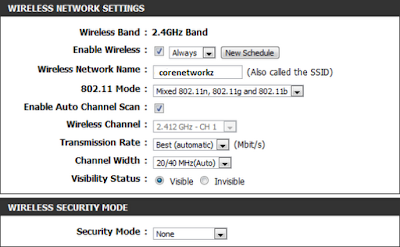
  4. 2.4GHz Devices(802.11n,11g, and 11b):

    1. Click on Enable Wireless and Select 802.11 mode (2.4GHz).
      configure 2.4ghz

      You can select one of the following 802.11 modes:

      • 802.11b Only
      • 802.11g Only
      • 802.11a Only
      • Mixed 802.11g and 802.11b
      • Mixed 802.11n and 802.11g
      • Mixed 802.11n,11g, 11b

    2. Check on Enable Auto Channel Scan:

      Now D-Link Wireless Router will automatically pick the channel with least interference.

    3. Wireless Network Name:

      Here you can write the name of your wireless network (SSID). SSID can be up to 32 characters, and it is case sensitive.

    4. Select Channel Width:

      20/40 MHz if you are using both 802.11n and non802.11n devices. If you are not using 802.11n devices, you can select 20MHz.

    5. Visibility of SSID:

      If you do not want to show your SSID, you can check the option Invisible.

  5. 5GHz Devices (802.11n and 11a):

    1. Enable Wireless:
      5 GHz frequency

In this article, you have learned to set up a brand new D-link router without the help of a setup disc.

  1. Error 633: The Modem is Already in Use or not Configured Properly
  2. Change COM Port Assigned to Modem on Your Computer
  3. Different Methods to Access Device Manager

Configuration with a DSL connection is different from a cable broadband connection.

  1. Remove Blogger Navbar from Your Blog
  2. Setup in Bridge Mode
  3. Port Forwarding in Nokia Siemens Residential

Do not forget to secure the device with a new login username and password.

  1. Setup WBR-2310 With WPA
  2. Access Point DWL-G700AP by Setup Wizard
  3. DIR-865L Amplifi Cloud 5700 With Cable & DSL

You should also set up a strong WiFi passphrase to prevent unauthorized use by intruders.
BSNL supplies modem with default firewall which prevents traffic through uncommon ports to ensure the security of devices connected to it. Sometimes it can be annoying because certain applications need some of these ports to work properly and the firewall settings prevent these applications from running properly. Port forwarding requires to fix issues with playing online games, online conferences or messaging, establishing a VPN connection through the BSNL modem. If you have installed an online camera on your network, you may need to open certain ports to it access through the Internet. Port forwarding for certain applications are already defined on BSNL modem and all you have to do is just enable them. For other applications, you should make sure you have the correct port number and the protocol type (UDP/ TCP) before starting the process. You can get this number either from the specific product manual or from their technical support.

Steps to Open a Port On BSNL Modem
  1. Login

    Type 192.168.1.1 on the address bar of the browser and enter the following details when it prompts.
    Open

    Username: admin
    Password: admin

    To learn more about it, visit the link below.
    How to Configure BSNL Teracom Modem

  2. Click on the Security tab

    The option port forwarding is under the Security tab.
    Open Age of Empires through BSNL

  3. Click on Port Forwarding

    It may prompt you to enter BSNL modem username and password to continue the process.
    Exception rule

  4. Click on Add
    Add

  5. Add a new Port Forwarding Rule

    You must specify which Port you want to open on BSNL Firewall.
    Angry birds bsnl

    Here you can select the specific application from the list of pre-defined rules. If you cannot find your application in this list, you can select user-defined option to open a port for your application. For that, you should have the port number and protocol type from the product vendor. After creating the rule, you have to click on "Apply".

  6. Reboot

    Under the admin tab, you can find the reboot option. You should select "reboot from last" option. Sometimes you may need to reboot your modem to take the port forward rule in effect.
    Fix

After rebooting the device, you might check whether the application is working properly. If not, you might need to make the computer as DMZ to stop all firewall restrictions. To do this, follow the instructions provided in the link below.
How to Make DMZ

Further Reading
  1. Setup wireless and security in Teracom Modem

  2. UT Starcom ADSL Configuration

  3. Setup Wireless Security On  Teracom Network
Nokia Siemens Residential Router 1600 is one of the common modems provided by BSNL. One of my friends lost the setup disc came with this device and struggled a lot at the time of reconfiguration. In this tutorial, you can learn how to setup BSNL Internet connection using Nokia Siemens Residential Router 1600. Just like other BSNL modem/ router models, we do not need setup disc to configure it. We can do it manually by following the steps provided in this tutorial. At the end of the tutorial, you can see the steps to activate WiFi and wireless security on Nokia Siemens Residential Router 1600.


Configure Nokia Siemens Residential Router 1600

In order to configure this device with BSNL broadband, follow the steps below.
  1. Connect Nokia Siemens Residential Router 1600 to the computer using Ethernet cable

  2. Power on the modem

  3. Type 192.168.1.1 on the address bar of Internet Explorer and press enter
    nokia modem

    Username: admin
    Password: admin

    Now you can access the web-based setup page of Nokia Siemens Residential Router 1600 by entering the login details given. You will be redirected to device info page where you can read basic information about it. You can select the right option to set up this device from the left-hand side menu.
    Network

  4. Click on Advanced Setup
    model

    Delete all connections except VPI/VCL 0/35.

  5. Click Edit button of 0/35
    atm

    Click next. Here we must make sure the value set for VPI is 0 and VCI is 35.
    pppoe

  6. Select PPPoE

    We need to configure PPPoE connection with BSNL modem. So we should select PPP Over Ethernet (PPPoE). Now we should enter the BNSL broadband username and password.
    selection

    We should check

    i. Enable PPP Debug Mode
    ii. Bridge PPPoE Frames Between WAN and Local Ports

    Now click on Next

  7. Enable NAT in Nokia Siemens Residential Router 1600
    Set NAT in Nokia Modem

    We should check

    i. Enable NAT
    ii. Enable WAN Service

    Click Next

  8. Click on Save and we will automatically redirect to the main page.


    We should click on Save/Reboot button there. After this step, we should go to Management (on the left-hand side) and click Save/Reboot to save the current settings properly.

Popular Tutorials
  1. Configure Teracom WiFi Device

  2. Nokia Siemens C2110 ADSL

  3. Setup Internet in WA 3002 g1 UTStarcom ADSL Type 2

Technology Blog
For the last few weeks, I have been getting an error message "Error 777: The Connection attempt failed because the modem (or other connecting devices) on the remote computer is out of order" while connecting to the Internet. I use Huawei Access Manager to connect to the Internet because the modem provided by Tata Photon Plus is from Huawei. Mainly the issue occurs in the evening (that means the peak time) and the error message prompt me to either redial to connect to the Internet or cancel. Here I would like to share the major reasons of "Error 777: The Connection attempt failed" and its possible solutions. After a few attempts, I would be able to go online but in some worse cases, I waited hours to get rid of the error.

If you are not sure how this error message looks like, have a look at the screenshot provided below.

Error 777: The Connection attempt failed because the modem on the remote computer is out of order


Reasons for Error 777: The Connection Attempt failed

The possible reasons for "Error 777: The Connection attempt failed because the modem (or other connecting devices) on the remote computer is out of order" are:
  1. Usage of the incorrect driver for your modem

  2. The number dialed by your modem is blacklisted

  3. Outdated modem driver

In addition to the above-mentioned reasons, I am getting this error message only in peak time. So I assume, the network users can also be a factor but I am not sure.
  1. Configure Airtel Broadband Modem
  2. Idea 4G APN Settings
  3. Destination host unreachable


The Solution for Error 777: The Connection Attempt failed

The major reason for "Error 777: The Connection attempt failed because the modem (or other connecting device) on the remote computer is out of order" is faulty modem driver. However, in my experience just restarting the computer itself fixed this issue. So here I would like to share a practical guide to fix this error message.

  1. Unplug the modem and reconnect (If you are using a USB modem or external modem )

  2. Restart your computer

  3. Update the driver

  4. Uninstall the current modem and reinstall it with the latest driver available.

Remedy Recommended by Readers

Two Airtel 4G dongle users ( allsubs99 & Ramesh Nagaraj ) shared their solution to fix this issue. According to them:
  1. Open the Airtel 4G Dongle utility

  2. Find out the Connection Type

  3. Change the connection type from RAS to NDIS
If the issue persists, it is advised to contact your ISP to fix it. Some of the related issues and solutions are provided below.
  1. Error 718: The Connection was Terminated
  2. Error 619: A Connection to the Remote Computer Could not be Established
  3. Error 619: A Connection to the Remote Computer Could not be Established
  4. Error 628: The Connection was Terminated by the Remote computer
  5. Error 797: A Connection to the Remote Access Server was not Made
  6. Error 651: The Modem (Connecting Device) has Reported an Error
Author

Published By Alex George

Today's post is an announcement for all my regular readers about the latest achievement of CoreNetworkZ Tech Solutions, which has crossed the milestone of 1,00,000 page views per month.

I want to thank all my blog readers who helped me achieve the goal of 1,00,000 Page Impressions per month.


Can I Run a Successful Blog in Blogspot?

I faced this question when I started CoreNetworkZ.com on the Blogspot platform. The answer is Yes.

There are Many Successful Blogs on the Blogspot platform.

One example is this blog. CoreNetworkZ.com is a blogspot blog with a custom domain. Right now, www.corenetworkz.com successfully maintains 1,00,000 page views per month for one month, and I would like to share this happy news with all my blog's readers.


Monthly Unique Visits and Page Views

With more than 72K visits, this blog received more than 100K Page impressions this month, and I can proudly say that www.corenetworkz.com joined the 100K club.

I will share the screenshots from Google Analytics with my readers. I hope this success will inspire other newbie bloggers, and I am grateful if this can bring more passionate bloggers.

How to get 100K traffic per month?

Nimin James, one of the regular readers, asked me when this blog crossed the 100K threshold. I saw the 100K cross one month ago but didn't announce it that day.

I wanted to ensure it was not just a temporary effect. So, I decided to wait at least one month to ensure it. With one month of steady analysis of received page impressions, I can state that my blog is getting 100K Page views per month.


The Country-Based Traffic Analysis

This blog is getting more visitors from the United States, and India is in second place. The United Kingdom is the third country, and Canada is in fourth place.

I believe the Map Overlay from Google Analytics will help you understand better. You can see the traffic map below to analyze the country-based traffic to this blog.

The major traffic sources of my blog

Major Traffic Sources

You must be curious to learn from which sources CoreNetworkZ Tech Solutions secure this 100K traffic. According to Google Analytics, the primary source is Google.

Critical Blog Traffic Sources

83.02% of traffic comes from Search Engines. As I said, Google is in the first position.

The second position goes to Yahoo, and Bing is in the third. My blog is getting 10.70% direct Traffic, and other sites contribute 6.23%.

Author: Alex George

Author

Alex George is the Chief Editor and founder of CoreNetworkZ EdTech Solutions. He is a software engineer and has 20 years of experience in the EdTech niche.

He graduated with a B.Tech in Computer Science & Engineering from CUSAT and worked with three leading IT companies before starting CoreNetworkZ EdTech Solutions.

He possesses sound knowledge of SOHO Network Engineering and has completed various IT certifications, including CCNA, RHCE, and CEH.

He developed and published more than twenty professional custom themes for Blogger and is an expert in software app development.

You can contact him at alex.george@corenetworkz.com.

BSNL provides Nokia Siemens C2110 ADSL Modem for users who opt not to take wireless modem. It has routing feature but does not have WiFi. Since it has DHCP server, we do not need to buy an extra router to share Internet among multiple computers. However, C2110 has just one LAN port and one USB port. So you must have an additional device known as a switch to share the Internet with multiple computers. Nokia Siemens C2110 ADSL Modem is best suited for BSNL customers who want Internet on just one computer. This tutorial explains how to configure broadband on Siemens C2110 ADSL Modem and instructs how to connect a switch to share the broadband among multiple devices.


Boost BSNL Broadband Speed

Configure Broadband On Nokia Siemens BSNL C2110 ADSL Modem
  1. Connection

    Connect LAN port of C2110 to a computer using an Ethernet cable. Make sure the device is on.

  2. Login

    Type 192.168.1.1 on the address bar of your browser and press enter.

    When a user login window comes it will prompt you to enter a username and password.


    Default Nokia Siemens BSNL Modem login username and password are:

    • Username: admin
    • Password: admin

  3. Configure Internet

    To configure the Internet in Nokia Siemens BSNL Modem, you should follow the steps below.
    DSL

    • Click on Configuration

    • Click on Internet
      create

    You should delete all the default connections shown on this page. You can select the connection and click on delete symbol.

  4. Create a new connection

    • Click on add to create a new connection

    • Enter the following details.

      1. PVC Name: PPPoE
      2. VPI : 0
      3. VCI: 35
      4. After entering the details click on Next.

    • Now enter the following details.

      1. Encapsulation Type: LLC/SNAP
      2. Encapsulation Mode: Bridged

      Then Click on Next.

    • In this page, you may need to select Obtain an IP address automatically.


      You should enable NAT and Default Route if you wish to connect a switch and share Internet among multiple PCs. After selecting this, click on next.

    • Here you should enter the username and password given by BSNL. Service name should be BSNL. After entering the details click on next and on confirmation page click Apply. It is important to type the broadband service username in the right form. Do not forget to add @ part if you are given the username as an email address by ISP. If you have any doubts, you must contact technical support immediately.
      user

  5. Reboot

    After finishing the setup you should reboot Nokia Siemens BSNL modem. To reboot, follow the steps below.

    • Click on Admin

    • Click on Reboot

    Select the option Reboot from last and click on Reboot button in the bottom. It may take a few minutes to come back your modem.

Other Articles
  1. How to Enable Wireless in BSNL Broadband Devices

  2. Setup Wireless in WA3002- g1 UTStarcom BSNL Type 2 Gateway

  3. How to Configure Belkin Wireless Router

  4. Setup BSNL Teracom Wireless and Security

Technology Blog

Activate Disabled WiFi On BSNL Wireless Modem

Updated on September 03, 2010
BSNL is the leading Internet Service Provider in India. They offer wireless modem with routing capability for their users. Since the modem has DHCP server, users can connect multiple computers to it both by using Ethernet cable and WiFi. This tutorial explains how to manage BSNL WiFi by tweaking it. Issues like disabled WiFi and weak network security are addressed in this guide. It also explains the steps required to enable disabled WiFi functionality on a BSNL modem and strengthen the protection by preventing unauthorized people from accessing it.


Steps to Manage Wireless in BSNL Wireless Modem
  1. Login

    Type 192.168.1.1 on the address bar of your browser and press enter.


    Now you need to enter the user name and password set for your BSNL modem. By default it is:

    Username: admin
    Password: admin

  2. Click on Configuration

  3. Click on Wireless Network

    Here you can manage basic settings of WiFi. You can either turn off or turn it on  from this page by selecting the right button. If you want to change the WiFi name, all you have to do is to delete the current entry at SSID and type the desired name.

    Procedure to Configure BSNL Wireless
  4. Prevent Unauthorized Users

    By default BSNL WiFi is unsecured and anyone can join it and share the broadband connection without your knowledge. You can prevent this by enabling protection. BSNL supports WPA and WEP. You can choose the suitable one from the list below. Do not forget to take note of the key generated because now onwards, you cannot join the network without entering the key.
    Secure

Filter Based On MAC Address

If MAC address filtering is activated on BSNL Modem, users will find issues with joining Wireless network even though they have the right username and password if MAC address of their devices is not in the white list. If anyone face issues with connecting to your network, you must go to the setup page and check under MAC filtering. Here you check the status of MAC filtering. If MAC filtering is activated, you must turn off it to resolve the issues with accessing BSNL WiFi network. It is important to note that BSNL modem supports two types of filtering, white list, and blacklist. If you have added a particular computer under blacklist, that computer will not be able to access the network. If you have enabled white list, only computers which are under white list are allowed to join the BSNl wireless network.

Wireless Channel

Another point we must check while facing connectivity issues is to change the current Wireless Channel. We can use channel 1, 6 and 11 for the best connectivity. If you are using channel 1, I recommend you to try channel 6 or 11.

Related Articles
  1. Configure Teracom Router

  2. Configure WA3002- g1 UTStarcom

  3. How to Setup Belkin Router

  4. How to Configure Linksys Range Expander WRE54G

Technology Blog
In many instances, we need to reset router or modem as the part of troubleshooting steps. Before explaining how to reset your router, you should understand what is reset. By resetting your Router / Modem, your device will go back to the factory default settings and again you may need to configure it. So before resetting your router, you should better learn how to reconfigure your router or take the backup of current device configuration.


When should I reset my router?
There are some situations like your router or modem stops responding or configured the device incorrectly, you may need to reset your device. Sometimes after upgrading to the latest router /modem firmware, you may need to reset your router/modem as instructed by the manufacturer.

In rare cases, if you forgot the router login password, you may need to reset the modem to set a new password. So the major reasons to reset a modem or router are:

  1. To reset incorrect Router/Modem settings

  2. Malfunctioning of Modem or Router

  3. Forgot Router or Modem password. To read more about this scenario click on the link below.
    I Forgot My Router Password and How to Recover It

  4. Reset a modem or router as part of the firmware upgrade process


Different methods to reset your router


There are three different types of router resetting.

1. Soft Reset

2. Hard Reset

3. Power Reset


1. Soft Reset
Soft reset is done by selecting the reset options through the router administration page(web interface). Depends on various firmware and manufactures, these options come in various forms like a reset to factory default, reboot with factory settings etc.

You should select the particular option and click OK. Now the router starts rebooting and within one minute it will be back with default factory settings. This kind of reset is known as soft reset.


2. Reset by holding the reset button (Hard Reset)
If a soft reset is not working for you, next option is holding the reset button of your router for 30 seconds and release your hands after it.

You can find reset button usually near the power button a small hole which can be pressed by pen tip or pin. Procedure to hard reset your router and modem are:

  1. Hold reset button using a pen tip or pin for 30 seconds

  2. Make sure power light is blinking while pressing the reset button

  3. Release your hands after 30 seconds and wait for one min(make sure power light is steady).
    Now your router has factory default settings.


3. Power Reset a Modem or Router
If the normal reset didn't work on your router, you can perform a hard reset. It is the most powerful reset form for any kind of Small Office Home Office devices(SOHO) like routers and modems. Steps to power reset your router are:

  1. Hold reset button for 30 seconds (make sure power light is blinking)

  2. Unplug the power cable (never release your hands from holding reset button) for 30 seconds

  3. Connect the power cable and still hold the reset button for 30 seconds

  4. Release your hands now (you are continuously holding the reset button for 90 seconds)

  5. Now wait one minute and make sure power button is steady.

It is recommended to perform a power cycle after resetting your modem. To learn how to do this, click on the link below.
How to Power Cycle a Modem or Router
I have been using Tata Photon Plus service for one month while my roommate is using Reliance Netconnect for his Laptop. We have chosen different wireless broadband services for our laptops because of the concept "Don't put all your eggs in one basket". I purchased my Tata Photon Plus wireless USB modem from their online store instead of the local dealer. It is because there was an offer (Laptop bag worth of 1.5K ) for every online Photon Plus purchase.

Update: Special offers are purely up to the time to time decisions made by Photon plus marketing team and I am not sure they offer the same at this point in time.


I received the packet including Photon plus modem (with a small delay) and the Internet is working fine (Though I am not getting 3.1Mbps what they offered) with reasonable speed. Seems everything fine but now only I noticed one issue how to check my Internet usage ?. In the manuals I received, it is written that you can check the Photon Plus Internet usage by login to online Photon Plus account but I didn't receive any online account details. Then I followed the online instructions and found that we need to create an account first using our connection number and tata photon plus account number instead of a ready-made account usually provided by ISPs.


Then the second problem... I don't know what is my account number and connection number. The local Tata photon plus agents activated the device on my computer and went without giving any clues. Somehow I found the Photon Plus account number by checking the mails (e-bill) and find the connection number via photon plus customer support. Now only I understood I am in time-based plan instead of data based plan. Right now I send a request to tata photon plus customer support to change the plan and waiting for their response.

Update: Successfully changed to data based plan (Took just one day only).


Tips to Increase your Photon Plus Broadband speed

You can increase the actual speed of your photon plus Internet connection. To know the tip click on the link below.
How to Increase Broadband Internet Speed on your Computer


Useful details and links for Tata photon plus users:
  1. Tata Photon Plus Customer Support number: 1800-266-121 (Toll-Free number)
  2. Troubleshoot Photon Plus connectivity issues: Check connectivity issues in a Network
  3. Tata Photon Plus Customer Care email address: customer.care5@tatatel.co.in
  4. Tata Photon Plus Online Store: http://www.ichoose.in/etrade/
  5. Check you Photon Plus Speed: Check Internet Speed
  6. Supported Photon Plus Modems in Linux: Linux Supported Tata USB Modems
  7. How to create a new Photon Plus user account: http://www.tataindicom.com/myaccount-new-user.aspx
  8. Customer care number for prepaid Photon Plus users can be found in:

    http://www.tataphoton.com/customer-service.aspx

    PS: Select the Tata service and your location to get the customer care number.
  9. How to configure your Tata Photon Plus Modem is Linux computer: How to Configure Tata Photon Plus USB Modem in Linux PC
  10. Check Photon plus Internet usage and Bills :

    Log in to my account in http://www.tataindicom.com/ by entering the photon plus phone number and password created.

Compare Tata Photon Plus With Other Mobile Broadband Services

I think if you are not yet started using Photon Plus service, you may be wondering to have a comparison between other wireless broadband services. Let me tell you frankly the speed and reliability of any mobile broadband service depends on the signal quality at the user location. So it may not be true if I say Photon plus is faster than BSNL Wireless broadband (WiMAX )or vice versa. It purely depends on how good the signal quality of WiMAX service and Photon Plus service. So my recommendation is to tell the service provider to show a live demo of the Internet speed at your location before taking the final decision. Nowadays you can see a lot of advertisements about the unlimited Internet Usage Plans by Photon Plus and Other service providers. Before biting the ads it is your duty to read carefully the conditions to use unlimited usage plans. You may not expect the same speed after crossing the threshold (for example 3GB download) and after crossing the threshold download value, your service may be degraded to 2G automatically. I think it will be helpful for you if I leave links to my articles about other major wireless broadband service providers.

  1. Photon Plus and Reliance Netconnect:

    If you are looking for a comparison of Tata Photon plus service and Reliance Netconnect, I suggest you read my article about the later by following the link below.
    Reliance Netconnect Wireless Broadband Service

  2. Photon Plus and Idea Net Setter:

    Just like Photon plus service, another market leader in wireless broadband service is Idea Net Setter. Though Photon Plus use CDMA, Idea Net Setter is 3G (GSM). To learn the speed difference between Photon Plus and Idea 3G at your location, better you can go to their official sites or ask the representatives to give a live demo. To read about Idea 3G broadband, click on the link below.
    How to Configure Idea 3G Broadband On your Handset

  3. Photon Plus and BSNL WiMAX (3G EVDO):

    Just like Photon Plus by Tata, BSNL also has 3G broadband service. One of the differences between BSNL EVDO service and Photon Plus is the difference in technology. Photon Plus use HSIA while BSNL uses "Evolution-Data Optimized". To learn about BSNL 3G follow the link below.
    BSNL 3G Wireless Broadband Configuration
Technology Guide

Purchased Samsung N128 Mini Laptop

Updated on December 30, 2009
Author

Published By Alex George

I purchased a Netbook from Samsung(Samsung N128) two weeks ago, and I think it is time to write a review of it.

It is travel-friendly because of its small size, and nowadays I need to travel a lot. While on a journey, it is difficult to carry my laptop because of its size. So, I planned to go for a mini laptop.

I found many products that suit my travel needs.

After checking different brands, I decided to buy Samsung N 128. You must be interested in knowing my experience with it.

Let me share my review of the Samsung N 128 netbook with you. So, you can find out if this product is suitable for you. The below picture shows what it looks like.


Small Laptop

How does it look? Fine right? Now, we check the system configuration.


Samsung N 128 Mini Laptop Configuration


Processor Intel ATOM 1.6 GHz Processor ( ID: N270)
RAM 1 GB DDR-2 Ram
Hard disk 160 GB HDD
Monitor 10.1" Wide LED Screen (Extra bright)

Other Features
  • Father Ethernet port

  • Webcam

  • WiFi

Ports

Available Ports and connectors on the Samsung N 128 Mini Laptop are:
  1. 3 USB 2.0 ports,

  2. VGA out,

  3. DC power-in,

  4. RJ-45/Ethernet (10/100),

  5. Stereo headphone/line out,

  6. Stereo microphone in,

  7. VGA webcam,

  8. Kensington lock port.

The total weight of this netbook is around 1.25 kg, and it has a 6-cell battery. This product comes with a one-year warranty. I bought a non-OS installed version and installed Windows 7 and Ubuntu. It supports both operating systems perfectly well.


Samsung N128 Mini Laptop Review

It is working better than I expected. At first, I failed to find a WiFi adapter driver compatible with Windows 7. The setup disc has only the Windows XP version of the Wireless adapter driver.

I downloaded the latest version of the wireless adapter driver from the manufacturer's website. I must say, the speaker volume is lower than I expected. It has a 1.5-watt speaker. The volume is low, and I need a headset to hear the sound properly. The next point I want to point out is about battery backup.


The shop owner promised me an 8-hour battery backup, but when I checked, it was just 6 hours only. Besides this speaker volume issue, I am satisfied with the Samsung N 128 netbook.

Author: Alex George

Author

Alex George is the Chief Editor and founder of CoreNetworkZ EdTech Solutions. He is a software engineer and has 20 years of experience in the EdTech niche.

He graduated with a B.Tech in Computer Science & Engineering from CUSAT and worked with three leading IT companies before starting CoreNetworkZ EdTech Solutions.

He possesses sound knowledge of SOHO Network Engineering and has completed various IT certifications, including CCNA, RHCE, and CEH.

He developed and published more than twenty professional custom themes for Blogger and is an expert in software app development.

You can contact him at alex.george@corenetworkz.com.


Author

Published By Alex George

Yahoo Messenger was once one of the most popular online chat platforms. Although Yahoo discontinued its public chat room feature, many users continued to use it.

In this article, I will discuss several tools that could determine the status of Yahoo Messenger contacts.

I will teach you to find whether they were online, offline, or in invisible mode.

How Do I Detect an Invisible Yahoo User?

Julia Sebastian, a regular reader of CoreNetworkz Tech Solutions, asked, "Hello Alex, is there any trick to find an invisible Yahoo user?"

The answer is yes.

When a user chooses invisible mode, Yahoo Messenger displays her as offline. However, specialized "invisible detector" tools could identify whether a contact was truly offline or appearing that way.

These tools helped users figure out if a contact was intentionally avoiding conversation.

Hannah Maria, a reporter at CoreNetworkZ Tech Solutions, told me, "I use these Yahoo status checker tools to find whether a person blocked me on Yahoo."

Hannah is right.

For instance, if a contact appeared offline in your messenger but one of these tools detects her as online, the person had likely blocked you.

Free Yahoo Invisible Status Checkers

Let me share some of my favorite tools for checking Yahoo user's online status. They are ydetector.com, imvisible.info, detectinvisible.com, who-is-invisible.co.cc, and ybuddy.info.

These platforms allowed users to check whether a Yahoo Chat contact was using invisible mode.

  1. Yahoo Messenger Invisible Detector (YDetector) – Check YM User Status

    YDetector is a free online tool that checks the status of a Yahoo Messenger (YM) user ID. If a contact is in invisible mode, the tool can detect and indicate that the user is not offline.

    Below is a screenshot demonstrating how the tool displays a status of 'offline' when a user is signed off.

    yahoo invisible

    If the user is truly signed out, the status will appear as Offline. Similarly, the tool can detect if a contact is 'Available' or in Busy mode.

    yahoo invisible detector

    Link to this tool: http://www.ydetector.com

  2. Check the Status of a YM User with Imvisible

    Imvisible is another free and widely used web-based tool that allows you to check the real-time status of any YM user ID. Like YDetector, it identifies whether a user is online, offline, or hidden in invisible mode.

    yahoo status checker

    Link to this tool: http://www.imvisible.info/

  3. Detect Yahoo Messenger Status with DetectInvisible

    DetectInvisible is another effective tool for verifying a Yahoo Messenger contact's status. It not only displays whether the user is online, offline, or invisible but also allows users to save the avatar of the checked Yahoo contact.

    Below is a screenshot example showing a user detected as Online.

    detector yahoo invisible messenger

    Link: http://detectinvisible.com/

William Brown, a client of CoreNetworkz Tech Solutions, mentioned, "It is helpful to determine whether a Yahoo Messenger contact is genuinely offline or simply using invisible mode."

I agree with William.

Some users might appear hidden because they are genuinely busy and unable to chat—while others may have chosen to block you from viewing their real status.

By analyzing the results returned by these detection tools, you can often infer whether a friend has deliberately hidden their availability or potentially blocked you altogether.

I recall your attention to what Hanna told me. She uses these tools to determine if a Yahoo user blocked her.

In addition to the tools previously mentioned, many other free utilities can help check the real-time status of Yahoo Messenger contacts. Some of these include:


  1. http://www.vizgin.com/

  2. http://www.ymland.com

  3. http://www.invisible.ir/

  4. http://www.invisible-scanner.com/

  5. http://www.statusdetect.com

  6. http://www.webxitin.net/

  7. http://yahoohunter.com (Updated )

  8. http://www.ymsgr.net (Updated )

  9. http://yscan.info(Updated )

  10. http://www.who-is-invisible.co.cc/

  11. http://invisibleim.com/

  12. http://www.ybuddy.info/

  13. http://www.yahoodetect.com

  14. http://www.spydetect.net/

  15. http://invisibleyahoo.net

  16. http://www.invizibil-ascuns.ro

Author: Alex George

Author

Alex George is the Chief Editor and founder of CoreNetworkZ EdTech Solutions. He is a software engineer and has 20 years of experience in the EdTech niche.

He graduated with a B.Tech in Computer Science & Engineering from CUSAT and worked with three leading IT companies before starting CoreNetworkZ EdTech Solutions.

He possesses sound knowledge of SOHO Network Engineering and has completed various IT certifications, including CCNA, RHCE, and CEH.

He developed and published more than twenty professional custom themes for Blogger and is an expert in software app development.

You can contact him at alex.george@corenetworkz.com.

Welcome to the Network Engineer Training Tutorials by CoreNetworkZ Tech Solutions. Today, I will be discussing Local Area Networks (LANs).

Let me start this tutorial by explaining the LAN.

A Local Area Network (LAN) is a collection of connected devices within a small area. A home network (with one router connected to computers and smartphones) is an example of a LAN.

Ethernet is the most popular LAN technology today.

A LAN facilitates communication between devices in a small area and improves work efficiency in an office environment.

Which Network Is a LAN?

Sharon Joe, a CCNA student, asked, "What type of network belongs to the category of a LAN?"

Questions about LAN technologies are in the CCNA and Juniper JNCIA-Junos examinations.

Let me now answer Sharon's question here.

So, how do we determine if a network is a LAN? In a LAN, all devices are connected and can share data. It typically covers a small area, such as an office building or home.

local area network in computer network

The media types used to connect devices in a Local Area Network (LAN) include Ethernet, FDDI, and Token Ring.

CCNA Questions From LAN Topologies

Let us now consider the common topologies used in Local Area Networks, as this topic is part of the CCNA exam syllabus.

Laxmi Vinod, a B.Tech (Computer Science) student from Chennai, asked, "Can you explain the concept of LAN topologies?"

CoreNetworkZ Tech Solutions classifies topology into two types: physical and logical.

Physical topology refers to the actual layout of devices in a LAN, while logical topology describes how these devices communicate over the network.

LAN Physical Topologies

  1. Point to Point

    If we connect two devices without interference from other devices, that is a Point-To-Point physical topology. In this LAN topology, these two devices can communicate without extra support.

    Wireless Bridge is an example of Wireless Point-to-Point Topology.

  2. Bus Topology

    You can say it is an extension of Point-to-Point topology. In Bus topology, we connect all devices in LAN in a single connection.

    Ethernet uses Bus topology.

  3. Ring

    If a Local Area Network has Ring Topology, all devices are in a ring form. It means PC 1 connects to PC 2. PC 2 connects to PC 3, and the last device connects to PC 1. So, it forms a ring structure.

    FDDI uses a ring topology.

  4. Star Topology

    In start topology, all devices in a LAN have a connection to the central device. An example is all the computers connected to a Switch.

LAN Logical Topologies

  1. Bus Topology

    Ethernet is an example of a LAN technology using a logical bus structure to communicate. To learn more about Ethernet, visit the link below.

  2. Ring Topology

    Token Ring is a good example that uses ring logical topology to communicate computers connected to the network.

The medium of Transmission in LAN

I will complete today's article by explaining the last question asked by a reader on CoreNetworkZ Tech Solutions.

Sanal Mohan, a working professional from Bengaluru, asked, "I am planning for a career change. I am about to join a course on Juniper and Cisco products. So that I can become a Network Engineer. My question is about the medium of transmission in local networks."

Here is the list of media of transmission as an answer to his question.

  1. Twisted-pair wire

  2. Coaxial cables

  3. Fiber optic cables

Reference

  1. https://www.cisco.com/c/en/us/products/switches/what-is-a-lan-local-area-network.html
  2. https://www.juniper.net/documentation/us/en/software/nce/feature-guide-virtual-private-lan-service/feature-guide-virtual-private-lan-service.pdf
  3. https://www.systosys.com/viewtopic.php?t=4
  4. https://answers.microsoft.com/en-us/windows/forum/all/lan-connectioncommunication-defined/9a4d4605-a0f4-4a07-bbba-beaadca676c1
Newer Posts Home