I have been using the Asianet Cable broadband connection for a while without any issues. Everything was fine till the last week.

Last week I faced connectivity problems on my computers connected to the Asianet WiFi network.

I was a little disappointed while checking up for help tutorials because there are not many resources available.

Ironically I received no help from their technical support. Every time I received either a busy tone or no answer.

They provide Cisco DPC2320 Wireless Residential Gateway as a modem, and it has both routing and WiFi features. Fortunately, I could fix the issues by myself without extra information.

This tutorial explains the steps I performed to fix the Asianet Broadband WiFi connectivity problems.

Configure Asianet Fiber Broadband Modem With Correct Settings


  1. Login Asianet Cable Modem

    The Login IP address of the Asianet Cable modem (Cisco DPC2320) is 192.168.0.1.

    There is no username and password set on Cisco DPC2320 by default.

    Some of the new modems like Genexis earth provided by Asianet Fiber Broadband have different login IP addresses. So, I share a simple tip to find out the login IP address of the modem you have.

    Power on the modem

    Connect the LAN port of the modem to your computer

    Type ipconfig on the Command Prompt and press the Enter key

    The IPv4 Default Gateway is the Asianet Fiber Broadband Modem login IP Address

    Click the login button when it prompts you to enter the login details. It will automatically sign in you to the modem setup page.

    Asianet broadband login

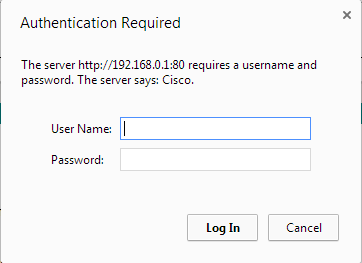
    At first, it will prompt you to change the current password with a new password.

  2. Change Asianet Broadband Modem Password

    To change the current Asianet fiber broadband login password of the Asianet cable modem, click the Password Settings link.
    Asianet broadband password change

    Leave the current password field blank for the first-time entry and then type the new password. After this, click Apply.

  3. Change Login IP

    We can change the default login IP address of Cisco DPC2320 from the IP Management page. Click on the LAN IP Address Management link under Basic Settings.
    IP Management

  4. Change Asianet WiFi Name

    You can change the current WiFi name set by Asianet from the Basic page under Wireless.

    Delete the current name set on the Service Set Identifier (SSID). Now type the new name.
    how to change Asianet WiFi password and name?

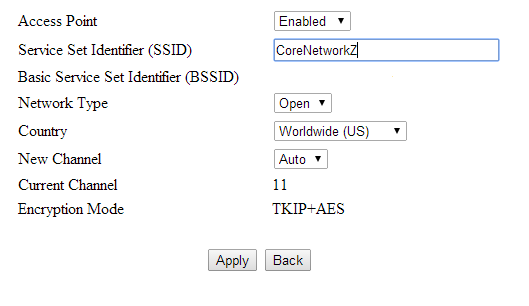
    It will be the new name of your wireless network.

  5. Change WiFi Password

    To change the current wireless password on Asianet WiFi, click on the Security link under Wireless.

    Here you can change the WPA Pre-Shared Key configured.

    Just check the checkbox at the Show Key to display the password you entered.

    You cannot join the WiFi without providing this new Wireless key.

  6. Block Websites

    We can use the Parental Control feature on the Asianet modem to block specified websites. To enable this feature go to User Setup under Parental Control.
    certain websites are blocked

    Procedure to block websites based on keywords as well as the domain name;
    • Click on Setup from the top menu

    • Click on User Setup

    • Select the user (default if none configured )

    • Go back to setup and click basic rules

      Here you can enter the keywords or websites you want to block.


    You can secure the Internet usage of your children by activating the Parental Control feature in Asianet Fiber Broadband Modem.

    Use the Parental Control feature very carefully.

    Any wrong settings on this page can deny your free access to the World Wide Web.

  7. Check Devices Connected to the modem

    If you suspect some unauthorized devices are accessing your Asianet cable Internet connection and stealing the bandwidth, you can investigate it by checking the CPE Connections under the Status tab.

    You can monitor the devices currently connected to the Cisco DPC2320. This feature helps you to identify the computers connected to the WiFi network by checking the MAC address.

    To check the currently active devices on the Asianet Wireless network, click on the Status tab.
    check intruder

    Under CPE Connections, you can see the devices currently connected to the Cisco DPC modem. You can check their IP and MAC address here

  8. Fix Asianet WiFi Connection Issues

    Follow the instructions provided in the link below to fix WiFi connection issues with the Asianet cable modem.


Useful Tips
  1. Create Invoice

    Dataline customers can automatically generate the last invoice from their account. You can do it by log in to the account and click the My Invoice link.

    https://myabb.in/

  2. Check Internet usage

    You can check Asianet Cable broadband usage by visiting the link 'My Account' at the top of the window. You may access the same page by visiting the link below.

    https://payments.asianet.co.in/

    You may need to enter the username and password. Here you can see the plan you opt for, IP address from Asianet, connection start time and end time, duration, upload data details and download data size, effective total data transfer, etc. So if you want to know the total data usage, you may log in to this page.

  3. You can change your current password from the same page by visiting the link 'Change Password' from the top menu.

  4. Customer Support

    If you want to visit the customer support page of the Dataline connection, visit the link below.
    http://www.asianetdataline.com/contact.aspx

    Asianet Technical support number: 80860 11111

    Fiber Connection Helpline Number: 9072090721

    You can contact Asianet customer support for any kind of complaints like lower connection speed, frequent disconnection, or billing issues.

    You can use either the support link or the telephone number for this purpose.

My Experience With Asianet Broadband


I wrote this review in 2014. Asianet support is so better now.


After paying the full amount in advance, I had to wait at least a week before getting the connection. They said that the delay was due to the shortage of cable to my house from the nearest connection.

I called them multiple times, and after one week, one technician came and activated the modem.

The major problem I feel is, Asianet wants me to keep one tab open by login into their website whenever I want to go online.

If I close the tab, the Internet connection will disconnect. Then I need to log on to their website again with the username and password provided by them.

I am happy with the speed they provide so far, but I must say I am not fully satisfied with their technical support.

Another disappointment is about the Asianet modem lease agreement, which I feel not so customer-friendly.

I strongly advise a new user to read their modem lease agreement before applying for their service. I smell their modem rental policy really bad.

My Asianet Broadband review will not be honest if I don't mention it.

Popular Guides
  1. MTS MBlaze Data Card Hack to Fix DNS Issues

  2. Tata Photon Plus Connection Review

  3. Reliance Netconnect Connection Review

  4. How to Configure Idea 3G On Android Handset

After the introduction of Blogger Responsive themes and Google Auto Ads, AdSense optimization for a Blogspot blog is very simple. Google AdSense Auto Ads helps a lot to an ordinary blogger, but we can improve the AdSense revenue by some extra steps.

This article explains how to get maximum revenue by combining the Google Auto Ads and manual AdSense units on your Blogspot Blog.

My experience with Google Auto Ads is very positive, but I have made more income by adding an extra manual AdSense unit just below the Blog post title.

I have explained in my previous article that one of the most important places to display AdSense unit on a blog post in just below the post title.

Google Auto Ads sometimes misses this position as there is no way to manually position the auto ads to display on a page.

The screenshot provided below will give you a clear idea of this point.

You can expect a higher Click Through Rate (CTR) on the Ad unit showing just below the blog post title.

  1. How Much Page Views Required to Earn $100 From AdSense?
  2. How to increase CPC?

Let us check the step by step instructions to place a Google AdSense Ad unit between the Blogger post title and the beginning of the content.

How to Place AdSense Ads below Blogger Post Title?

Before proceeding, you must have a responsive AdSense Display Unit code generated from your AdSense account.

The following steps teach you where to paste your AdSense code to display Ad Unit below the post title.

  1. Open Blogger Theme Editor

    To Open Blogger theme editor, follow the instructions below.

    • Login to the Blogger account and select the blog where you want to display Ad units

    • Click on Theme from the left side menu

    • Click on the vertical ellipsis (the vertical three dots)

    • Click on Edit HTML

    I am using the Blogger Notable theme for CoreNetworkZ.com. It is a free responsible theme from the Blogger team.


  2. Add Google AdSense Code in the Blogger Responsive Theme

    You need to know the exact location on the Blogger HTML to paste the AdSense code to show the ad units just below the post title.

    • Search for <data:post.body/> from the HTML page


      You might see more than one time this code on the template. In the Notable theme, you should select the second <data:post.body/> search result.

      PS: Click on the Template HTML Edit window and press [Ctrl] and [F] buttons together to search for a code.

    • Paste the responsive AdSense Display Unit code just above <data:post.body/>.

    • Look at the screenshot below. I have pasted the Google AdSense Code.

    • Do not forget to click the save button at the bottom of the Edit window.

Once you have completed the procedure, Blogger will display an AdSense Ad unit just below the blog post title.

  1. How to Remove Date Figure From Blogspot Post Links?
  2. How to Setup Custom Domain Name For Blogspot Blog?

Google Auto Ads feature is very helpful for bloggers who do not have a lot of time to try different manual ads placements.

  1. How to Open Blocked Websites On Airtel Network?
  2. How to Open Blocked Ports In Cox Cable Modem?

Google automates this process and displays ads at the best places available on a page.


Airtel is one of the popular 4G Mobile Service Providers in India. Their faster Data Connection helps to access the Internet and download video files hasslefree.

However, some Airtel users find problems with accessing some websites using their Internet connection. Thousands of genuine websites are blocked for Airtel 4G users either by technical problems or by the Government regulations.

This tutorial will help you with unblocking blocked websites on the Airtel 4G data connection.

CoreNetworkZ team has a handful of tutorials that teaches how to access banned websites including torrents and video sharing sites your computer.

However, this tutorial teaches you how to open all websites on an Airtel Internet connection.


Why Can't I Access a Website On Airtel Mobile Connection?

If you are looking for the reasons for not able to open a website on your Airtel Phone, the below list will help you.

  1. Airtel blocks some websites due to Government and court orders.

  2. Technical errors lead to the ban of an entire website

  3. Airtel may block torrent websites to prevent piracy and save the bandwidth

  4. If a website server IP address belongs to the pool of banned IP addresses, Airtel users cannot open that site

Let us check how to fix the above problems.


How To Open Blocked Websites On Airtel 4G Network?

Let us check the different solutions to open a banned website on Airtel 4G Network.

  1. Change the Default Airtel DNS Server:

    If the problem with loading a website on your computer is due to DNS issues, the best solution to open that website is to change the default DNS server address of the Airtel 4G Connection.

    If you don't know how to change the DNS server address details on your computer having Airtel Mobile internet, follow the instructions provided in the link below.
    How to Change the DNS Address on a Computer?


  2. Use The Google Cache Technique:

    If it is an information site you want to open with your Airtel connection, you can use the Google cache to view the content. To do Google Cache trick to view website content, follow the steps below.

    • Open https://www.google.com on your browser.

    • Type cache: link address and press the enter key.

    For example, if you want to see the cached page of the CoreNetworkZ blog on Google, use the following code on Google Search.

    cache:https://www.corenetworkz.com


  3. Using Tor Proxy to Bypass Airtel Blocks

    Tor proxy is a free proxy tool which helps you to bypass almost every ISP firewall restrictions. To read more about it, visit the link below.

    Tor Proxy Review


  4. Use the Opera Browser to Unblock Airtel Website Ban

    The Opera browser offers free VPN service which helps you to open blocked sites on your Airtel Mobile Phone. Follow the steps below to use the Opera VPN to open a blocked website on Airtel Network for free.

    • Download the Opera browser using the link below.

      https://www.opera.com/hi/download

    • Once you installed the Opera browser on your laptop, open it.

    • Click on the Easy setup icon on the right-hand top of the Opera browser.

      how to open torrent sites on airtel data connection
      Scroll down the Easy setup window and click on the browser settings.

    • Click on the Advanced link and toggle the Enable VPN button.
      how to open porn websites on airtel

      Wait for a few seconds. Once the VPN is on, you can access all blocked websites on your Airtel connection.

  5. Use the Puffin Secure Browser to Unlock a Domain

    Puffin Secure Browser helps to unblock a website on your Airtel data connection. You can simply bypass the Airtel firewall using the Puffin browser.

    To download the Puffin browser, visit the link below.

    https://www.puffin.com/secure-browser/

CoreNetworkZ.com has dozens of tutorials related to Cybersecurity.

  1. Idea 4G APN Settings
  2. BSNL 3G APN Settings For Your Android Phone

We have similar articles like how to access a blocked website on the Jio 4G network, open a web port in Cox WiFi modem, etc.

  1. How to Configure Airtel Broadband Modem?
  2. How to Deactivate BSNL Value Added Services?

About The Author:

Alex George is a Cisco and Microsoft certified Network Engineer. He has been working in the Network Engineering field since 2006.

He has hands-on experience in configuring and troubleshooting various mobile networking products for both corporates and small IT firms.

To learn more about his qualifications, please check the About Us page.

I have been using Idea Cellular Service since 2010 and am a happy customer. Now, they have changed the name to Vodafone Idea Limited (or VI) after merging with Vodafone India. So, I am a VI customer now.

The new company is offering high-speed data services for its customers. VI has updated its APN settings, which is necessary to join its 4G Internet service.

After merging with Vodafone India, Idea Cellular Services formed a new company called Vodafone Idea Limited.

This article teaches you how to configure your Android Phone with the fastest Vodafone Idea Limited APN settings. By activating the correct 4G APN settings, you can increase the average Idea Internet speed on your handset.

Let us check how to get new Idea 4G Net Settings for your device.


How to Get Latest Idea 4G Internet Settings?

  1. Get Idea Net Settings Automatically
    When you activate Idea GPRS, 4G or 3G Internet on your Android phone, your phone will receive the automatic settings.

    If you have not received it automatically, you may visit the link below on another device and enter your Mobile Connection Number.

    https://www.ideacellular.com/mobile-internet/2g/gprs-settings

  2. Manual APN Settings

    Sometimes you may need to configure the Access Point and GPRS settings for Idea (both GSM second and third generation) connection manually on your Android phone.

    To enter the APN Settings manually, follow the instructions provided below.


Steps to Configure Idea 4G/ GPRS/ 3G on Android
  1. Click on Applications

  2. Go to Settings

  3. Click on Wireless and Networks

  4. Click on Mobile networks

  5. Go to Access Point Names (APN)

  6. Create New APN (you can get this option by pressing the left button)

To activate the Idea Data service, you need to enter the following details. Once you entered the details, the Idea will activate 4G data service on your Phone.


Name Idea gprs
APN internet
Proxy < - not set - >
Port < - not set - >
Username < - not set - >
Password < - not set - >
Server < - not set - >
MMSC < - not set - >
MMS proxy < - not set - >
MMS port < - not set - >
MCC 404
MNC 19
Authentication type none
APN type default, supl

In case if you delete the previous configuration, it is better to know how to set up the same settings again by yourself.

A wrong Access Point Name can stop you from accessing their mobile broadband service.

So if you deleted the existing Idea GPRS APN, you should re-insert the SIM again to get automatic settings from the Vodafone Idea LTD.


What If The Idea 4G APN Is Not Working?

In rare cases, some Idea 4G customers find the default APN is not working on their Phones.

If the above settings do not work on your Phone, you should visit the idea cellular website and request auto APN for your Idea SIM.

You can do it by visiting the link below.

https://www.ideacellular.com/mobile-internet/2g/gprs-settings


how to Increase Idea Internet Speed?
There are multiple factors affecting the net data transfer speed from Idea Cellular Network.

  • Signal strength is the most important factor which affects the Idea 4G Internet speed.

  • Big constructions and natural barriers (like hills) between the tower and your Phone will reduce the speed.

  • Sharing Idea 4G among multiple devices will reduce the Net speed on each device.

  • If you are looking for the steps to get maximum speed from Idea 4G, you may click the link below and follow the instructions.

    The below Idea 4G Speed hack will give you better data speed on your PC using Mobile WiFi.

    Boost Idea 4G Data Transfer Speed


Important Tips
  1. Steps to Activate Idea 3G on Android

    This manual setting valid for every mobile broadband connection.

    To activate data connection, follow the steps provided in the link below.

    How to Activate Mobile broadband on your Smart Phone

  2. How to Recharge Idea 3G on a Handset

    You can recharge Idea 3G and 4G using the existing balance on your account or by recharging with a specific amount.

    To get the latest Idea Offers type *121# on your Mobile Phone.

    PS: The below USSD codes no longer works
    Dial  *150* 107#  to get 300MB 3G Bundled Usage valid for 30 days
    
    Dial  *150* 199#  to get 600MB 3G Bundled Usage valid for 30 days
    
    Dial  *150* 249#  to get 1GB 3G Bundled Usage valid for 30 days
    
    Dial  *150* 348#  to get 1.5GB 3G Bundled Usage valid for 30 days
    
    Dial  *150* 448#  to get 2GB 3G Bundled Usage valid for 30 days
    
    Dial  *150* 595#  to get 2GB 3G Bundled Usage valid for 60 days
    

    Vodafone Idea LTD may change the tariff plans over time. Click on the link below to get the latest plans.

    For the wrong recharge amount, they may send invalid request error.

    https://care.ideacellular.com/wps/portal/account/online-recharge


  3. How to Check The Remaining Idea 3G Data Balance

    The idea doesn't send alerts of remaining data balance.

    So we may continue to use the Internet even though the data balance is exhausted.

    Then the Idea Cellular network deducts money from the main balance for the rest of the data.

    To avoid this situation, you must check the remaining data balance. Use the USSD code to check the remaining data balance.

    Dial *125#  


  4. To configure BSNL GPRS on your Android phone, click on the link below.
    How to Configure BSNL GPRS on Android Phone

  5. Speed differences in 2G, GPRS, and HSDPA

  6. How to Avoid Idea Prepaid SIM Number Monthly Rent by Re-enabling The Lifelong Validity


How to Activate Idea 3G Broadband and Get Latest Plans

For the Idea to migrate from 2G to 3G, we do not need to change the SIM. All we need to do is activate 3G and get an Internet setting from Idea.

To activate 3G broadband on Idea, follow the steps below.

  1. Make sure your Mobile Phone supports 3G

    If you are not sure whether your handset is 3G compatible, type "CHECK" and SMS to 12345 (without ""). This number is a toll-free number.


  2. Send SMS "ACT3G" to 12345 (without "")

    Now you will get a confirmation message from Idea about the status of the 3G activation process.


  3. Configure 3G Internet setting from Idea in the handset

    To configure Internet settings in your mobile phone, type "SET" (without "") and SMS to 54671 (toll-free number).


How to get the latest 3G Idea Internet Plans
To get the latest 3G Internet plans, dial *147# and follow the instructions provided by Idea.


About The Author:

Alex George is a Cisco and Microsoft certified Network Engineer. He has been working in the Network Engineering field since 2006.

He has hands-on experience in configuring and troubleshooting various Vodafone Idea products for both corporates and small IT firms.


JioFi Hotspot is one of the most popular WiFi Hotspots available in India. Though the WiFi signal has WPA2-PSK encryption protection, we can do a little more. One of the extra precautions to avoid unauthorized access to your JioFi network is to hide them from other devices. Which means, no other devices will see your Jio Wireless broadcast while scanning for all available networks. This tutorial teaches you how to make JioFi WiFi invisible from others.

Let us see how to make Jio WiFi invisible from the public and hide from potential hackers.

How to Hide JioFi Wireless Network From Others

It is very simple to make Jio Wireless Network invisible from other devices and prevent them from connecting to it.

All you have to do is to disable the SSID broadcast from the GUI of Jio WiFi Hotspot. I suggest you connect the JioFi router to your computer using the USB cable to perform it.

Once you have connected PC and the Reliance Jio router using a USB cable, follow the step by step instructions provided below.

  1. Type http://jiofi.local.html on the address bar of a browser and click the Login link.

  2. Use administrator as both username and password.

  3. Click on the Login button


  4. Click on WiFi from the left menu. Click on the drop-down menu at SSID broadcast and select Disable.

  5. Click on the Apply button at the bottom of the window. Now the Jio wireless will restart. After the restart, no other devices will see this JioFi broadcast.

Is Your Jio WiFi 100% Hidden?

The answer is no. This invisible network will show as Hidden Network. However, no one without having the SSID (JioFi Wireless Network Name) can connect to this network.

  1. How to Change SSID and Password?
  2. How to Check JioFi Daily Data Balance Left In Your Account?

So the external device must need both SSID and Passphrase to connect to a hidden Jio Network. It provides an extra layer of protection.


How to Connect to a Hidden JioFi Network?

Once you have made the Jio 4G Hotspot WiFi signal invisible, you need its SSID to connect it. To connect to an invisible Jio 4G Hotspot WiFi, follow the instructions below.
  1. Click on the Wireless symbol on the system tray to scan all available networks.

  2. You will see the signal from Jio 4G Hotspot as one of the hidden networks. Click on the hidden network to connect.

    If there are multiple hidden networks, you can identify your Jio 4G Hotspot signal by analyzing the signal strength.

  3. You need to type the SSID (WiFi Name) to proceed. After typing the password, you can connect to the invisible JioFi WiFi signal.

Once you have made your JioFi signal invisible, no one can connect it without the SSID and Password. If you do not reveal the SSID to anyone, it will be difficult for someone to identify your WiFi.

  1. How to Analyze Windows 10 Local Hard Drive Storage Allocation?
  2. How to Keep Idea Prepaid Number Without Paying Monthly Rent?

I hope you like this trick to add one more layer of protection to your JioFi network.

  1. How to Setup Siemens SpeedStream Modem?
  2. How to Do Port Forwarding on Cox Cable Modem?
I have an Acer Aspire laptop which often hangs in the middle of my work. When I started checking the actual reason for this, I found a few processes which consumes too much CPU resources. So, most of the time, my laptop CPU usage is 100%. One of the main culprits is a process named Windows Setup API. This article explains the process Windows Setup API and how to prevent it from consuming too much CPU.


My Acer Aspire laptop runs on Windows 10 Operating System. I started Task Manager to check the reasons for the continued freezing of my Acer Aspire laptop. The below photo is a screenshot of my Task Manager.

The screenshot shows how much the Windows Setup API process demands CPU resources.

While at the time of taking the screenshot, Windows Setup API was consuming 57.2% of the total CPU usage. But most of the times, it demands more CPU usage and let other processes suffer.

Another point I have noted is the 100% Disk usage.

How to Solve Windows Setup API High CPU Usage Problem?
You can solve the high CPU usage of the process Windows Setup API by killing that process from Task Manager.

You may need to start Task Manager in admin mode to kill this rough process. For that, I suggest you follow the instruction given below.
  1. Type Task Manager on Windows Search

  2. Right click on the Task Manager, and click on Run as administrator

  3. Microsoft may need you to authenticate yourself by entering the admin password to continue.

  4. Once the Task Manager (with administrative privilege) opens, you need to right-click on Windows Setup API under the Processes tab

  5. From the menu, click on End Task

Once you have ended the process, check the CPU usage. You can see a sudden drop in CPU usage by your computer.

What is Windows Setup API and Its Uses?
According to the Microsoft database, the Setup API provides a set of functions that a setup application calls to perform installation operations.

However, Microsoft says they no longer use it for the installation process of software applications on a Windows 10 computer.

  1. Check If Someone Rejected Your Facebook Friend Request?
  2. How to Delete Junk Files In Windows 10
  3. How to Change the Registered Phone Number?

But, they say, installation of device drivers require this process.

How to Check JioFi Data Balance Left

Updated on November 27, 2018
It is important to have a look at the remaining data balance left for the day on your JioFi daily limit before starting downloading any large file. It is very simple to check the JioFi 4G data used and the balance left on your account. This article explains the different methods to check JioFi 4G daily data balance left on your account. You can check your JioFi data used on from either MyJio App or Jio website.


How To Check Data Already used From MyJio App
To check the daily JioFi Data left on your account from your Mobile Phone, you need to install MyJio App. If you have MyJio App on your Smart Phone, follow the instructions below.

  1. Click on MyJio App icon on your Mobile Phone

  2. Once login, you can see how much data remains from your daily data limit. You can see the time left to renew the limit.

How to Fix a Slow Jio 4G Internet Connection

How to Check Reliance Jio Data Balance On Desktop Computer
Reliance provides an option to check the data used on the day from your computer also. You need to login to Jio online portal by verifying with a one time OTP.

How to Open Blocked Websites On Reliance 4G Connection

Once you have logged into your Jio account, you can see the data used at the top of the page. To check the data consumed using a laptop or desktop computer, follow the instructions below.

  1. Visit the link given below

    https://www.jio.com/

  2. Click on Sign In link at the right-hand top of the web page.

  3. Log into your account by providing the Jio ID and Password.

  4. Now you can see the data usage details

How to Check The Upload Data and Download Data
You can check the download and upload data by login to JioFi Hotspot web interface. To check the data consumed for downloading and uploading on a day, follow the instructions provided below.

  1. Type http://jiofi.local.html or 192.168.225.1 on the address bar of your browser and press enter key

  2. Click on WAN Info

  3. Under WAN Status, you can see the data consumed for downloading and uploading on the day

If you have JioFi hotspot to create a home wireless network, it is important to check the Internet usage balance left. Once the daily limit as per your subscription plan is over, Reliance will give you a slow connection.

The easiest balance check method on a Smart Phone is by login to MyJio App installed.

  1. Enable Metered Connection For WiFi Networks
  2. Delete Recently Accessed Folders and Files History On Windows 10

Daily verification of the upload and download data usage will give you an idea of the activities by the background processes running on your Mobile Phone.
Reliance Jio 4G is one of the most popular LTE mobile data service providers in India. Though they provide 4G data service at a cheap rate, many users find fluctuations in the data speed.

JioFi hotspot users also face the same problem. This tutorial investigates the major reasons for slower Jio 4G Internet connection on a mobile handset and JioFi Hotspot.

We also explain how to fix the Jio 4G connection speed issues.

What Is The Reason For Getting Slower Jio Internet Connection?
Reliance Jio 4G has decent network coverage, but it is not free from signal drops and slow data transfer speed. Let us check the common reasons for the slow JioFi network speed.
  1. Poor network signal strength
    The most common reason for facing lower data transfer speed is the poor signal strength. You should check the signal strength on your mobile handset. On JioFi, you should ensure that the network indicator is green.

  2. Number of Active Users Under the same Jio Tower
    If too many active Jio users are in your tower coverage area, you will get a reduced speed. Too many active users under the same tower can lead to frequent Jio call drops.

  3. Outdated JioFi Firmware & Mobile Handset Software
    Bugs in the outdated mobile phone software and JioFi firmware can reduce the overall Jio 4G Internet connection speed.

  4. Problems with Default Reliance Jio DNS Server

  5. Check the Daily Data usage
    If you have crossed the daily data limit set by Reliance Jio, your smartphone will get a slower data transfer rate. You can check if your data usage crossed the daily limit set by the ISP by log into the MyJio app.

  6. Signal Interference
    Signals from Microwave oven, cordless phone, etc.. can interfere with the mobile signal. A wall or similar physical obstructions can reduce signal strength.

  7. The Distance between JioFi hotspot and device
    Your device (whether computer or Mobile Phone) must be within 10 meters from JioFi Hotspot.

  8. Number of Devices sharing the same network
    You should not connect more than ten devices to a single JioFi network.

  9. Frequency Bands supported
    Jio supports Band 40, Band 5 and Band 3. If your operation Band is 40, you will get maximum speed.


How to Troubleshoot Poor Jio 4G Signal Strength and Internet Speed
We have checked the major reasons for the poor Internet connection speed. Now let us check how to troubleshoot and fix slower JioFi Data transfer speed.
  1. Check the Signal indicator color

    • A green signal indicator shows your JioFi router is under good network coverage. Change the position of your hotspot until it shows green instead of blue or red.

    • Place the router near the window rather than deep inside your room.

    • Avoid using the cordless phone and other microwave wave devices near your hotspot.

  2. Do not connect more than ten devices at a time

  3. Check the Operation Band and if it is not 40, call Jio customer support. You can check it by visiting the link below.
    http://jiofi.local.html/

  4. Broadband Hack to Increase the Speed of Your Internet Connection


  5. Make a complaint

    You can report slower speed issues at Jio customer support by calling the number 1800 889 9999.

By adopting the steps mentioned above, you can increase the JioFi bandwidth and speed.

  1. How to Perform a Factory Reset
  2. Destination Net Unreachable Error
  3. Tips to Access Blocked Websites

The first step to increase Jio 4G Internet speed on your hotspot is to turn the network indicator to a green color. If it shows in red color, you are at a poor signal coverage area.

  1. How to Delete Windows 10 File Explorer History
  2. Anonymous Proxy Detected, Click Here
  3. Remove Background Of a Photo Using Microsoft Paint Application

The blue signal indicator shows an average network coverage.

My 4G Phone Is Not Showing 4G LTE Networks

Updated on March 24, 2018
This post is on response to an email sent by one of our readers to correct issues with picking up 4G signals on a 4G mobile handset. He is using a mobile phone with 4G features. Though his phone supports 4G LTE network, he could not access 4G network on it. By default, those handsets which support 4G LTE can pick up the signal automatically and access data through it. However, there are occasions where your 4G Phone fails to show 4G signals and access 3G or 2G networks instead.

In this article, I will explain how to enable 4G network on a supported Phone and access the Internet on it.

Reasons For Not Showing 4G Networks On Your Handset

Here is a list of common issues which prevents your mobile phone or tabs from connecting to 4G or 3G wireless networks. They are:
  1. Your Phone Does not Support LTE

  2. Wrong APN Settings

  3. Incorrect Cellular Networks Settings

  4. Problems from the side of your Cellular Service Provider

Solve Troubles to Access 4G Network On a Supported Device

  1. Make Sure Your Device has Correct APN Settings
    If you have not configured your device with correct APN settings provided by your Cellular Service Provider, it will not connect to their network. Here are some support links which will help you to check your current APN settings with the default APN supported by major Cellular Service Providers.

  2. Incorrect Cellular networks settings
    If your device has incorrect Cellular Networks settings, it will pick up only the network which is allowed by the existing Cellular Networks settings. So you must verify whether your tab has correct cellular network details which allow the device to access LTE signals.

    If you don't know how to check whether the current settings allow your Android Tab to view and register on 4G LTE networks, follow the instructions below.
    1. Go Settings

    2. Click on Cellular Networks under Wireless & Networks

    3. Select the SIM

    4. Click on Preferred Network Type

    5. Make sure you have selected GSM/WCDMA/LTE

  3. Issues From the Side of Network Service Providers
    Here, you can do nothing much. Issues like tower location, obstacles like hills or big constructions between you and the tower, transmission issues etc can be fixed by the Service Providers only.

    LTE Internet speed depends on the number of users joined in the same connection at the specific time too. Here, all you can do is to contact the customer care of the company who is responsible for the LTE coverage on your area.
Cox Communications is one of the leading Cable Internet Service Providers in the USA. They provide high-speed Internet plans for almost all type of users all over the USA. This tutorial explains how to set up Cox Cable modem by yourself and troubleshoot any network connection issues with their High-speed Internet. We also reveal small tricks to improve both download and upload speed of Cox cable broadband connection. They allow customers to use customer-owned modems to connect to the network.

However, if you are looking for Panoramic WiFi, you should go for Panoramic WiFi modem that comes as Cox rental modems which are installed by the company technicians.

How to Setup Cable Modem With Cox High-Speed Internet Connection

This article covers the instructions to configure cable modems which support DOCSIS 3.0 technology and above. Cox High-Speed Internet supports ARRIS / Surfboard modems, Asus CM16 modem, Cisco cable modems, Hitron-Zyxel CDA30360, D-link DCM301, Hitron-Zyxel CDA30360 modem, TP-LINK TC-7610, Linksys, etc..

You can read the configuration and troubleshooting steps with each of the models below.
  1. Setup & Troubleshoot ARRIS / Surfboard Modems with Cox Connection
    Cox supports various models of ARRIS / Surfboard modems like ARRIS / Surfboard CM8200, DG2460, SB6120, SB6121, SB6141, SB6180, SB6182, SB6183, SB6190, SB8200, SBG6400, SBG6580, SBG6700, SBG6782, TG1682, TM3402, WBM760 etc. Step by step instructions to connect Arris modem to Cox cable Internet and configure broadband access are given below.
    1. Connect Modem to Computer
      • Connect one end of coaxial cable comes with Arris modem to Cox cable wall outlet and the other end on the coaxial port of your Arris device.
      • Connect Ethernet port of Arris cable modem to LAN port of your Computer using an ethernet cable
      • Power on Arris modem and computer
    2. Self Activate Arris Modem With Cox Cable Internet
      • You can manually activate your Arris modem with Cox broadband by yourself. All you have to do is to visit the link below.
        http://www.cox.com/activate

      • For more technical assistance to activate Arris modem with Cox high-speed Internet, visit the online support page.
        https://www.cox.com/residential/support/self-activating-your-new-cox-equipment.html

      • If you face any problems while activating Arris modem with Cox, you can get immediate assistance by calling the support number 888-556-1193.

    3. Login to Cox Arris Cable Broadband Modem
      If you wish to access the Arris modem setup page from your computer, type the default login IP on the address bar of a browser. It is important to note that different arris modem models supplied by Cox have a different login IP address.

      To find default login IP Address of a Cox modem, follow the instructions provided in the link below.
      How to Find Default Cox Modem Login IP

      List of Cox Arris Modem Login IP Address and default username and password.
      Modem ModelLogin IPUsernamePassword
      Arris CM8200192.168.100.1
      Arris SBG7580192.168.0.1adminpassword
      Default Arris CM8200 modem login IP address is 192.168.100.1 and press enter. Without entering Username and password, you can access Arris CM8200 modem configuration page.

      However, if you have Arris SBG7580-AC modem and want to install Cox WiFi, you should use the IP address 192.168.0.1 and admin as default username. The default password is password.

    4. Setup Cox WiFi on Arris Modem
      After login, Click the Wireless 2.4 GHz or Wireless 5 GHz main menu button on the Arris Web Manager menu bar. Now under wireless basics, perform the following things.
      • Check the enable wireless checkbox. Now Cox WiFi is activated on Arris modem
      • On Wireless SSID field, change the default wireless network name and type a new name for your Cox wireless network.
      • To activate Cox WiFi protection, choose WPA2 on security mode field. Now enter the wireless key on the field below it.

  2. Setup Cox Internet With Asus Cable Modem
    Cox cable Internet supports Asus CM16 modem, and you can manually install Internet on it. Below steps explain how to connect and activate Cox broadband on Asus CM16 modem.
    1. Connect Asus Modem with Computer
      • Using a coaxial cable, connect Asus modem to Cox cable wall outlet.
      • Connect the Ethernet cable to CM-16 and Ethernet port on your computer.
      • Power on both Asus device and computer
    2. Self Activate Asus Modem with Cox Internet
      • You can manually activate your Asus modem with Cox broadband by yourself. All you have to do is visit the link below.
        http://www.cox.com/activate

      • For more technical assistance to activate Asus modem with Cox high-speed Internet, visit the online support page.
        https://www.cox.com/residential/support/self-activating-your-new-cox-equipment.html

      • If you face any problems while activating Asus modem with Cox, you can get immediate assistance by calling the support number 888-556-1193.

  3. Install Cox High Speed-Internet With Cisco Modem
    Cox communications support different models of Cisco modems. Some of them are Cisco DPC3000, Cisco DPQ3925, DPQ3212, DPC3825, Cisco DPC3010, DPC3008. Here we provide instructions to set a Cisco modem with Cox Cable Internet.
    1. Physical Connection of Cisco Modem with Computer
      • Using a coaxial cable, connect Cisco modem to Cox cable wall outlet.
      • Connect the Ethernet cable to Cisco modem and Ethernet port on your computer.
      • Power on both Cisco device and computer
    2. Self Activate Cisco Router with Cox Internet
      You can activate the Internet with your Cisco gateway by visiting the link below.
      http://www.cox.com/activate

    3. Login Cox Supplied Cisco Modem
      The default login IP of Cox supported Cisco DPQ3925 is 192.168.0.1, and you should keep both username and password fields blank.

    4. Activate Cox WiFi on Cisco DPQ3925
      • Once login to the setup page, click on Wireless tab
      • You should click Enable radio button near Wireless Network
      • Change the default name on SSID field and type a new name for your WiFi
      • Select WPA2 as encryption and type password at the pre-shared key field

  4. Setup Cox Cable Internet on DLink Modem
    Cox communications support DLink DCM-301 cable modem and you can install and activate broadband on it. Let us check how to connect D-link DCM-301 Broadband Cable Modem on your office/home and set Cox Internet on it.
    1. Connect D-link Modem to Your PC
      Follow the instructions provided above for other models and power on both D-link gateway and PC.
    2. Self Activate D-Link with Cox Internet
      You can activate Cox Internet on your D-link gateway by visiting the link below.
      http://www.cox.com/activate

      In cases, if you call the support to activate the device (support number 888-556-1193), you may need to register the MAC address of the D-Link modem. The MAC address is on a label on the bottom of the D-link device.

WiFi Troubleshooting

  1. How to Reset and Change Cox WiFi Password

    If you want to change the current Cox Wireless network password, follow the instructions below.
    1. Log in to the setup page

    2. Click on Wireless

    3. Go to Wireless Security

    4. Change the passphrase under WPA/WPA2 encryption with new password

  2. How to Find Cox WiFi Password

    If you forgot the current Cox wireless password, follow the instructions below to recover Cox wireless password.
    1. Look at the bottom panel of your modem and look for password/key.

    2. If you have changed the default password, visit My WiFi portal on Cox.com

    3. Log in to the wireless security page on your modem and check for the passphrase under WPA/WPA2 encryption


Important Tips

  1. Solutions to Slower Cox Cable Broadband Connection Speed 
    If you feel you are not getting a reasonable upload and download speed from your Cox Broadband Service, you may try the solutions provided below.

  2. Cox support number is 1-800-234-3993.

  3. Check Remaining Unused Cox Data Balance
    Once login to Cox account, you can check your unused data balance on data usage meter.

  4. Connecting Extra Router to Cox Network
    If you are looking for assistance to add additional routers to your Cox broadband connection, follow the instructions given in the link below.
    Connecting Multiple Routers to a Network

  5. Third Party Tools to Check Your Cox Connection Speed
    Cox supplies an in-house tool to verify the speed of your network. However, it is recommended to test and verify whether your Cox connection has stead upload and download speed as promised. You can use the tools listed below.
    Tools to Check Internet Upload & Download Speed
FASTtelco is one of the leading Internet Service Providers in Kuwait. They provide high-speed ADSL broadband service to both business and residential users. This tutorial explains how to configure FASTtelco ADSL modem by yourself without the assistance from any experts and troubleshoot both Internet and wireless connection issues with FASTtelco router. Next part of this guide explains how to check FASTtelco Internet usage and pending bill payment by login to FASTtelco payment account and comparing the monthly data charges of various Fast telco broadband plans with competitors monthly charges.

How to Setup FASTtelco ADSL Modem

To install any modem/router with FASTtelco ADSL broadband connection, follow the instructions below.
  1. Connect FASTtelco Modem with Computer
    Make sure the LAN port of FASTtelco modem/router is connected to Ethernet port of Computer using an ethernet cable. Modem WAN port should be connected to Phone cable.

  2. Login to FASTtelco Modem Setup Page
    If you don't know the default login IP address of your FASTtelco modem or do not know the modem login username and password, follow the instructions provided in the link below.
    Find Default Login IP Of a Modem

  3. Click on New Connection button on Configuration/Setup Page

  4. Continue FASTtelco Connection Setup Wizard

    You will be asked to enter following FASTtelco ADSL parameters in different pages.
    FASTtelco Connection typePPPoA VC-Mux
    VCI value35
    VPI0
    IP ControlStatic IP
  5. Enter FASTtelco Broadband Username and Password. You will receive these details from FASTtelco support.

  6. Reboot FASTtelco Modem

Compare Fast Telco With Other ISPs in Kuwait
Choosing an Internet Service Provider from a list of ISPs in Kuwait should be based on your requirements. You should analyze your requirements with the packages offered from various ISPs in Kuwait. Here you can compare the Internet speed, broadband charges and quality of service from FAST telco with other companies in Kuwait. You may have a look at the chart below to compare Fast telco Internet with its competitors.
  QualityNet DSL Broadband Service in Kuwait   
Gulfnet Broadband Internet in Kuwait
Comparing Zain and Viva

FAST telco Network Connectivity Issues Solution

Once the modem is configured correctly, you will be able to access the Internet without any trouble on your devices. However, it is possible that sometimes you may face issues with connecting the Internet with your FASTtelco ADSL connection. The guide given below will assist you to find the reasons of not able to access the Internet from FASTtelco modem.
I Cannot Access Any Websites

Installing FAST Telco Internet With Second Router
FAST telco supplies its own modems from different vendors like Zhone, Belkin, Netgear, Linksys, Cisco etc. While configuring FAST telco Internet connection with Zhone router, Cisco router etc, you may find different user interfaces. The same problem happens while you add a second router to Fast telco modem. The below chart shows how to configure routers from Zhone, Netgear etc with FASTtelco modem.
  Setup D Link Router   
Setup Belkin Wireless Router
Setup Linksys Wireless Router

Important Points
  1. FAST Telco ADSL Broadband Monthly Plans
    You can see the latest FASTtelco ADSL Broadband Internet monthly charges for different plans based on data transfer speed from the link below.
    http://www.fasttelco.net/residential/

  2. Check Fast telco Connection Speed
    It is important to check your broadband speed once the fast telco modem is installed at your place. You can use the tools provided below to check fast telco download and upload speed.
    Online Tools to Check Internet Speed

  3. Customer Support
    FASTtelco Customer Support number is 1886666
    http://www.fasttelco.net/support/

  4. Fast telco Online Payment Page
    You can pay your pending FAST telco broadband bill by visiting the page:
    http://www.fasttelco.net/online-payment/

  5. Improve FAST telco Internet Speed
    There might be many reasons for not getting faster FASTtelco Internet connection. Follow the instructions given below to increase the fast telco broadband speed.
    Increase Internet Connection Speed
Yesterday night I encountered a strange error on my computer. I couldn't boot my computer and failed my efforts to load the Operating System. Instead of the Windows login screen, I reached an error message Hard Disk SMART Command Failed. Whatever the error, it affected the keyboard too. Other than the Tab key, no other keys were working. This article explains what is the meaning of Hard Disk SMART Command Failed error message, and how to fix it.

Why Am I Getting S.M.A.R.T. Command Failed Boot Error?
SMART is a BIOS feature which stands for Self-Monitoring, Analysis, and Reporting Technology for monitoring the health of Hard Disk Drive.

If the S.M.A.R.T feature in BIOS detects HDD malfunctioning, you will get this error message while booting your computer.

It is a confusing situation because whenever you reboot your PC, it will go back to the same error page in a loop.

Whatever you do, this error will prevent you from booting your computer.

The BIOS S.M.A.R.T feature reminding you that it is the time to purchase a new HDD for your PC.

However, some other minor reasons too will result in the Hard Disk SMART Command Failed error even if the Hard Disk is fine.


Reasons for Getting Hard Disk S.M.A.R.T Command Failed Error
It is important to understand the reason for receiving the Hard Disk SMART Command Failed error when you start your laptop.

  1. Hard Disk is About to Fail

    If your computer HDD is about to die, the SMART feature will detect it and display the Hard Disk S.M.A.R.T Command Failed alert.

    You should immediately back up the data from your HDD and purchase a new one.


  2. Possible IDE/SATA cable Loose Connection

    If the IDE cable (PATA) or the SATA cable, which connects the motherboard and the HDD are loose, you will get a false Hard Disk S.M.A.R.T Command Failed Error while booting your PC.


  3. Faulty Port/Connector

    One of the rare chances is the faulty connector between the HDD and the Motherboard.


How to Fix Hard Disk SMART Command Failed Error Message?
The permanent solution to prevent the Hard Disk SMART Command Failed issue to purchase a new HDD for your laptop.

However, if this issue is due to any other reasons other than the fault of HDD, you can fix without replacing the hard disk.

  1. Disconnect HDD and Reconnect

    • Power off your computer and open the cabinet

    • Disconnect the SATA/PATA cable between the motherboard and HDD

    • Remove the Dust and Reconnect the HDD to the motherboard

    • Reboot your computer

    If the issue persists, go to the next step.


  2. Try a Different Port

    Follow the same procedure and connect your HDD to a different port on the motherboard.

  3. Use a New Connector

    You need to replace the current SATA/PATA cable with a new one and check for the issue.


  4. Disable S.M.A.R.T feature in BIOS

    If none of the above solutions work, you need to disable the SMART feature from BIOS as a temporary solution.

    It will avoid the chance of the HDD failures detection, and you will not get any more SMART error message.

    • Reboot your computer

    • Start pressing the key as mentioned by your vendor to access BIOS before loading the Operating System screen.

      Popular Keys are [Del] and [F2]

    • Once logon to the BIOS, navigate to HDD

    • Select the Off option for S.M.A.R.T feature at HDD

    • Save the settings and exit BIOS

  5. Try Hard Disk Recovery Methods

    You should perform HDD recovery steps like defragmentation to prolong the life of the HDD.

  6. Purchase a New Hard Disk

    You should backup the data from your hard disk and purchase a new one for your computer.

Getting into the BIOS might be difficult sometimes.

When my PC got stuck at the Hard Disk SMART Command Failed error, I was getting an alert press [Del] to enter BIOS.

But it didn't work because the delete button was not responding. So I had to press the reset button to reboot the PC.

  1. Check Frequency of RAM
  2. Broadband Hack to Increase the Speed of Your Internet Connection


You should start pressing the key immediately once your PC starts booting. Different vendors have different keys to access BIOS.

  1. Cannot Start my computer - Disk Boot Failure
  2. How to Connect Two Computers Using a USB Cable?

For my Samsung netbook, it was the Delete button. [F2] is the Key for my Acer Aspire Laptop.
Author

Published By Alex George

Today, I encountered a strange redirection issue with CoreNetworkZ.com. The bare address was not opening or redirecting to the WWW version.

Initially, I suspected my Internet Service Provider, but their support team confirmed that everything was working fine on their end. My next step was to check the Blogger settings.

However, after conducting detailed research on popular webmaster forums, I found that the issue was not with Blogger’s custom domain name settings.

How Did I Find Out It Was a NameCheap Error?

Two friends, Merin and Juble, reached out to me with the same issue regarding their websites. Surprisingly, both had registered their domain names through NameCheap.

Juble said, "Hello, Alex. I can't access my travel blog on any device. It's a WordPress blog that has been online for five years. Can you fix it?"

Merin also has the same request.

As a last resort, I contacted the Domain Registar live chat support.

I registered https://www.CoreNetworkZ.com with NameCheap, one of my preferred domain registrars.

What Did The NameCheap Technical Support Engineer Say?

While troubleshooting the issue with the support representative, she informed me that it was due to a DDoS attack against their default DNS server. She mentioned that it would take some time to resolve.

The support representative suggested I change the DNS server assigned to my web address to their backup DNS system.

Although switching to a backup DNS server might help mitigate the effects of the DDoS attack, it can take up to 24 hours for the changes to take effect.

For the latest updates on the DDoS attack affecting NameCheap’s DNS system, follow the link below:

http://status.namecheap.com/?p=17097

I have checked the status of CoreNetworkZ using various online tools. See the screenshots below.

Domain from namecheap is down

Google Bot Cannot Access a NameCheap Domain Name

I have checked the WWW version of CoreNetworkZ.com. I uploaded the screenshot of the test result. There are no problems with the WWW version.

namecheap redirect not working

But the worst thing was just about to start. I received a warning in my Google Webmaster Tools account.

This warning message says, "Google bot cannot access your site. Over the last 24 hours, Google bot encountered 54 errors while attempting to retrieve DNS information for your site."

namecheap domain is not working

If you are a NameCheap customer having issues redirecting your naked domain address to the WWW version, follow the steps below to resolve the issue.

How to Change Your NameCheap DNS Server?

I explained why the domain from Namecheap was down. It was due to their faulty DNS.

Here, I will explain how to replace the current NameCheap DNS server with a better-performing one for your website. To update your domain name's DNS settings on NameCheap, follow these steps:

  1. Log in to your NameCheap account using this link: https://www.namecheap.com.

  2. Navigate to Manage Domains under My Account.

  3. Under General on the left-hand side, click Switch to DNS System v1. namecheap server down

    Check the box for Transfer your domain to DNS System v1.

    namecheap redirect not working
  4. Click the 'Save Changes' button.

  5. You will see a DNS status update message.

    namecheap domain not working
  6. Ensure your domain name servers are updated.

Author: Alex George

Author

Alex George is the Chief Editor and founder of CoreNetworkZ EdTech Solutions. He is a software engineer and has 20 years of experience in the EdTech niche.

He graduated with a B.Tech in Computer Science & Engineering from CUSAT and worked with three leading IT companies before starting CoreNetworkZ EdTech Solutions.

He possesses sound knowledge of SOHO Network Engineering and has completed various IT certifications, including CCNA, RHCE, and CEH.

He developed and published more than twenty professional custom themes for Blogger and is an expert in software app development.

You can contact him at alex.george@corenetworkz.com.

Airtel provides a high-speed broadband connection for users with attractive plans. We have been using it for our office for the past two years without having any problems. They provide an almost steady connection by keeping the promised data transfer speed. Their unlimited packages come with a limited number of free calls and for some plans, they offer a free DSL wireless modem. D-Link DSL -2730U modem is installed by them in our office. This tutorial explains how to setup Airtel broadband modem with WiFi feature and share Internet connection and WiFi among multiple computers. Next portion of this tutorial covers how to make customizations for your connection in case of speed, security etc.

Configure Internet On Airtel Broadband Modem
  1. Connect LAN port of modem to the computer using an Ethernet cable

  2. Type 192.168.1.1 on the address bar of the browser and press enter.

  3. Enter the default login username and password for Airtel modem

    • Username : admin
    • Password : admin

  4. Click on Advanced Setup
    default login

  5. Click Add button

    Now we can configure airtel DSL ATM Interface with right VPI and VCI values.
    remove

    Remove all previous configurations using the remove button before clicking the add button to set up a new one.

  6. ATM PVC Configuration

    Now we are at the major step in configuring airtel broadband access. Enter the following values on this page.

    • VPI : 0


    • VCI : 35


    • Select EoA as DSL Link Type because we are configuring airtel modem in PPPoE


    • Select Default mode as the connection mode


    • Encapsulation Mode : LLC/SNAP-BRIDGING


    • service category : UBR Without PCR


    Choose strict priority for IP QoS Scheduler Algorithm. After entering all the details provided above, click the Apply button.

  7. Reboot

    Once the configuration is completed, you should click on reboot link from the left-hand side menu under Management.


    Click reboot button.

Setup Wireless & Security

Once the Internet connection is configured, we need to set up wireless and wireless security on Airtel modem. Follow the steps below to enable WiFi and security.
  1. Log in to the setup page

  2. Go to Wireless

    To enable WiFi, you must select "Enable Wireless" checkbox. You can create a custom name for Airtel WiFi network by deleting the current entry at SSID and type the name you want. It will be the name of the WiFi network.


    • Restrict Number of WiFi Clients using Max Clients entry

    • Make your Wireless network invisible by selecting Hide Access Point

    • Create Guest Accounts by enabling Guest Access Points

    Don't forget to save the changes using the Save button at the bottom of the page.

  3. Enable Wireless Security

    1. Go to Security page under Wireless


    2. Select the Wireless profile from SSID

    3. Select Network Authentication

      You can choose open network (no security), WEP (less secure), WPA Personal and WPA Enterprise from Network Authentication. I am using WPA-Personal to secure office wireless network. Save the changes once it is completed.


  4. MAC Filtering

    You can block a specific device from joining your Wireless network by banning the MAC address of that device. For that, you must enable MAC filtering.

    1. Go to MAC Filter under Wireless


    2. Select MAC Restrict Mode

      1. To disable a MAC address from joining your network, you may select Deny mode and enter it's MAC address

      2. If you want to allow selected devices only to join your network, you may choose to allow and enter the MAC address of the devices which are allowed to access your Wifi

  5. Wireless Disconnection & Lower Data Transfer rate

    If you are facing troubles with Airtel mobile wireless network, you may follow the steps provided in the link below.
    Disconnection Issues With Wireless Connection
Modem Tweak Tips
  1. Change Modem Password

    1. Click on Management

    2. Click on Access Control


    3. Types Of Users

      Airtel supplied D-Link DSL-2730U model as the modem for my office. This device supports three types of users. They are

      1. admin: User with full privilege who can change any previous configurations made

      2. Support: This login id is provided to airtel technicians. Those authorized technicians will examine and run diagnosis test while your Internet connection experiences issues. This ID too can update device software along with admin id.

      3. User: Though user with this ID can view settings and update software, he cannot change any previous configurations.

    4. Change Default Password

      Type the username (from the three) and old password first and then type the new password. After confirming the new password, click the Apply button.

  2. Change Local Network Settings

    The default login IP address of airtel modem is 192.168.1.1 but we can change it to a different one by following the procedure explained below.

    1. Click Advanced Setup

    2. Click on LAN

      Here we can change the default login IP of the device by changing the IP address specified at "IP Address". If you want to enable IGMP snooping, you must check the checkbox at "Enable IGMP Snooping". The same window gives options to either turn on or disables Firewall protection. If you don't want to share the Internet with multiple computers, simply select "Disable DHCP Server" radio button.


      After making necessary changes, don't forget to click the Save button at the bottom of the window.

  3. Block Certain Websites

    By using the feature Parental Control, we can block any websites for users sharing broadband. This feature is configured on the MAC address of the browser's laptop. to set up this feature to block unwanted websites on Airtel broadband connection, follow the steps below.

    1. Click On Advanced Setup

    2. Click on Parental Control


    3. Click Add button

      Here you can enter the restrictions by following the Parental Control rules.


  4. Firmware Upgrade

    It is necessary to update the current firmware of the Airtel modem with the latest release. To perform a firmware upgrade, follow the steps below.

    1. Download Firmware

      To download the latest firmware of any models of airtel modems, visit the link below. Save the downloaded file on your desktop. It is important to download the firmware for the right model.
      http://mywifi.airtelbroadband.in/airtelwifi/pages/html/firmware.html

      Right now they have listed firmware for Beetel Wi-Fi DSL CPE 450-TC1 and CPE 450-BX1 with Binatone Wi-Fi DSL CPE Model DT845W. If you cannot find firmware for your model, you may search vendor website.

    2. Login to Modem setup page

    3. Click on Management on the left side menu

    4. Click on Update Software

    5. Click on Choose file button to select the downloaded firmware


    6. Once the downloaded file is selected, click the "Update Software" button.

    7. Once the process is finished, the modem will restart. You need to wait at least one minute.
Useful Links
  1. Test Download Speed

    If you doubt the actual speed of Airtel DSL connection, you can test it here. You may click the link below to test your current download and upload speed.
    http://www.airtel.in/speedcheck

  2. Where to Pay bill

    You can pay airtel DSL broadband monthly bill online by following the link below.
    https://pay.airtel.com/online-payments/broadband-fixed-line-bill.jsp

  3. Get extra Speed

    Airtel offers extra speed for their DSL users with extra payment. To learn more about it, visit the link below.
    http://www.airtel.in/broadband-vas/broadband-vas/speed_on_demand.html

    If you are not planning to pay extra for higher speed, I recommend you to follow the instructions provided in the link below.
    Increase Broadband Speed For Free

  4. Register complaints

    If you are facing issues with Airtel DSL broadband connection, you may use the following information to reach their technical support division.

    • Customer Care Number: 121

      To get the exact broadband hub technical support number (for states and cities), visit the link below. Here you can find the technical department number exclusively for your state or city.
      http://www.airtel.in/TM_Dialling_No.xls

    • Airtel Customer care email address: 121@in.airtel.com

    • Get Bill Summary Information: 12113

    • Last three bill payment details: 12114

    • To get the current bill plan information: 12117

  5. Internet Usage and Bill

    You can check your current Airtel DSL Internet usage and bill by login to your account by following the link below.
    https://www.airtel.in/myaccount
Newer Posts Older Posts Home