menu
close

Error 720: A Connection to the Remote Computer could not be Established

Yesterday while starting a dial-up connection on my laptop it showed an error message Error 720: A connection to the remote computer could not be established. While searching for the possible reasons and solution for error 720, I found the following information. Some of the reasons to get this error message are the weak signal, Loose contact of the modem, corrupted TCP/IP protocol, etc. I have troubleshot my dial-up connection and laptop with the information I collected and fixed the error. This tutorial is based on the procedure I followed to fix the problem. If you ever see this error message, I hope the following troubleshooting guide will help you to resolve it.

How to Resolve Error 720

  1. If it is a USB modem, you should unplug and replug the modem. In most cases, the re-connection of the USB modem fixed the Error 720: A connection to the remote computer could not be established

  2. Uninstall and Reinstall TCP/IP:
    Corrupted TCP/IP protocol on your computer may results "Error 720: A connection to the remote computer could not be established" error message while making a dial-up connection. To fix this follow the instructions provided in the link below.
    How to Uninstall and Reinstall TCP/IP Protocol on Your Computer

  3. Update Adapter Driver:
    To fix Error 720: A connection to the remote computer could not be established you may need to uninstall the Ethernet Adapter driver and update it with the latest version. To perform this follow the instructions provided in the link below.
    Uninstall and Update Ethernet Adapter Driver on Your Computer

  4. If the issue persists, you may follow the steps provided in the link below.
    Error 619: A Connection to the Remote Computer Could not be Established

Error 720: A connection to the remote computer could not be established simply vanished once just after a Windows restart. However, I am not sure it will work in most cases.

  1. Error 797: A Connection to the Remote Access Server was not Made
  2. Error 628: The Connection was Terminated by the Remote computer
  3. PING: Transmit failed. General Failure
  4. Assign Static IP Address From Command Prompt

In my case, I uninstalled the adapter driver and updated it with the latest version. Once I have updated the Ethernet adapter driver, the issue resolved automatically.

  1. Delete Yahoo Messenger Account
  2. Reset Linksys Router
  3. Ping Request Could not Find Host. Please Check the Name and Try again
  4. Tools to Check Internet Connection Speed

It is always a good practice to keep the adapters of the peripheral devices connected to your PC. It will ensure the smooth operation of devices.
  1. Difference between Internet speed and bandwidth
  2. RPC Server is Unavailable While trying to Renew IP Address
  3. Resolve IP Address Conflict With Another System On The Network
  4. Wireless Network Keep Connecting and Disconnecting

How to Uninstall and Reinstall TCP/IP Protocol

On CoreNetworkZ, we have discussed many connectivity issues. One of the many common solutions found in different tutorials is the reinstallation of  the TCP/IP suite. So, we decide to write a supporting article to cover this area. Uninstalling TCP/IP on your computer is another supporting article for our major network troubleshooting guides. Before going to the steps to uninstall TCP/IP protocol, we should understand what is TCP/IP.

TCP/IP is a protocol suite, a combination of a set of protocols which are necessary for establishing communication between computers in a network. Major protocols in TCP/IP suite are:

  • 1. TCP
  • 2. UDP
  • 3. IP
  • 4.ICMP
  • 5. DHCP

In many networking issues, we need to uninstall and reinstall TCP/IP protocol on our computer. To do this, I suggest you follow the instructions provided below. It is important to know that you have to log in to the Windows Administrative account to perform the steps.

Steps to uninstall TCP/IP Protocol
  1. Click on Start and go to Control panel
  2. Open Network and Dial-up Connections or Network and Sharing Center
  3. Open Local Area Connection and Click on Properties
    How to install TCP/IP on your computer

  4. Uninstall TCP/IP: Click on Uninstall button to uninstall TCP/IP protocol on your computer. After this, you should reboot your computer.
    Steps to uninstall TCP/IP

  5. Install TCP/IP: Click on the install button to do this. Do not forget to reboot your computer after completing the steps.
Once your PC is rebooted, a fresh TCP/IP suite will be completely installed. Just like uninstalling TCP/IP Protocol on a Windows computer, the following link explains steps to reset Winsock on your computer.
How to Reset Windows Socket

  1. Unresponsive Script- A Script On This Page May be Busy
  2. Make a Program Starts Automatically When Your Computer Boots
  3. Setup Cox Cable Modem
  4. Compare Zain & Viva Prepaid Internet Plans

In many adapter related issues, we may need to uninstall and reinstall TCP/IP protocol on our computer. Just like this step, one another important step is to delete temp files on our computer. To learn how to do this, follow the link below.
How to Delete Temp Files and Prefetch Folder on Your Computer

  1. Update D-Link Router Firmware
  2. How to Delete Yahoo Messenger
  3. How to Reset Linksys Router
  4. Problems With Receiving Emails On ZOHO Mail

In some cases, right after uninstalling TCP/IP protocol we may need to update the adapter driver on your computer. To learn how to do this, follow the steps provided in the link below.
How to Update Adapter Driver On Your Computer

How to Delete My Yahoo Messenger Account

I believe you heard the news about the closing of Yahoo Messenger public chat rooms. Some of the loyal users of Yahoo messenger service(YM) are angry on it, and one user asked me to share steps to delete YM accounts. Whatever the reasons Yahoo provides an option to delete your Messenger account. However, the important point to remember is you cannot delete YM account alone. The only option is to delete entire features associated.

So I recommend using the different alias if you are no longer interested in disclosing your real ID. If you are determined to delete entire Yahoo account, you can follow the steps provided below.

  1. Go to the Yahoo Account Termination page by click on the link below

    https://edit.yahoo.com/config/delete_user

  2. Login using your username and password

  3. Now you need to verify the termination process by filling your password

  4. Now they will permanently disable your access to this account and put this account in the deletion queue. After 90 days, they will remove your account.

Points to Remember
  1. If you are using any premium service, you have to cancel them before you start the deletion process.

  2. Even if you delete the Yahoo account, it will be still in their server for 90 days

This 90 days delay in complete removal is to prevent users from doing fraudulent activities using their service. For example, if one particular user uses his messenger account to do any malicious or fraudulent activity may close his YM profile after the completion of his task.

 Once his profile no longer exists in the server, he can assure safety from getting caught for his works. However, this 90 days delay is enough for legal authorities to track his user ID and the IP address used to create and manage that ID.

  1. Deactivate and Get Refund For Automatic BSNL Value Added Services
  2. WAMP Server Is Offline Due to Internal Error
  3. Reset GoDaddy Web Hosting Accounts

The above steps are enough to remove your YM profile. If you are looking for services which show whether your current contacts are invisible or offline, click on the link below.

The steps and tools provided in that tutorial will help you understand the current real status of your contacts.
Check Whether Your Contact is Invisible or Offline

  1. Delete Photos Shared on Google Hangouts
  2. Find Phone Number of Hangouts Friend
  3. Configure Cox Cable Modem

Have you ever think about finding out whether the location mentioned by your YM contact is correct? Theoretically, it is possible to find out the actual location of your contact. To learn how to do it click on the link below.
How to Find the Location of Your YM Contact

  1. Update D-Link Router Firmware
  2. How to Reset Linksys Router
  3. Open Web Cam on Yahoo Messenger Without Permission

Once I received an error with Yahoo messenger, not related to termination while starting messenger. The below link leads to the solution and reasons for that error.
Runtime Error- has Requested Runtime to Terminate

How to Reset Linksys Router

Though not recommended there are many instances where you may need to reset the network devices on the home network. For example, if you forgot the current router login password, you would not be able to access the configuration page. Linksys router does not come with a password recovery wizard, and the only way to claim access to the setup page is by resetting the current password.

Another reason is to fix connectivity issues due to the faulty configuration, and you are unable to find the exact wrong setting made.

Linksys router comes with a reset button, and it is very much needed if you want to reset the current configuration. In that case, you may need to reset the router to factory default and start it from scratch.

Why Should I Reset Linksys Router

  • Forgot log in password

  • To recover from faulty configuration

  • Part of the firmware upgrading process


Steps to Reset Linksys Wireless Router

  1. Hold the Reset button for 30 seconds by using a pen tip. You can find the reset button on the rear side of the Linksys router.

  2. Make sure Power button, the Internet button, and WLAN button are blinking

  3. After 30 seconds release pen tip from the reset button and wait till all three lights are steady

To learn more about different methods to reset a device, follow the instructions provided in the link below. If you do not know where to find the reset button on a Linksys device, you may have a look at the photos provided below.
How to Reset a Modem

Reset Different Linksys Router Models

  1. Where is the Reset Button on WRT1900ACS Dual-Band Wi-Fi Router

    At the back panel of WRT1900ACS Dual-Band Wi-Fi Router, you can see the reset button. Have a look at the image below.

  2. Reset Linksys Wi-Fi E2500 Dual-Band N Router

    On the rear side of Linksys Wi-Fi E2500 Dual-Band N Router, there is a reset button. You need to follow the same instructions provided above.

  3. Reset Linksys EA8300 Max-Stream AC2200 Tri-Band Wi-Fi Router

    Look at the rear side of Linksys EA8300 Max-Stream AC2200 Tri-Band Wi-Fi Router. You can see a reset button. You need to hold there using a pencil tip for one minute and make sure the lights are blinking.

  4. Reset Linksys EA8500 Max-Stream™ AC2600 MU-MIMO Smart Wi-Fi Router

    You can see the reset button near the power port on EA8500 Max-Stream™ AC2600 MU-MIMO Smart Wi-Fi Router.

    The above image will help you find the reset button on EA8500 Max-Stream™ AC2600 MU-MIMO Smart Wi-Fi Router.

  5. WRT32X Dual-Band Gaming Router

    If you do not know how to reset Linksys WRT32X Dual-Band Gaming Router Designed for Xbox, look at the image below.
    You need to press the button on the Linksys WRT32X Dual-Band Gaming Router with a pencil clip for 30 seconds. Make sure the lights on WRT32X Dual-Band Gaming Router are blinking.

  6. How to Reset Linksys E900 N300 Wi-Fi Router

    You may check the rear panel of E900 N300 Wi-Fi Router.

  7. Reset EA6500 AC1750 Dual-Band Wi-Fi Router

    Look at the image below. You can see the reset button on the back panel of Linksys EA6500 AC1750 Dual-Band Wi-Fi Router.

  8. How to Reset EA6100 AC1200 Dual-Band Wi-Fi Router

    To reset EA6100 AC1200 Dual-Band Wi-Fi Router, you need to hold the reset button for 20 seconds with a paper clip.

  9. How to Reset Linksys WRT54GL WiFi Router

    In order to reset WRT54GL, you need to press the reset button on the back panel. Have a look at the position of reset button on WRT54GL.

  10. How to Reset Linksys EA5800 AC1000 Dual-Band WiFi Router

    The location of reset button on Linksys EA5800 AC1000 Dual-Band WiFi Router is at the bottom. Have a look at the screenshot given below.

    Location of reset button on Linksys EA5800 AC1000 Dual-Band WiFi Router is marked with a yellow arrow.

After resetting your Linksys router, you need to reconfigure it. It is because while resetting the previous configuration saved will be removed. So to reconfigure it, follow the instructions provided in the link below.
How to Setup Linksys Wireless Devices

Recovering Lost Linksys Router Password
While I was working as a network support engineer for SOHO department, I had received many queries related to the recovery of Linksys router passwords. The real problem with Linksys router is that if we lost the custom password set, there is no way to recover it.

The only option remains is to reset the device and reconfigure it from the beginning. If you have lost the login password of your Linksys router, I suggest you follow the instructions provided in the link below.
I Lost Router Login Password

  1. A Script On This Page May be Busy, It May Have Stopped Responding
  2. Port Forwarding on Nokia Siemens Residential

One of the common troubles users see after resetting a Linksys router is the problem with playing online games and the working of Internet programs. It is because the previously opened ports are again blocked. To fix it, we need to open the same ports again. The following link leads to the steps to port forwarding.
How to Open Ports on Linksys Firewall

Unresponsive Script- A Script On This Page May be Busy,It May Have Stopped Responding

For the past few days,  I have been getting an error message on Firefox while browsing. The error message is A script on this page may be busy, or it may have stopped responding. You can stop the script now, or you can continue to see if the script will complete. There are two buttons on the error message, continue and stop script. If we press the continue button, Firefox starts to wait for the completion of the process.

If you are not patient, you can stop the code by pressing the second button. Reason for getting "Unresponsive Script" error message is the long time taken by it to execute than the expected time set in the Firefox configuration.

If you are not familiar with the error, have a look at the screenshot given below. As I explained before, if we do not press the "Stop Script" button, this message will stay a very long time. We have provided the Solution to this Firefox Unresponsive Script error below.
Unresponsive Script solution

Firefox Unresponsive Script Error Solution

To solve the unresponsive process error, we should increase the maximum time Firefox wait to declare a code unresponsive. It is because sometimes Mozilla decides a particular program is not responding before completing its process due to the lower time set to decide whether a process is working or not.

To do this follow the steps below.
  1. Start Firefox

  2. Type about:config on the Address bar and press enter

  3. Click on I'll be careful, I promise!

  4. Double click on dom.max_script_run_time
    A script on this page may be busy, or it may have stopped responding. You can stop the script now, or you can continue to see if the script will complete.

  5. Enter the maximum  runtime 25 and click OK
By increasing the maximum runtime, we can avoid most unresponsive code error messages. Each process will get enough time to start work normally before generating an alert to stop it.  Just like this, if you are looking for different methods to clear cookies, follow the link below.
Various Methods to Clear Cookies in Mozilla

  1. Convert D-Link Wireless Router into Bridge Mode
  2. Solve Oops! Firefox Could not Find HTTP
  3. Clear Saved Cookies & History From Firefox

As you can see by increasing the time to decide whether a process is unresponsive, we can fix unresponsive code issues. If you are looking for a way to find previously saved passwords and usernames from Firefox browser click on the link below.
How to View Saved Passwords in Mozilla Browser

  1. Delete My Yahoo Messenger Account
  2. How to Reset Linksys Router
  3. Port Forwarding in Nokia Siemens Residential Router

In this article, you have learned how to fix the Firefox error message A script on this page may be busy, or it may have stopped responding. You can stop the script now, or you can continue to see if the script will complete. To read other Firefox articles, click on the link below.
Browser Tips and Tricks

Tata Docomo GPRS and 3G Settings For Android and Windows Phones

Tata Docomo offers GPRS and 3G services (3G service offers to the speed up to 21.1 Mbps )in India, and this article is about enabling their GPRS settings on mobile phones irrespective of Android or Windows versions. To activate GPRS on your mobile handset (both Windows Phone and Android Phone), you should recharge with a specific rate. To get Tata Docomo GPRS settings automatically on your mobile phone, you should type the INTERNET and SMS to 52270.

They will send you the default GPRS Internet settings, and you need to save it on your handset. If the automatic settings don't arrive, you can manually set Docomo GPRS settings on your Android and Windows mobile phones by entering the following details.

Manual Docomo GPRS Settings For Android and Windows Phones

NameTata Docomo Internet (You can change it if you want)
APNtata.docomo.internet
ProxyNot set
PortNot set
UsernameNot set
PasswordNot set
MCC405
MNC035
AuthenticationNone
APN Typedefault

Get Tata Docomo 3G & GPRS Settings Automatically On Windows and Android Handset
To get Tata Docomo GPRS and 3G settings automatically on your Windows and Android handset follow the procedure provided below.

  1. SMS INTERNET to 52270

  2. Save the Settings sent by Docomo

Please note that for different Phone Operating Systems (Android, Windows Phone 7, etc..) the path to get Mobile Internet settings may be different. For that, you might check the user manual of the respective Phone model and Mobile Operating System using.

  1. BSNL 3G & 4G APN Settings For Android Phone
  2. Convert Android Phone into a Modem
  3. Toggling of H and 3G Symbols Near the Signal strength in Mobile Phone
  4. USB Tethering Error Showing On My Android Phone

However, Docomo GPRS Settings for Android Phones and Windows Phone 7 Phones are the same. 3G settings for Windows and Android phone are too same. You can add the same APN settings to 3G on your Android and Windows Phones.

  1. How to Reset BSNL Broadband Modem
  2. BSNL Modem Port Forwarding Steps
  3. Getting No Wireless From BSNL Modem
  4. BSNL Network Blocks Some Websites

Enable Tata Docomo 3G Internet Access On Android Phone
You can enable Tata Docomo 3G Internet access on Android phone by enabling data (or data enabled)under mobile network settings. To learn more about how to configure and enable  3G and GPRS on an Android handset click on the link below.
How to Enable Internet Access On Your Android Handset

  1. Convert D-Link Wireless Router into Bridge Mode
  2. Remove Blogger Navbar from Your Blog
  3. 4G Phone Is Not Showing 4G LTE Networks
  4. Use Reliance Jio Free SIM in 3G Or Ordinary Phones

In this article, you have learned the manual settings to activate Docomo 3G and GPRS on your Windows Phones and Android Phones. Here we have learned the default Docomo APN for 3G/GPRS and APN type.

After saving these details, you will be able to access GPRS from your mobile handset. Just like this, the following link tells the steps to configure Internet with Idea on your mobile handset.
Idea 4G APN Settings

  1. Recover Nighthawk X6S AC4000 Tri-Band WiFi Router Password
  2. Reset Linksys Router
  3. Delete Yahoo Messenger Account
  4. Nokia Siemens Residential Router Port Forwarding

Tata is not just providing GSM data service. It also provides CDMA service too. To learn more about the CDMA wireless Internet service provided by Tata, check our previous article about the Photon Plus.

If you are looking for the review and service of Tata Photon and the account balance, I recommend you to follow the link below.
Review Of Tata Photon Plus Internet Service And Check Account Balance

Port Forwarding in Nokia Siemens Residential Router

Nokia Siemens Residential Router provides inbuilt firewall protection from external intruders. It is good for the security of your home network, but sometimes this may cause some issues. This firewall might block some network applications, which work through specific ports. Default router firewall settings might block all the communications via uncommon ports due to the security rules. To ensure the smooth working of the devices and applications which use the port communication, you need to forward specific port numbers associated with them on your router.

This article is specifically for Nokia Siemens Residential Router. Before proceeding to the steps to forward port numbers on Nokia Siemens Residential Router, you should ensure that you have the port numbers of the applications and the IP address of the computer on which the applications run.

Port Forwarding On Nokia Siemens Residential Router

  1. Type 192.168.1.1 on the address bar of the browser

  2. Enter the Router setup page by providing username and password.
    User Name: admin
    Password: admin

  3. Click on Advanced Setup
    Port forwarding in  Siemens Residential Router 1600

  4. Click on NAT (in Some versions Port mapping) and select virtual servers to start Port forward.
    How to perform port forwarding in Nokia Siemens router to fix online gaming issue

    1. Select Custom Servers and enter the name of the application or device for which you are performing port forwarding in Nokia Siemens Residential Router.
    2. Enter the IP address of the computer on which the device connected
    3. Add the Port numbers in the respective fields

    PS: Depends on different firmware versions you may see the port forwarding option under different a heading. So I recommend you to check under other tabs too if you failed to find port forwarding option as I showed here.

  5. Click on Save

What if Port Forwarding Doesn't Work
Maybe due to some strange reasons, port forwarding on Nokia Siemens Residential Router may not work. In that case, you can use the option DMZ for the device connected to Nokia Siemens router. To do this follow the steps below.

  1. Log into Nokia Siemens Residential Router

  2. click on Advanced Setup

  3. Click on NAT (In some versions this option is under security)

  4. Select DMZ host.
    Now enter the IP address of the device or computer which you want to avoid all default router firewall restrictions.

PS: It is important to remember that while enabling DMZ, you are lifting entire router firewall protection.

  1. Unresponsive Script Error
  2. Reset Linksys Router
  3. Convert D-link into Bridge Mode
  4. Remove Blogger Navbar
  5. Setup D-link Wireless Manually
  6. Router Cascading Tutorial

Once you have done it, there won't be any problems with playing online games, working on network applications, etc.. over Nokia Siemens Residential Router.

  1. Idea 4G Settings
  2. PING: Transmit failed. General Failure
  3. Destination Net Unreachable
  4. Destination Host Unreachable
  5. Turn On Disabled Adapter
  6. Asianet Cable Modem

To learn how to configure Nokia Siemens Residential Router with your ISP click on the link below.
How to Setup Nokia Siemens Residential Router

  1. TTL Expired in Transit
  2. Ping Request Could not Find Host. Please Check the Name and Try again
  3. Setup Reliance ADSL Modem
  4. Find Login IP Address of a Modem
  5. Hard Reset a Modem
  6. Solve 169.254.X.X (APIPA)

If you ever faced the problems to access certain websites after installing Nokia Siemens Residential Router, you can fix it by enabling DMZ.

How to Remove Blogger Navbar from Your Blog

You may notice that in default blogger themes, you can see navbar on the top of your blog. This bar helps you to search for important information on this site or other blogs. However, it affects the overall template perfection, and sometimes you may wish for a method to hide it. In the case of customization, if you feel a little uncomfortable with this blogger navigation bar, you can remove it. Previously you have to add some CSS/HTML edit to remove navbar, but now Blogspot offers a simple radio button to disable it. This tutorial explains how to remove the navigation bar without editing the template by using the radio button provided by Blogspot.


how to disable Blogger Navigation bar

Steps to Disable Blogger Navbar
  1. Log on to Blogger Account

  2. Click on Layout

  3. Click on Edit button near Navbar

  4. Select the Off button and click on the Save
    Steps to disable Blogspot navigation bar

The above tweak disables the default navigation bar from the top. If you do want this feature later, you can repeat the same steps and select the one which you want to display and click save. The navigation bar will return.

  1. Remove Date Number (Year & Month Figure) From Blogger Post URL
  2. Change Link Color On Blogger Posts
  3. Show AdSense Ads Inside Blogger Post
  4. How to Calculate CPC

In the same way, we can improve the blog search rank by optimizing the default way to show post titles in every post. To learn more about this, I recommend you to follow the link below.
Optimize Default Blogspot way to Show Blog Post Titles

  1. Error 633: The Modem is Already in Use
  2. Change the COM Port Assigned
  3. Setup Blogger Custom Domain
  4. Why Did AdSense Reject My Application

We have seen how to stop showing navigation bar on default Blogger themes. Most of the newer Blogger themes come with no navigation bar. Like how we removed the navbar, we can optimize a default Blogger theme in many ways. One of them is the way Blogger execute scripts.

  1. Convert D-Link Wireless Router into Bridge Mode
  2. Nokia Siemens Residential Router Port Forwarding
  3. Setup D-link Router
  4. Issues With Submitting Same Content

We cannot just display scripts on blogger posts by pasting them into the blog post while composing it. We need some tweaks to show scripts on a post. To learn this trick click on the link below.
How to Display JavaScript and HTML on Published Posts

  1. Tools To Check Historical Design Of a Website
  2. Traffic Required to Earn $100 Per Day
  3. Stop Others From Copying Your AdSense Code
  4. Can Guest Blogging Attract Google Penalty?

Even if you do not want to show blogger navigation bar on your blog, you may like to display blogger social share button on your blog. To know how to do it, click on the link below.
Default Social Share Button is Not Showing

How to Manually Setup D-Link Wireless Router

D-Link quick setup wizard is enough for an average user to set up his router but for advanced options, it is better to learn how to configure this device manually. This tutorial explains how to configure every model of D-Link wireless router manually for advanced features. Here we learn how to enable Internet access, WiFi and WiFi security. The first step of this guide is to make sure you can go online with the modem by connecting a computer to the Ethernet port of the modem.

If it is fine, disconnect the modem and connect the computer to one of the LAN ports of D-Link Wireless Router using an Ethernet cable. Now power on the device.

Configure Broadband Access On D-Link Router
  1. Access Setup Page:

    • Type 192.168.0.1 on Browser address bar and press enter.
      configuration

    • Enter username admin and leave the password field blank. Click on login to access setup page.

  2. Click on Manual Internet Connection Setup
    steps to setup d link router

  3. Select Internet Connection type:

    Using the drop-down menu, you can select the Internet connection type you are using.
    DSL

    Configuration details for each of the Internet connection types are listed below.

    1. Configure D-Link Router for Cable Internet Connection:

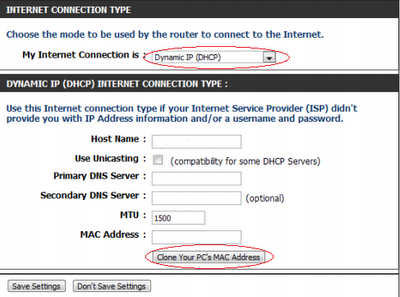
      To setup, your router with cable Internet, select the option Dynamic IP(DHCP).
      Cable broadband

      If you are using cable Internet connection the most important step is to click on the button Clone Your PC's MAC Address. To know the importance of this step, click on the link below.
      Why MAC Address Cloning Required for Cable Internet Connection

      If your cable ISP doesn't provide any details about Host Name, DNS Server, etc.. leave them blank or keep the default value. Do not forget to click on Save Settings button.

    2. Configure D-Link Router with DSL Connection (PPPoE):

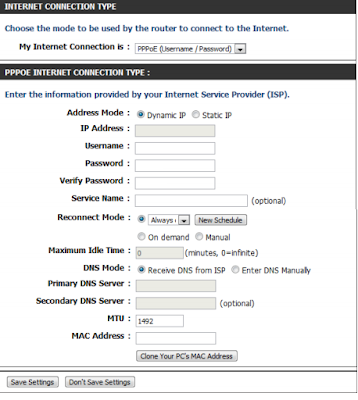
      With DSL broadband, you should select the option PPPoE(Username/Password) from the drop-down menu. Enter the Username and password provided by ISP.
      DSL broadband

      Keep the Address mode "Dynamic" if your ISP does not provide you any IP address details. Normally for a DSL connection, you do not need to clone computer MAC address unless asked by your ISP. Click on Save Settings after entering details.

    3. Configure D-Link Router with PPTP Connection:

      Steps to setup your router with PPTP connection is similar to PPPoE connection.
      PPTP Connection

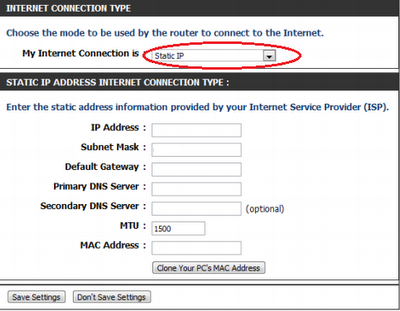
    4. Configure D-Link with Static IP:

      Here you should enter the full IP address details provided by your ISP including Subnet Mask, Default Gateway, DNS Servers, etc.
      static

      After entering details click on Save Settings.

  4. Connect Modem to D-Link Router:

    • Connect the Internet port of D-Link router to the LAN Port of modem

    • Connect Computer to LAN port of Modem

    • Switch on Modem

  5. Power Cycle:

    I recommend you to perform a power cycle if you face any issues with going online. To do the power cycle follow the steps mentioned in the link below.
    How to Power Cycle Router and Modem

Configure Wireless & Security
Right after configuring Internet access on the D-Link router, you need to configure the wireless settings if you want to use it. Latest D-Link wireless routers support both 2.4GHz and 5GHz frequencies.

So it can extend its support for 802.11a, 802.11b, 802.11n, and 802.11g wireless standards. 802.11n supports both 2.4GHz and 5GHz where 802.11a supports 5GHz only. 802.11b and 802.11g work in 2.4GHz.

 Here we share the manual steps to configure wireless and security on the D-Link router.

  1. Login

  2. Click on Wireless Settings tab
    Dlink WiFi

  3. Click on Manual Wireless Connection Setup

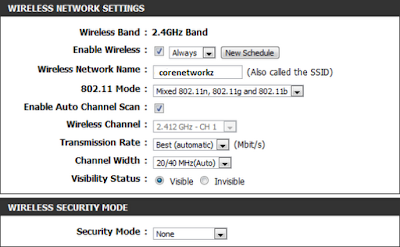
  4. 2.4GHz Devices(802.11n,11g, and 11b):

    1. Click on Enable Wireless and Select 802.11 mode (2.4GHz).
      configure 2.4ghz

      You can select one of the following 802.11 modes:

      • 802.11b Only
      • 802.11g Only
      • 802.11a Only
      • Mixed 802.11g and 802.11b
      • Mixed 802.11n and 802.11g
      • Mixed 802.11n,11g, 11b

    2. Check on Enable Auto Channel Scan:

      Now D-Link Wireless Router will automatically pick the channel with least interference.

    3. Wireless Network Name:

      Here you can write the name of your wireless network (SSID). SSID can be up to 32 characters, and it is case sensitive.

    4. Select Channel Width:

      20/40 MHz if you are using both 802.11n and non802.11n devices. If you are not using 802.11n devices, you can select 20MHz.

    5. Visibility of SSID:

      If you do not want to show your SSID, you can check the option Invisible.

  5. 5GHz Devices (802.11n and 11a):

    1. Enable Wireless:
      5 GHz frequency

In this article, you have learned to set up a brand new D-link router without the help of a setup disc.

  1. Error 633: The Modem is Already in Use or not Configured Properly
  2. Change COM Port Assigned to Modem on Your Computer
  3. Different Methods to Access Device Manager

Configuration with a DSL connection is different from a cable broadband connection.

  1. Remove Blogger Navbar from Your Blog
  2. Setup in Bridge Mode
  3. Port Forwarding in Nokia Siemens Residential

Do not forget to secure the device with a new login username and password.

  1. Setup WBR-2310 With WPA
  2. Access Point DWL-G700AP by Setup Wizard
  3. DIR-865L Amplifi Cloud 5700 With Cable & DSL

You should also set up a strong WiFi passphrase to prevent unauthorized use by intruders.

Error 633: The Modem is Already in Use or not Configured Properly

"Error 633: The modem(or other connecting devices) is already in use or not configured properly" is a possible error message you may receive while trying to access the Internet mostly using a dial-up connection. If the modem driver installed on your computer is outdated or not compatible with the OS, you may receive this error message. This tutorial explains the reasons and solution to solve this problem. To fix this error, I suggest you try the steps provided below.


The solution for Error 633: The modem is already in use or not configured properly

Troubleshooting steps to solve Error 633: The modem(or another connecting device) is already in use or not configured properly are:

  1. Uninstall and Reinstall Modem Driver: To do this follow the steps mentioned in the link below.
    How to Uninstall and Update Modem Driver installed on Your Computer

  2. Delete all saved dial-up connections and create a new one

  3. Change COM Port Assigned for Modem: To perform this step to resolve Error 633: The modem(or another connecting device) is already in use or not configured properly follow the steps mentioned in the link below.
    How to Change COM Port Number Assigned to a Modem

Just like the Error 633 related to the Dial-up connection on your computer if you are continuously receiving connection prompt, follow the steps mentioned in the link below.
Continues Dial-up Connection Prompt to Connect to a Network

  1. Solution For Hard Disk SMART Command Failed Error
  2. Problems With Zoho Mail
  3. MTNL Broadband ADSL Modem Configuration Guide
  4. Setup Asianet Dataline Cable Broadband Modem

"Error 633: The modem(or other connecting devices) is already in use or not configured properly" can be resolved by the steps mentioned in this article.

  1. Setup Cox Cable Modem
  2. How to Convert HotStar Video Files
  3. Get a Refund For Automatic BSNL Value Added Services
  4. Change Default TTL Value Set On Ping Packets

Here I give a common troubleshooting guide when you are facing issues with accessing the Internet without having any special error message.
I cannot Go Online due to Internet Connectivity Issues

  1. Anonymous Proxy Detected, Click Here
  2. Recover IRCTC Rail Connect App Username and Password
  3. Access Blocked Websites On Reliance Jio 4G Network
  4. Ping Request Could not Find Host. Please Check the Name and Try again

The message, Error 633: The modem (or other connecting device) is already in use or not configured properly, displayed mostly on computers with default dial-up modem.

  1. How to Manually Setup D-Link Wireless Router
  2. How to Remove Blogger Navbar from Your Blog
  3. PING: Transmit failed. General Failure
  4. How to Convert D-Link Wireless Router into Bridge Mode

As I explained, the major reason for this message is the multiple Internet connections setup.

  1. Different Methods to Access Device Manager
  2. How to Show JavaScript or HTML Code on Blogger Blog Posts
  3. TTL Expired in Transit
  4. Enable Metered Connection For WiFi Networks On Windows 10 Devices

Another important reason is the allocation of the communication port for another software installed on the PC.

How to Change COM Port Assigned to Modem on Your Computer

When you connect a modem to your computer using an Ethernet cable, your PC assigns a COM Port number to establish the communication. In many Modem related troubleshooting guides, we provide the step release or change the COM port number assigned to the modem. Instead of repeating the same steps in multiple guides, it is better to write a supporting article for our other network troubleshooting guides. In this tutorial, we give step by step instructions to release or change the COM Port assigned to the modem on your computer.

Different Methods to Access Device Manager

Device Manager is an important feature in Windows where all hardware devices installed on your computer are listed. From here we can manage, check the status and settings of installed hardware devices. In the device manager, you can update the driver of installed hardware or even uninstall them. This guide explains various methods to access Device Manager on your computer. These methods are from DOS Prompt, Run and GUI. You can use these methods on Windows 10 to Windows XP computers.

  1. Open Device Manager from Command Prompt

    You can open Device Manager straight from the Command Prompt. Follow the steps below to do it.
    1. Click on the Start button and open Command Prompt by typing cmd on the Search windows

    2. Type mmc devmgmt.msc on Command Prompt and Press enter
      How to open DM from the command prompt

    3. The Device Manager will open after you press the enter key.

      PC

  2. Access Device Manager from Run window
    1. open Run

      Either you can open Run from Start menu or by pressing the keyboard combination [Microsoft button] and [R] button together.

    2. Type mmc devmgmt.msc and click OK
      Steps to access DM using the RUN command

      In some Windows versions, you may not see Run in the Start menu. In that case, you can open it by pressing both windows and R keys together. There is a tutorial to bring Run in Start menu. Follow the steps provided in the link below to bring Run in Start menu.
      How to Enable Run Command in Start Menu

  3. Open Device Manager from Windows GUI
    1. Click on Start

    2. Right Click on Computer
      Open the hardware management area

    3. Click on Device Manager link displayed on the left-hand side.
      Manage connected hardware

    4. If you are using Windows XP, you should click on the Hardware tab and then go to Device Manager.
      XP
In this article, we shared different ways to open Device Manager on your computer.

  1. DOS Command To Open Command Prompt In Any Folder
  2. Setup Log Files for IP Messenger
  3. Assign Static IP To Any Interface From Command Prompt
  4. Important Network Commands

From here you can check the status of every hardware components installed on your PC.

  1. Setup Asianet WiFi Modem
  2. Delete Beneficiary Fund Transfer in HDFC Netbanking
  3. Setup Idea 4G on Android Phone
  4. How to Setup MTNL Broadband ADSL Modem

Here you can check whether the driver software installed for a specific component is working fine by checking the status code.

  1. What is Smurf Attack & How to Prevent it
  2. Enable Copy Paste Feature On Command Prompt
  3. Reasons For Getting the Message - Anonymous Proxy Detected, Click Here
  4. Android Keyboard Tweaks

Just like this tutorial, we have many OS related articles. To read them follow the link below.
Important Windows 7 Operating System Tweaks

  1. Delete Recently Accessed Folders and Files History On Windows 10 File Explorer
  2. Either you Specified a Destination Address that is not Valid
  3. The Requested Operation Requires Elevation
  4. How to Delete Junk Files In Windows 10

In many hardware related issues, we need to access Device Manager to check the actual reason for the issue.

  1. Change COM Port Assigned to Modem on Your Computer
  2. Error 633: The Modem is Already in Use
  3. Manually Setup D-Link Wireless Router
  4. How to Show JavaScript or HTML Code on Blogger Blog Posts

Following article tells some popular hardware issues and solutions.
Computer Hardware Troubleshooting Guide

Either you Specified a Destination Address that is not Valid or Remote Server is Down

"Error 769: Either you specified a destination address that is not valid, or your remote server is down" is a failure message you may receive when you are trying to go online using a PPPoE connection. According to Microsoft support, this problem may occur if the network adapter installed on your computer is not turned on. There is another alert sharing the same error code 769. Both of them are related to PPPoE.

Though the message displayed by them are different, the solution to fix them is the same. This tutorial explains all possible troubleshooting steps to fix this issue.

  1. Quick Fix

    As mentioned above, to fix Error 769: Either you specified a destination address that is not valid, or your remote server is down, we need to follow the troubleshooting steps provided in the link below. Though it is a different error message, the solution for both error messages is the same.
    How to Resolve Code 769

  2. If the modem configured in PPPoE, you should not configure Internet access in PPPoE on your computer. It is because your computer cannot find PPPoE server when the modem configured in PPPoE, and that may give you the error message Either you specified a destination address that is not valid, or your remote server is down. To check how the modem configured, follow the link below.
    How to Setup Teracom Wireless Modem

  3. There are some tweaks on your computer which can improve the Internet speed irrespective of the connection type you are using. To learn some of these tweaks, follow the link below.
    How to Increase Internet and Download Speed

  4. If your computer is not getting a proper IP address, Windows may assign APIPA. Since APIPA is not a valid IP address, your computer won't go online. To fix this issue click on the link below.
    How to Troubleshoot APIPA on a Wireless Laptop

Conclusion

If you see this alert while trying to access the Internet on your PC, I recommend you to check the status of the adapter. If it is disabled, you must enable it. The below link will help you to perform this step.
Activate NIC On a PC

No: Recent Posts
Destination Net Unreachable
Request Timed Out
Getting 169.254.X.X (APIPA) Windows Automatic Private IP Address
Ping Gives Hardware Error
Setup Idea 4G on Android Phone
Bypass Windows Admin Account Password Of Vista, XP, Windows 8
PING: Transmit failed. General Failure
Ping Request Could not Find Host
Error 628: The Connection was Terminated by the Remote computer
Error 797: A Connection to the Remote Access Server was not Made
Adobe Flash Player has Stopped a Potentially Unsafe Operation

The Requested Operation Requires Elevation (Run as Administrator)

If you are trying to access certain files or services those need the elevated permission as a local administrator, you will receive an error message The requested operation requires elevation(Run as administrator). It is due to the continued efforts of Windows to protect the safety of user computer from unauthorized access to important services and applications by adding an extra layer of security which enforces users to run the application with administrative privileges only.

This Windows feature is called User Access Control(UAC) which ensure the user is accessing the program/service with necessary administrative rights.

The error message you may receive if you are trying to access the application without sufficient administrative rights looks like one below.

Error 769: The Specified Destination is not Reachable

Today morning while connecting my PC to the Internet using BSNL modem I received a message 'Error 769: The Specified destination is not reachable' and failed to access the Internet. It seems like my computer was trying to connect through WAN Miniport using PPPoE but failed to do so. So we can confirm this issue is related to PPPoE connection. This message shows additional buttons Redial, Cancel and More info and we can click on any one of them.

I clicked on redial but received the same failure message.

Possible Reasons for Getting Error 769
The major reason for "Error 769: The specified destination is not reachable" is wrongly configured the network connection.

If the network connection is PPPoE for DHCP connection (means DHCP server is enabled on Modem), your computer will not be able to find the PPPoE server and you will get this message. Another possible reason is the disabled network card on your PC.
 769: The Specified destination is not reachable


How to Fix Error 769
To fix Error 769: The specified destination is not reachable you should follow the steps below.
  1. Make sure Network Card is enabled:

    To enable Network Card in your computer follow the steps provided in the link below.
    How to Turn On Network Card on Your Laptop

  2. Remove Extra PPPoE

    Remove any PPPoE connection setup in Network Connection (If you have enabled the DHCP on Modem). There is no need to configure dual PPPoE to go online. If the modem is in PPPoE, you should delete all connections you have created on your PC using the username and password provided from ISP.

  3. Make sure the Modem is working Properly:

    It is advised to do a power cycle as an additional step to troubleshoot Error 769. To do proper power cycle follow the steps provided in the link below.
    How to Power Cycle a Modem

  4. Reset Winsock: To know how to perform this follow the link below.
    Steps to Reset Winsock on Your Laptop

If you receive error 769 even after completing the steps mentioned above, you are advised to uninstall and reinstall adapter driver on your computer.

After uninstalling the currently installed software, you must use the latest version downloaded from the vendor website. To do this follow the steps mentioned in the link below.
Uninstall and Update Driver Installed

  1. Destination Net Unreachable
  2. Request Timed Out
  3. Getting 169.254.X.X (APIPA) Windows Automatic Private IP Address

As we explained before, the two major reasons to get Error 769 are faulty network configuration and disabled NIC.

  1. Adobe Flash Player has Stopped a Potentially Unsafe Operation
  2. Error 797: A Connection to the Remote Access Server was not Made
  3. Error 628: The Connection was Terminated by the Remote computer

When you see the error message Error 769: The Specified Destination is not Reachable, you should start with the status of the Network Interface Card on your computer.

  1. Ping Gives Hardware Error
  2. Setup Idea 4G on Android Phone
  3. Ping Request Could not Find Host

If the NIC is working fine, you should start checking the network configuration. If the issue persists, you should do a power cycle.
  1. Bypass Windows Admin Account Password Of Vista, XP, Windows 8
  2. Windows Setup API Process Consumes Too Much CPU Resources
  3. PING: Transmit failed. General Failure

Blogger Social Sharing Button is not Showing

Right now professional bloggers cannot avoid the impact of Social network and media sites to bring traffic to their blogs and websites. So adding a social sharing button on a website is necessary nowadays. We can see many third-party tools which offer the facility but now Blogger is also offering an official social sharing button for blogs in blogger platform. It helps to share the blog posts in social networks like Twitter, Google plus etc. Sharing blog posts in Google is very easy now by using this new inbuilt feature. This tutorial explains this new Google feature and how to utilize it to bring more traffic. How can we integrate this social share button on blogger blogs? It is as simple as to check the show Share button on page elements in the layout.

How to Show Share Buttons in Blogger Blog
If you like to activate this inbuilt future, follow the steps below.
  1. Login to Blogger

  2. Click on Layout
    How to add Google plus

  3. Click on Edit link in "Blog Posts"

  4. Check "Show Share Buttons" and click on save
    plus
You can specify the location of the Share button in a blog post by arranging the gadget position by drag and drop method.


What Can I do If It is Not Working
For some templates by just checking the "Show Share Buttons" is not enough to display the Blogger official share button. If you are using older templates, you cannot activate this feature by simply following the steps mentioned above. In that case, you need additional tweaks to bring this feature on every post automatically. In the last blog post, we discussed how to enable Blogger official Social Share button on Blogspot blogs. However, at least in some blogs, this trick is not working. Even though we enable the feature, Show Social Share in layout, it is not displaying under blog posts. So let us check what we can do if this feature is not showing up on a blog. The best option is to add the share button (including Google plus) code manually in a Blogspot template just below the posts. Before jumping to this, it is better you read the previous article about steps to enable the share button. Link to that post is provided at the end of this tutorial.


Manually Add Social Share Button On Blogger Blog
  1. Login to Blogger account

  2. Click on Template link

  3. Click on Edit HTML
    Official Blog Share button is not showing

  4. Click on Edit template
    Edit

    Now Search for the following code

    <div class='post-body entry-content'>
    <data:post.body/>
    

    Note: You should press [CTRL] [F] buttons together to open Search

    Below it, paste the following code
    <div class='post-share-buttons'>
      <b:include data='post' name='shareButtons'/>
    </div>

  5. Click on Save Template

Add Social Share Button in Old Blogger Template

  1. Logon to Blogger account
  2. Click on Template link
  3. Click on Edit HTML
  4. Click on Proceed
  5. Check Expand Widget Template

    Manually adding blog share button

    now find any one of the following codes using browser Search Feature([CTRL] and[F] )

    • <p class='post-footer-line post-footer-line-3'>
    • <div class='post-footer-line post-footer-line-3'>
    • <data:post.body/>
  6. Now paste the following code just below it.

    <div class='post-share-buttons'>
      <b:include data='post' name='shareButtons'/>
    </div>

    Now Save the template

Now onwards Social Share button will be displayed under every blog posts. Just like adding this feature, it is important to own a custom domain name for your blogger site. To do this click on the link below.
How to Setup Custom Domain name for My Blogspot Site

After adding a custom domain name for my blogger site, I faced one issue. Links without WWW prefix of my blog were not redirecting to WWW version. I fixed this by following the steps listed in the link below.
How to Redirect  URL without WWW to WWW Version of Address

Adding Social Share button under blog posts will increase the chances of post sharing by your blog readers. It automatically improves the traffic to the blog. So the next step we need to do is placing Google Adsense code at the right places on your blog template. To do this follow the link below.
How to Insert Google Adsense Code in Between Post Title and Content

Sharing published posts in social network sites with author account gives more credibility to your blog. Having a unique favicon instead of default blogger favicon will provide additional credibility. To do this click on the link below.
How to Show Custom Favicon for Blogspot Blogs

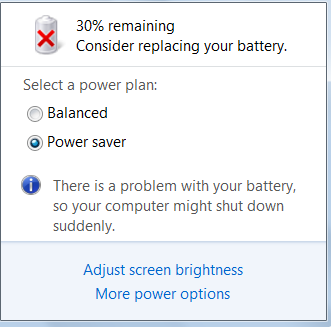
Consider Replacing Your Battery Alert on Battery Icon in Taskbar

Today morning, I have seen one new notification in Taskbar. It is a warning with a message "Consider replacing your battery" and the description with this warning is "There is a problem with your battery so your computer might shut down suddenly". In addition to this error message, I see one cross mark on the power cell icon and noticeable reduction in its life. To learn more about this new error, I opened Windows Mobility Center but there too the same message displayed. To launch Windows Mobility Center. follow the link below.
How to Access Windows Mobility Center

According to Windows support, if Power Cell is working with less than 40% of its original capacity, we will see this warning. Other possible reasons for the warning "Consider Replacing Your Battery" are:
  • The laptop is not Designed for the current Windows version

  • Power cell full charge capacity is less than 40% of original capacity

  • Wrong Power Cell Settings in your computer

  • Possible BIOS error in reporting charge capacity
Consider Replacing in Taskbar


Fix for "Consider Replacing Your Battery"
I have been using this laptop for more than 3 years. So I know it is the time to replace the laptop cell. However, I searched for any possible fix and found one solution (but this solution didn't work for me) especially for new laptops. According to that solution, wrong laptop battery settings in Windows may invoke false alerts about its life. In order to fix this false alerts, we need to remove the battery from the laptop and hold the power button for one minute to reset the default settings. Then insert it back and check for the issue. Other possible solutions for the warning are:

  1. Windows Update:

    Update Windows to fix incorrectly reported message. To learn more about this, go to the Microsoft Kb
    http://support.microsoft.com/kb/2293330

  2. Upgrade BIOS firmware:

    To get the latest firmware you should go to the BIOS manufacturer's website.

  3. Reset the power cell settings saved on your computer

  4. Change the Battery with a new one

To improve the battery life, you should know when to charge it. We must know the nature of Lithium based cells to keep it healthy. Most of the notebook cells are lithium based. To know more about how to keep it healthy for a long period following the link below.
When to Charge Laptop to enhance its life

If you forget the BIOS password and looking for a way to reset it, follow the steps provided in the link below.
How to Reset BIOS Password

A Runtime Error has Occurred. Do you Wish to Debug ?

"A Runtime error has occurred. Do you wish to debug ?" is an Internet Explorer error message you may receive while opening certain websites in it. Along with this error message, you may see the line number where this error happened and the nature of the error. This error message can come due to following reasons.
  1. Bad Website programming
  2. The hardware or Software issues on your computer

According to Microsoft support, this error can come due to possible hardware or software issues which prevent the browser from working correctly. In addition to the computer related problem, faulty website programming also plays a big role in this error.


How to Fix this error
In order to fix "A Runtime error has occurred. Do you wish to debug?", we should disable Script debugging in Internet Explorer. To do script debugging manually, follow the steps provided in the link below.

How to Disable Script Debugging in Internet Explorer


Please note that I wrote the above article to fix another error. So you must ensure that the first two checkboxes are checked and the third one (Display any notification) is unchecked to fix this error.

  • Check -Disable Script debugging (Internet Explorer)
  • Check- Disable Script debugging (other)
  • Uncheck- Display a notification about every script error

Actually, this step prevents IE to debug script. So you will not see any script related error in IE. Just like "A Runtime error has occurred. Do you wish to debug ?" another Runtime error and its solution are listed below.
Runtime Error- Yahoo Messenger has Requested Runtime to Terminate

If you are annoyed by the message to make Internet Explorer as the default browser, click on the link below to stop it.
Turn Off IE Message To make Internet Explorer as Default Web Browser